- Introduction
- Out with the old NAS
- In with the new NAS
- Parts & Specifications
- Building the system
- Reminder
- Unpacking the case & components
- Installing the power for the backplane
- Installing the CPU and CPU Holder
- Installing the RAM
- Installing the NVME Drives, Riser, and SATA Expander
- Installing the SATA SSDs (Boot Drive)
- Installation on CPU & Heatsink Installation
- Installation of the Backplane SATA Cables
- Using the System
- Setting up ZFS
- Installing Tailscale
- Setting up Docker & Services
- 1 Month Later
- Plan for the next several months
Introduction
For several years, I have had a very nice setup. Google Workspace had unlimited storage, a roughly 20 TB storage NAS that would upload to the Google Workspace Shared Drives storage, automated server dynamic domain name updates, ZFS with encryption, and more. It was my first primary NAS system, full of mistakes.
Out with the old NAS
The old NAS system was originally an AMD system that I installed ESXI on, passed through an LSI HBA into the Guest VMs, and was enormous - it was placed into a full-sized ATX tower. Then, when I moved to the EU, I stayed at my parent’s place and started to have PSOD frequently and rapidly (e.g., once a month). Because there was no power management or IPMI controller attached to this on consumer hardware, I could not do much at such a distance and had to rely on my parents’ good nature and nicety to turn the machine off and on when these things happened. As one can imagine, that good nature only lasts for so long after one year of doing this.
So, something had to change.
The machine itself:
- AMD Ryzen 7 1700 Eight-Core Processor
- 64 GB ECC DDR4 Memory
- ASRock X470 Master SLI/ac
In with the new NAS
I had a few ideas in mind with the new NAS build:
- Long-Term Usage
- Consumer components only
- Small Physical Footprint (ITX or less)
- Larger Storage Footprint than the old server
- Components will be purchased in the US and brought to the EU via international flight on carry-on
- Must have redundancy where possible
- Minimal initial mistakes
- Minimize crashing/downtime/issues
- Must be transportable in case I move
- Must be able to appeal to a GF / Wife factor
- Reuse parts that could be reused where possible or made sense
- As energy efficient as I could be
- Must be as silent as possible
- Light enough to be mounted onto a wall shelf and be off the ground
- Ability to transcode 4K content using Intel Quicksync
The ultimate use case of the system is:
- ZFS Storage
- Media Consumption & Automation
- Plex
- *arrs
- Jellyfin, as a backup to Plex
- Calibre
- Navidrome / Music Streaming Service
- Home Services
- Web Server
- Automation Tools (n8n)
- SSO-backed systems and services using:
- Okta
- Authentik
- IRC
- RSS
- Document Management
- System & Service Monitoring
- Various other things
So after about four months of researching and questions on various forums, I decided on the following components:
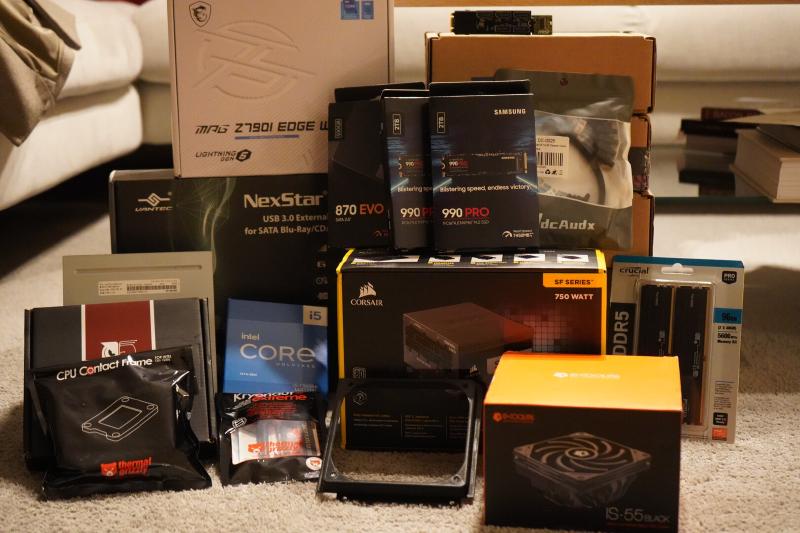
Parts & Specifications
Purchased in the EU
Purchased in the US
- Intel i5-13600K
- MSI MPG Z790I Edge WiFi Gaming Motherboard
- Corsair SF Series, SF750
- Crucial Pro RAM 96GB Kit (2x48GB) DDR5 5600MT/s Desktop Memory CP2K48G56C46U5
- 2x SAMSUNG 870 EVO SATA SSD 500GB 2.5” Internal Solid State Drive, MZ-77E500B/AM
- 2x SAMSUNG 990 PRO Series - 2 TB PCIe Gen4. X4 NVMe 2.0c - M.2 Internal SSD (MZ-V9P2T0B/AM)
- 5x Western Digital 22TB WD Red Pro NAS Internal Hard Drive HDD - WD221KFGX
- SilverStone Technology ECS07 5-Port SATA Gen3 6Gbps Non-RAID M.2 PCIe Storage Expansion Card, SST-ECS07
- Thermal Grizzly Intel Contact Frame (13th & 14th GEN)
- Thermal Grizzly Kryonaut Extreme The High Performance Thermal Paste for Cooling All Processors, Graphics Cards and Heat Sinks in Computers and Consoles (2 Gram)
- ID-COOLING IS-55 Black Desktop CPU Cooler Low Profile 57mm Height CPU Air Cooler 5 Heatpipes 120x120x15mm Slim Fan, CPU Fan for Intel LGA1700/115X/1200; AMD AM4/AM5
- Kentek 8 Inch 8" 4 Pin Molex 5.25 Male to Right Angle 90 Degree 4 Pin Molex 5.25 Female M/F IDE DC Internal Computer PC Power Cable Adapter Cord
- ADCAUDX SATA-III Cable:0.5M 6Pcs/Set-SATA Cable 90-Degree Right-Angle SATA-Data Cable SAS/SATA-6Gbps Cable for Server-Raid SDD HDD CD DVD Drives (1.6FT)
- Samsung Type-C™ USB Flash Drive, 256GB, 2022, Blue, MUF-256DA/AM
- SAMSUNG MUF-256AB/AM FIT Plus 256GB - 400MB/s USB 3.1 Flash Drive, Gunmetal Gray
- Vantec NexStar DX2 USB 3.0 External Enclosure Design for 5.25" Blu-Ray/CD/DVD SATA Drive, (NST-540S3-BK)
- 3D Printed Jonsbo N2 Case Fan Module
Reused parts
- LG Blu-Ray Drive

This might seem like an overkill machine - usually, the systems I built are. But they achieve the need.
The reason for the single purchase of the case in the EU and the fan - was that after long thought about it, I didn’t think I could bring it back from the US. If it didn’t fit in the space, on the wall next to my tv cabinet, I would need to be able to return it, and shipping it back to the US was not going to be an option.
Warranty Situation
Of all the parts purchased here, only Corsair & Crucial have a global warranty program, which works for me.
All other items have to be shipped back to the originating country. But for Western Digital - Drives must be sent back to the RMA Warehouse from which the original purchase originated, meaning that if one of the drives dies, I need to send it back to the US. However, the cost savings I received by buying the drives in the US, compared to the EU, is worth enough. I am okay with this risk, and I can always bring them back to the US if I need to or ship them.
Testing the hard drives before heading back to the EU
My biggest concern when I first got the drives was ensuring one of them was okay. So to do that, the easiest thing to do is run it through smartctl and bad blocks.
Simple enough, plug in as many drives as I can and run the following:
|
|
Each drive took about nine days to complete the entire process, but none reported errors, so they got shipped back up into the boxes they came in and stuffed back into a bag. I was on a business class ticket, which was a fantastic experience, but this allowed me to have extra space and weight restrictions on my bags to bring back these items without any significant issues.
Building the system
So, after a month of having all the components needed and the desire to build this, I finally got home, unpacked, and set aside some time to get this done and stop dealing with an unreliable server.
Reminder
The plastic film covers most pieces of the motherboard; be sure to take that off before you place everything in the case.
Unpacking the case & components


The case is relatively compact, and the back takes advantage of its space quite well.
Unfortunately, as far as I know, Stockholm has no public services where you can provide a 3D printer file to a state or county-owned public service (EG, A library, or an alternative). However, as I was visiting family in the US, the public libraries there have “Maker” areas where you can pay a minimal fee for a 3D Printed file. I spent roughly 2 USD for the extended fan module made of ABS plastic filament. While the printing tolerance could have been slightly improved, overall, it was a fabulous service and worked well for the needs.
Installing the PSU is relatively easy, but it is much easier if you route the cables through the compartment first and leave it “half installed” first (basically, don’t screw it down), as this will provide you enough room to route cables and the like all over.
Installing the power for the backplane
I wanted to keep enough space between the fan that I would install if the 3d printed mount didn’t work and the case power plane itself. So getting 90-degree angle power plugs and the extended fan bracket above would be really useful.


This allows the installation of a 25 mm fan over a 15 mm fan to cut down on noise and improve airflow simultaneously.
Installing the CPU and CPU Holder
Because I would mount the case on a wall, I wanted to rely on something other than the CPU holder that came in stock on Intel motherboards, so I grabbed the Thermal Grizzly CPU Mount. If the case falls, the more flimsy stock mount might pop open or off. I have difficulty believing that the Thermal Grizzly holder would do that.


Installing the RAM


Pop the RAM into the board. What else should I say?
Installing the NVME Drives, Riser, and SATA Expander
Unfortunately, I didn’t take as many photos of this process - but the MSI Motherboard has the capability to use 3x m.2 slots in precisely the layout we need.
- 1x M.2
- M.2_1 Source (From CPU) supports up to PCIe 4.0 x4 , supports 2280 devices
- M.2_2 Source (From Chipset) supports up to PCIe 3.0 x4 / SATA mode, supports 2280 devices
- M.2_3 Source (From Chipset) supports up to PCIe 4.0 x4 , supports 2280 devices
M.2_1 is the unit closest to the top side of the motherboard, M.2_2 is on the heatsink & riser card, which is where the SilverStone Expansion Card will be installed, and M.2_3 is located on the back of the motherboard. In this case, the motherboard placement and the space surrounding it in the case, there is enough space to add or use a heatsink - something I should have looked at when I originally got the NVME drive, as I thought it might not fit. Unfortunately, I need to install this later as I didn’t wait until I got a heat sink for the NVME card on the bottom.
Initially, the plan was to use one of the NVME drives as a boot drive, the other as Docker Cache (EG: Docker scratch space), and a ZIL or SLOG for ZFS. Then I changed my mind while in the US and grabbed the SATA SSDs for the boot drive, and I would use one whole NVME as a Docker Scratch drive and the other NVME as a split SLOG/ZIL.
However, after discussing with some people on the *arr server, reading over more of the discussion on Ubuntu Forums that I had, and some other conversations on IRC, I opted to change this plan to use the SATA SSDs as a mirrored ZFS Boot Drive, the NVME drives as a mirrored ZFS Docker Cache Drive, and the five spinning disks in its original intention as a ZFS RAIDZ Config.


Installing the SATA SSDs (Boot Drive)
The Jonsbo case allows for the installation of one SSD drive on the side of its case here:

However, if you use the Corsair SF 750, there is enough space in the PSU compartment for all the cables you will use, the PSU, and plenty of spare SATA drives. Unfortunately, I don’t have a picture, as it would have been too dark and too cramped a space to take a photo of - but you can make that space work to your advantage and stick another SSD in there.
Installation on CPU & Heatsink Installation
I have to say, I attempted to use the Thermal Grizzly Thermal Paste, which initially worked well but took much work overall. I tried to warm it up by hand by creating some friction heat by rubbing my hands together around the thermal paste. It seemed to have enough for just one installation without any potential screw-ups.
I recommend installing the mounting brackets first, leaving the heatsink off until you get the motherboard into the case and everything adjusted to how you want. Then, remove the fan’s top and use the included tools to install the heatsink. Then, re-install the fan.
Also, this is another section I should have taken photos of.
Installation of the Backplane SATA Cables


Using the System
Installing BIOS Update
First things first, update the BIOS. MSI includes a 16 GB USB drive for Windows or BIOS updates. At the time of writing, the BIOS for the system was on something like 11, 12, 13, or 16 (from what I remember, at least). So, anywhere from 6 to 14 months old.
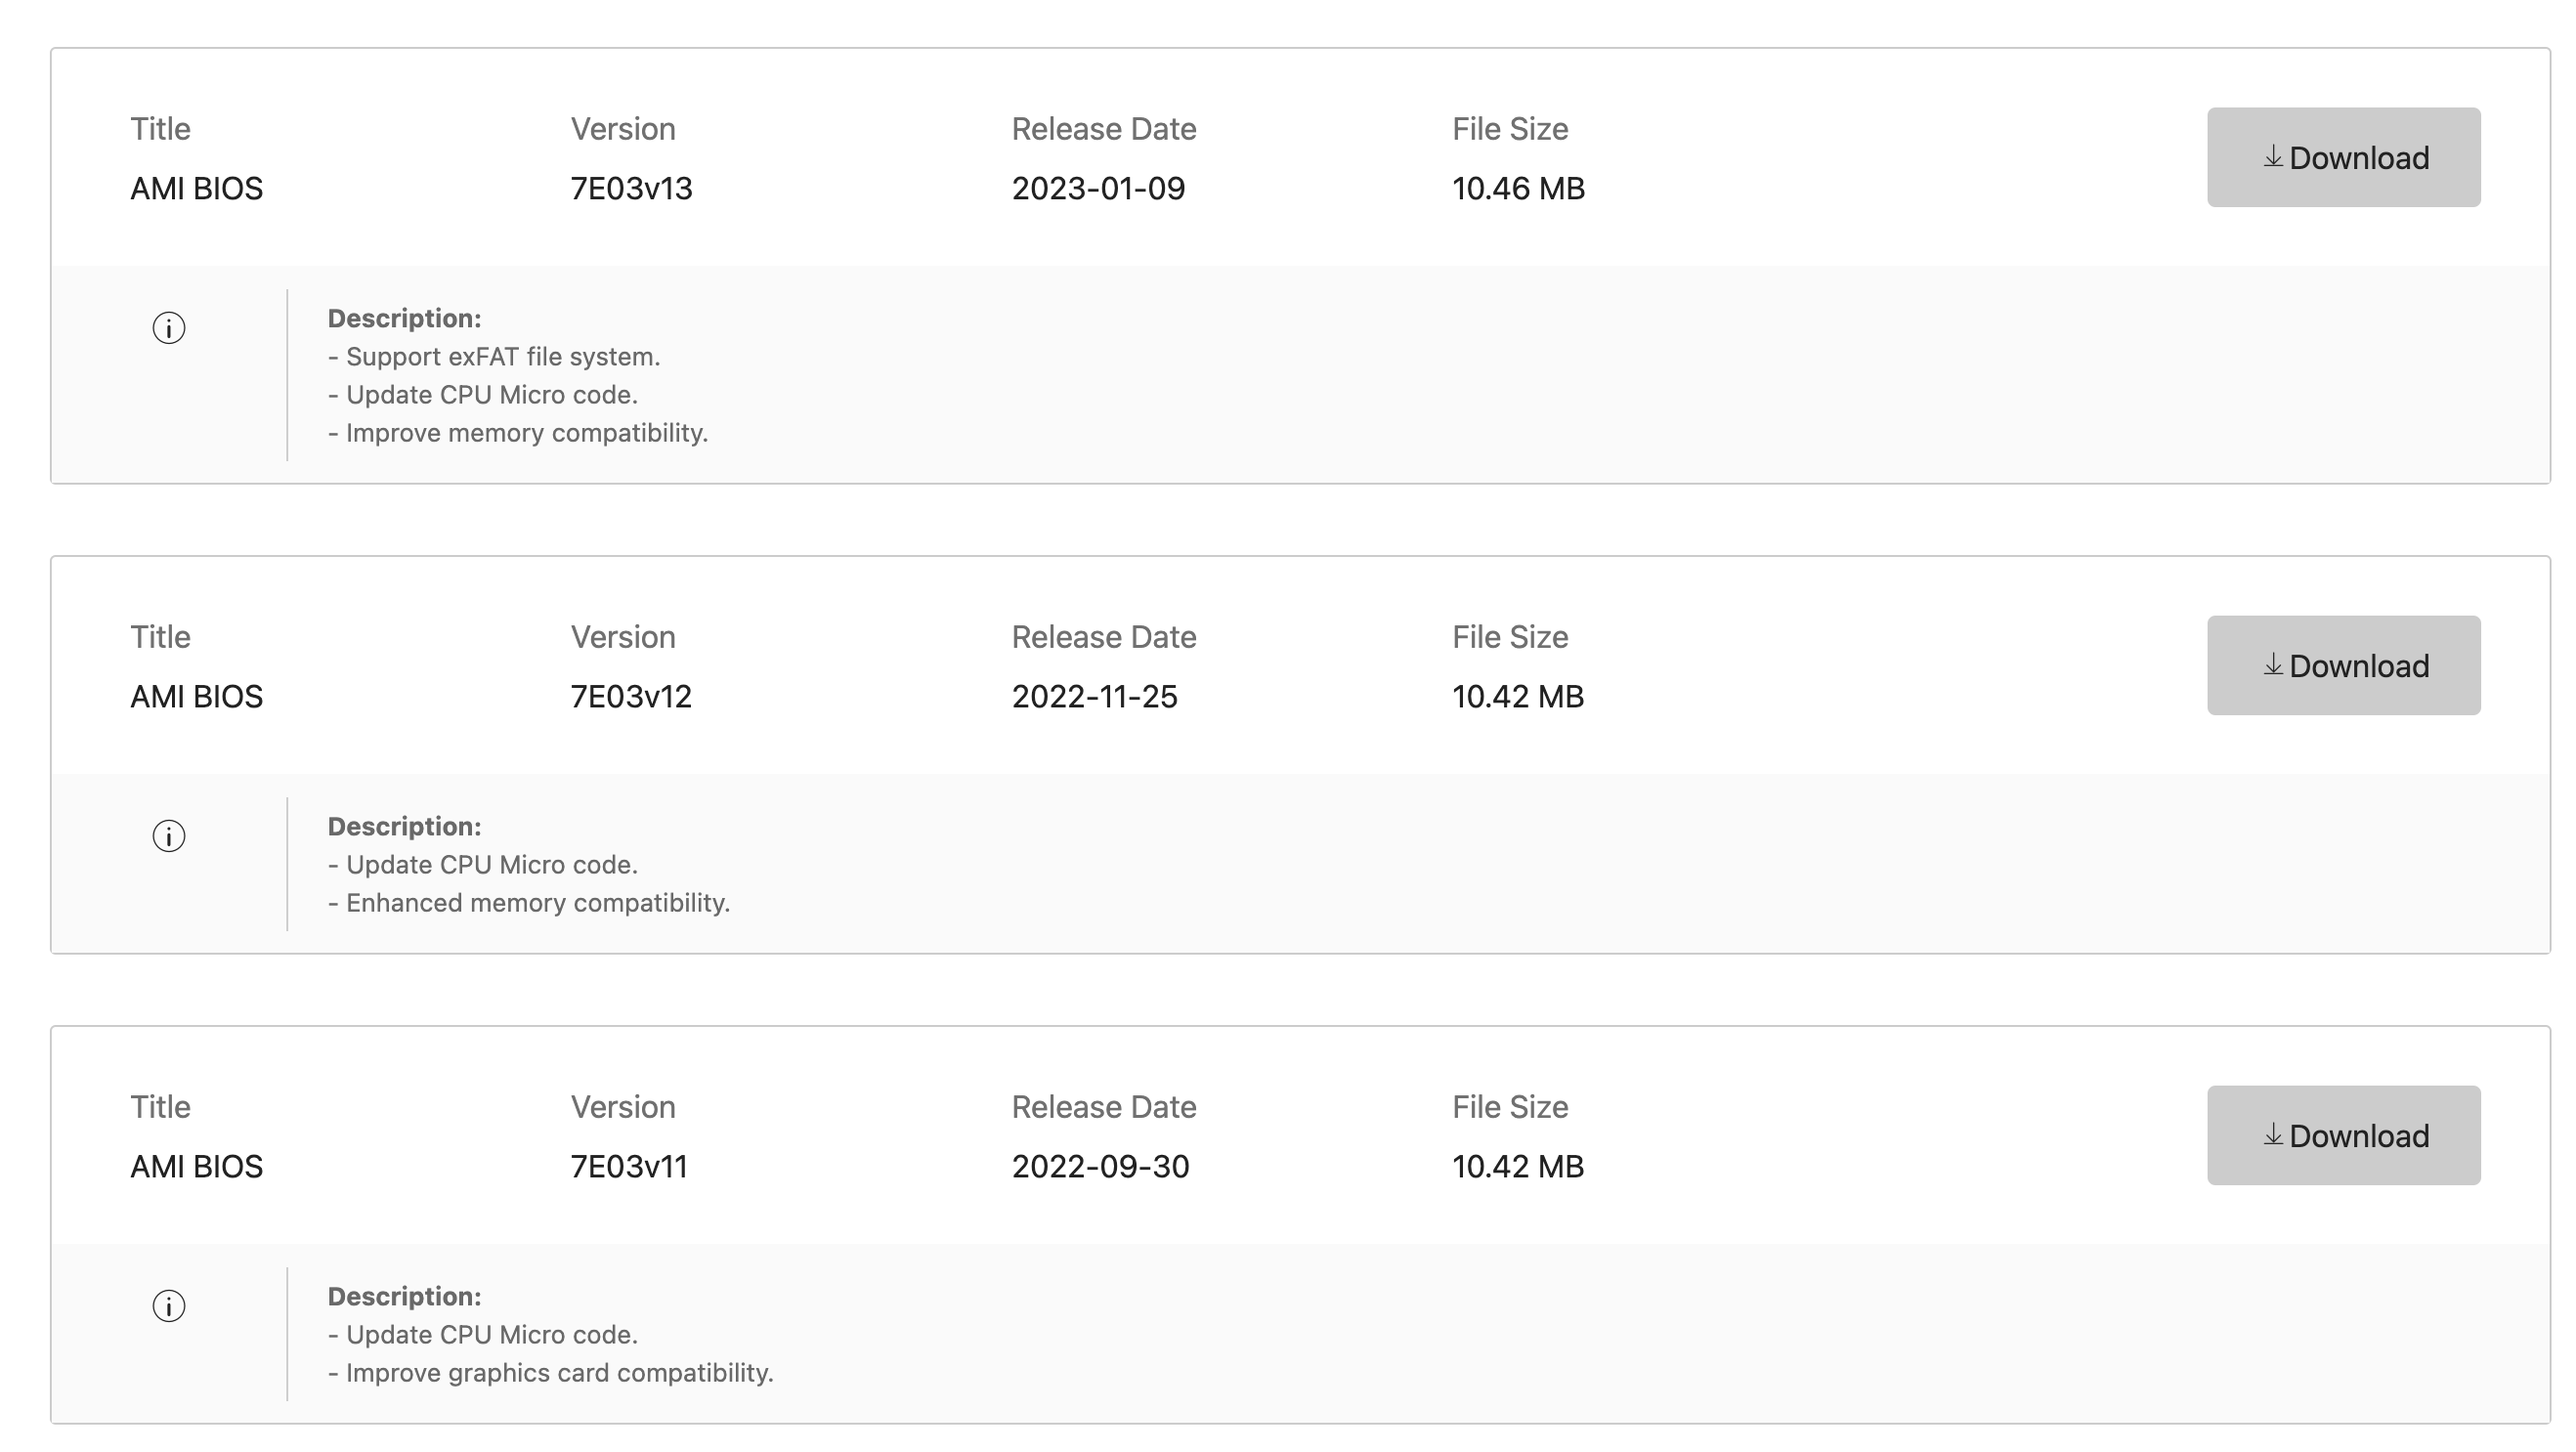
When I returned to the EU, a BIOS update was released for microcode updates to improve some of the processors’ functionality. So I installed v19.
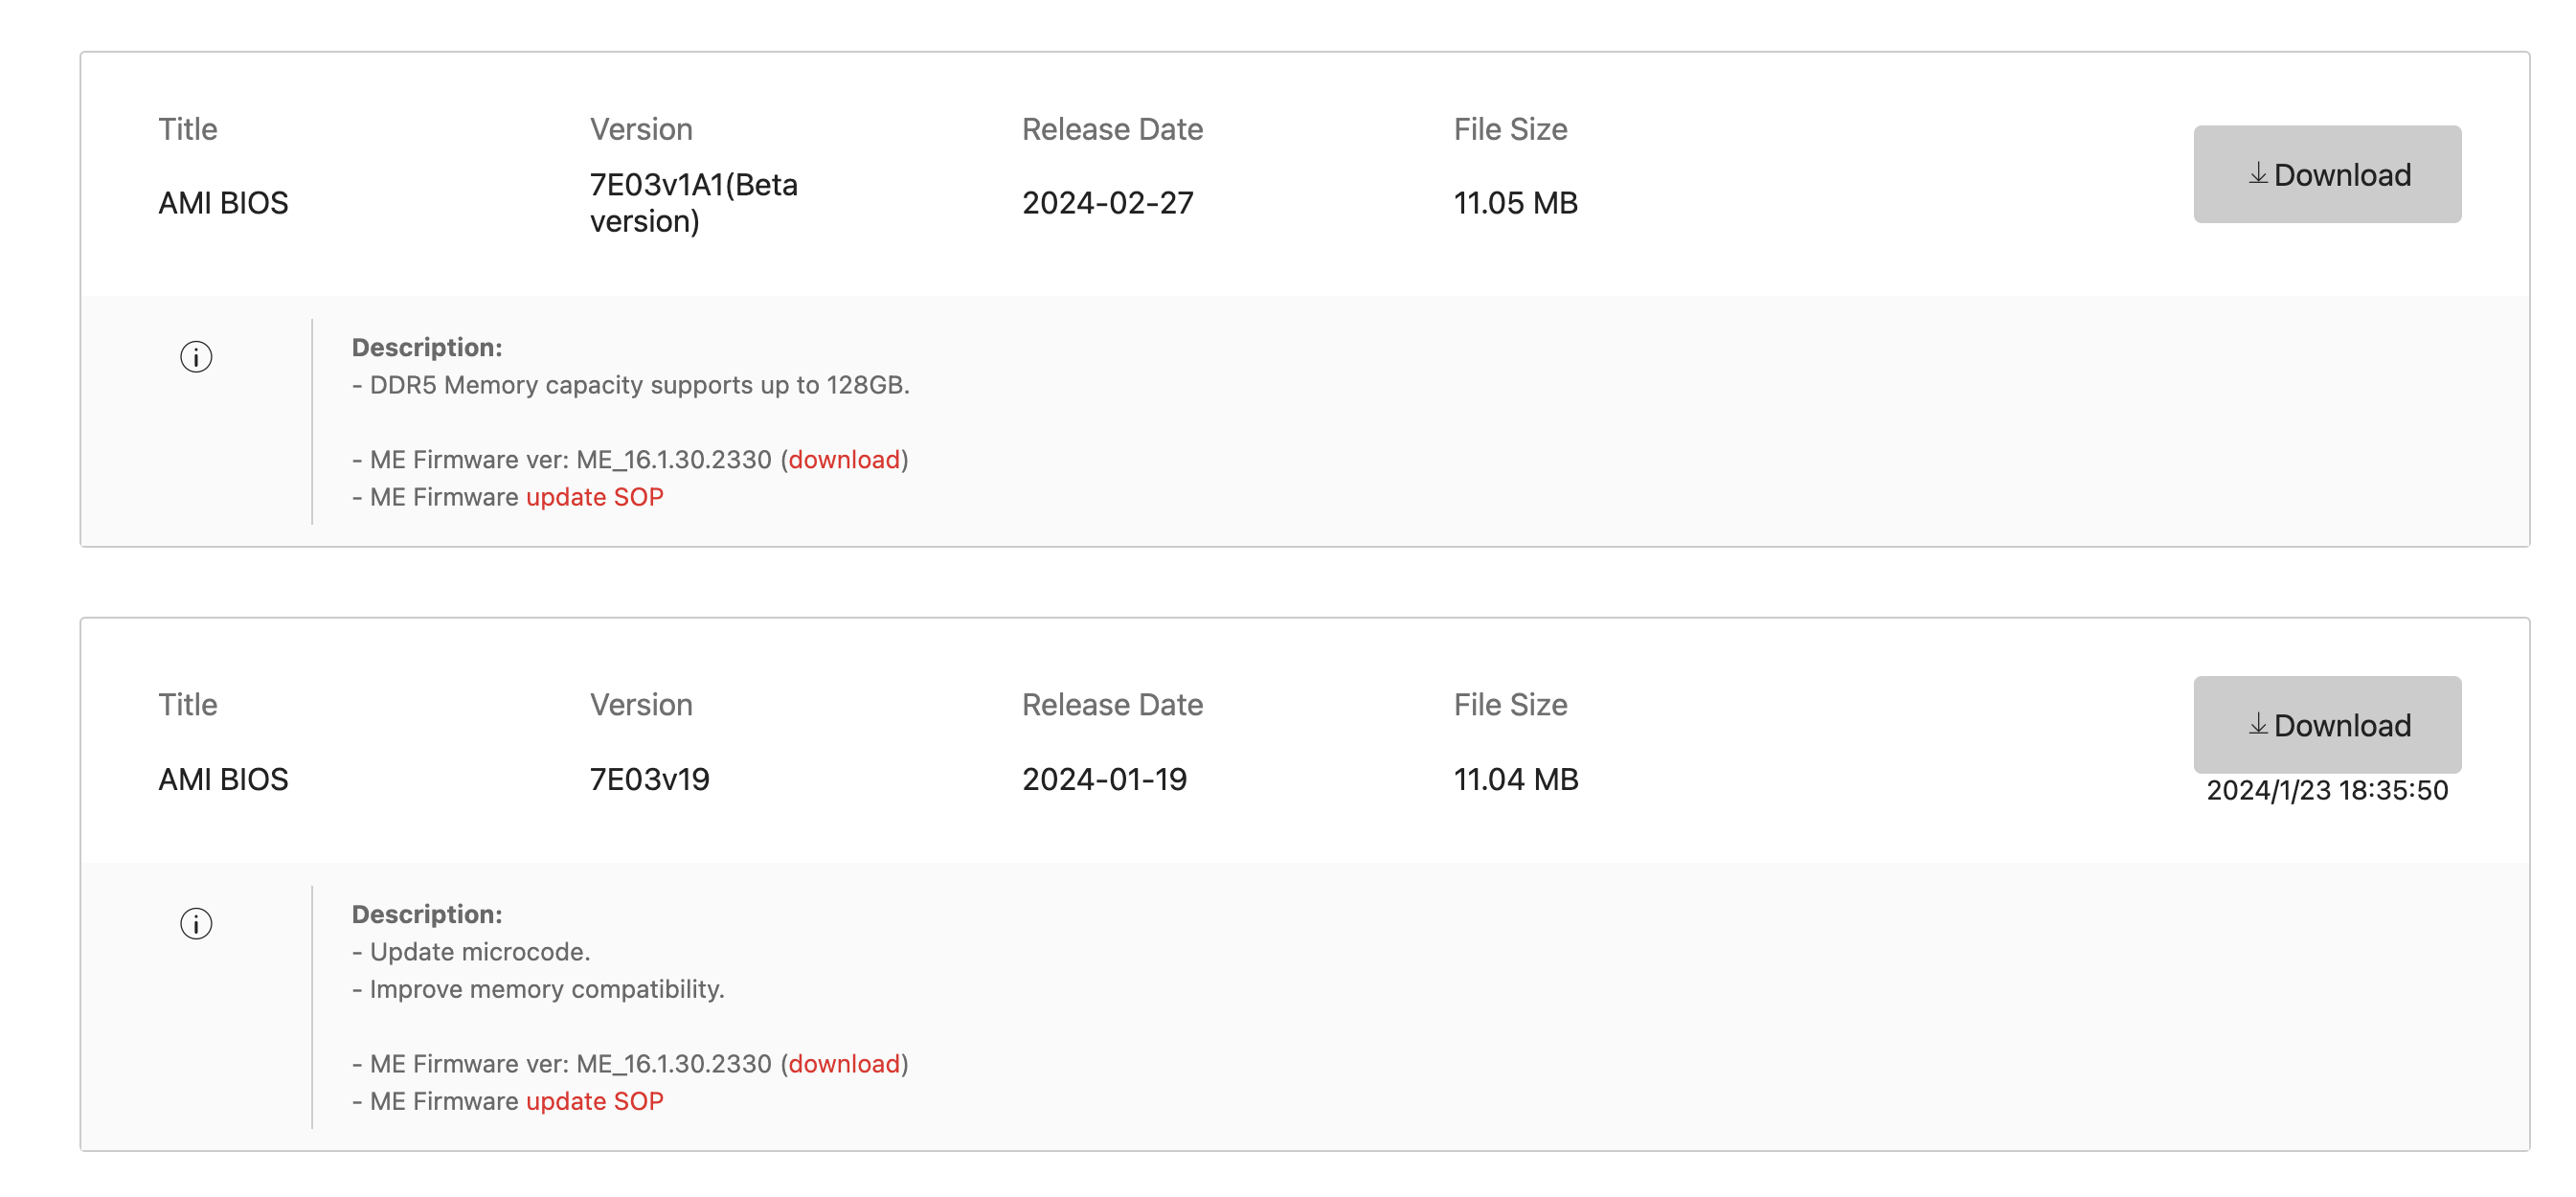
When writing this, it appears that MSI will start adding capacity to the maximum supported RAM from 96 GB to 128GB via a Beta BIOS. Courtesy of the Internet Archive’s Wayback Machine, we can check out the previously supported spec and the current spec.
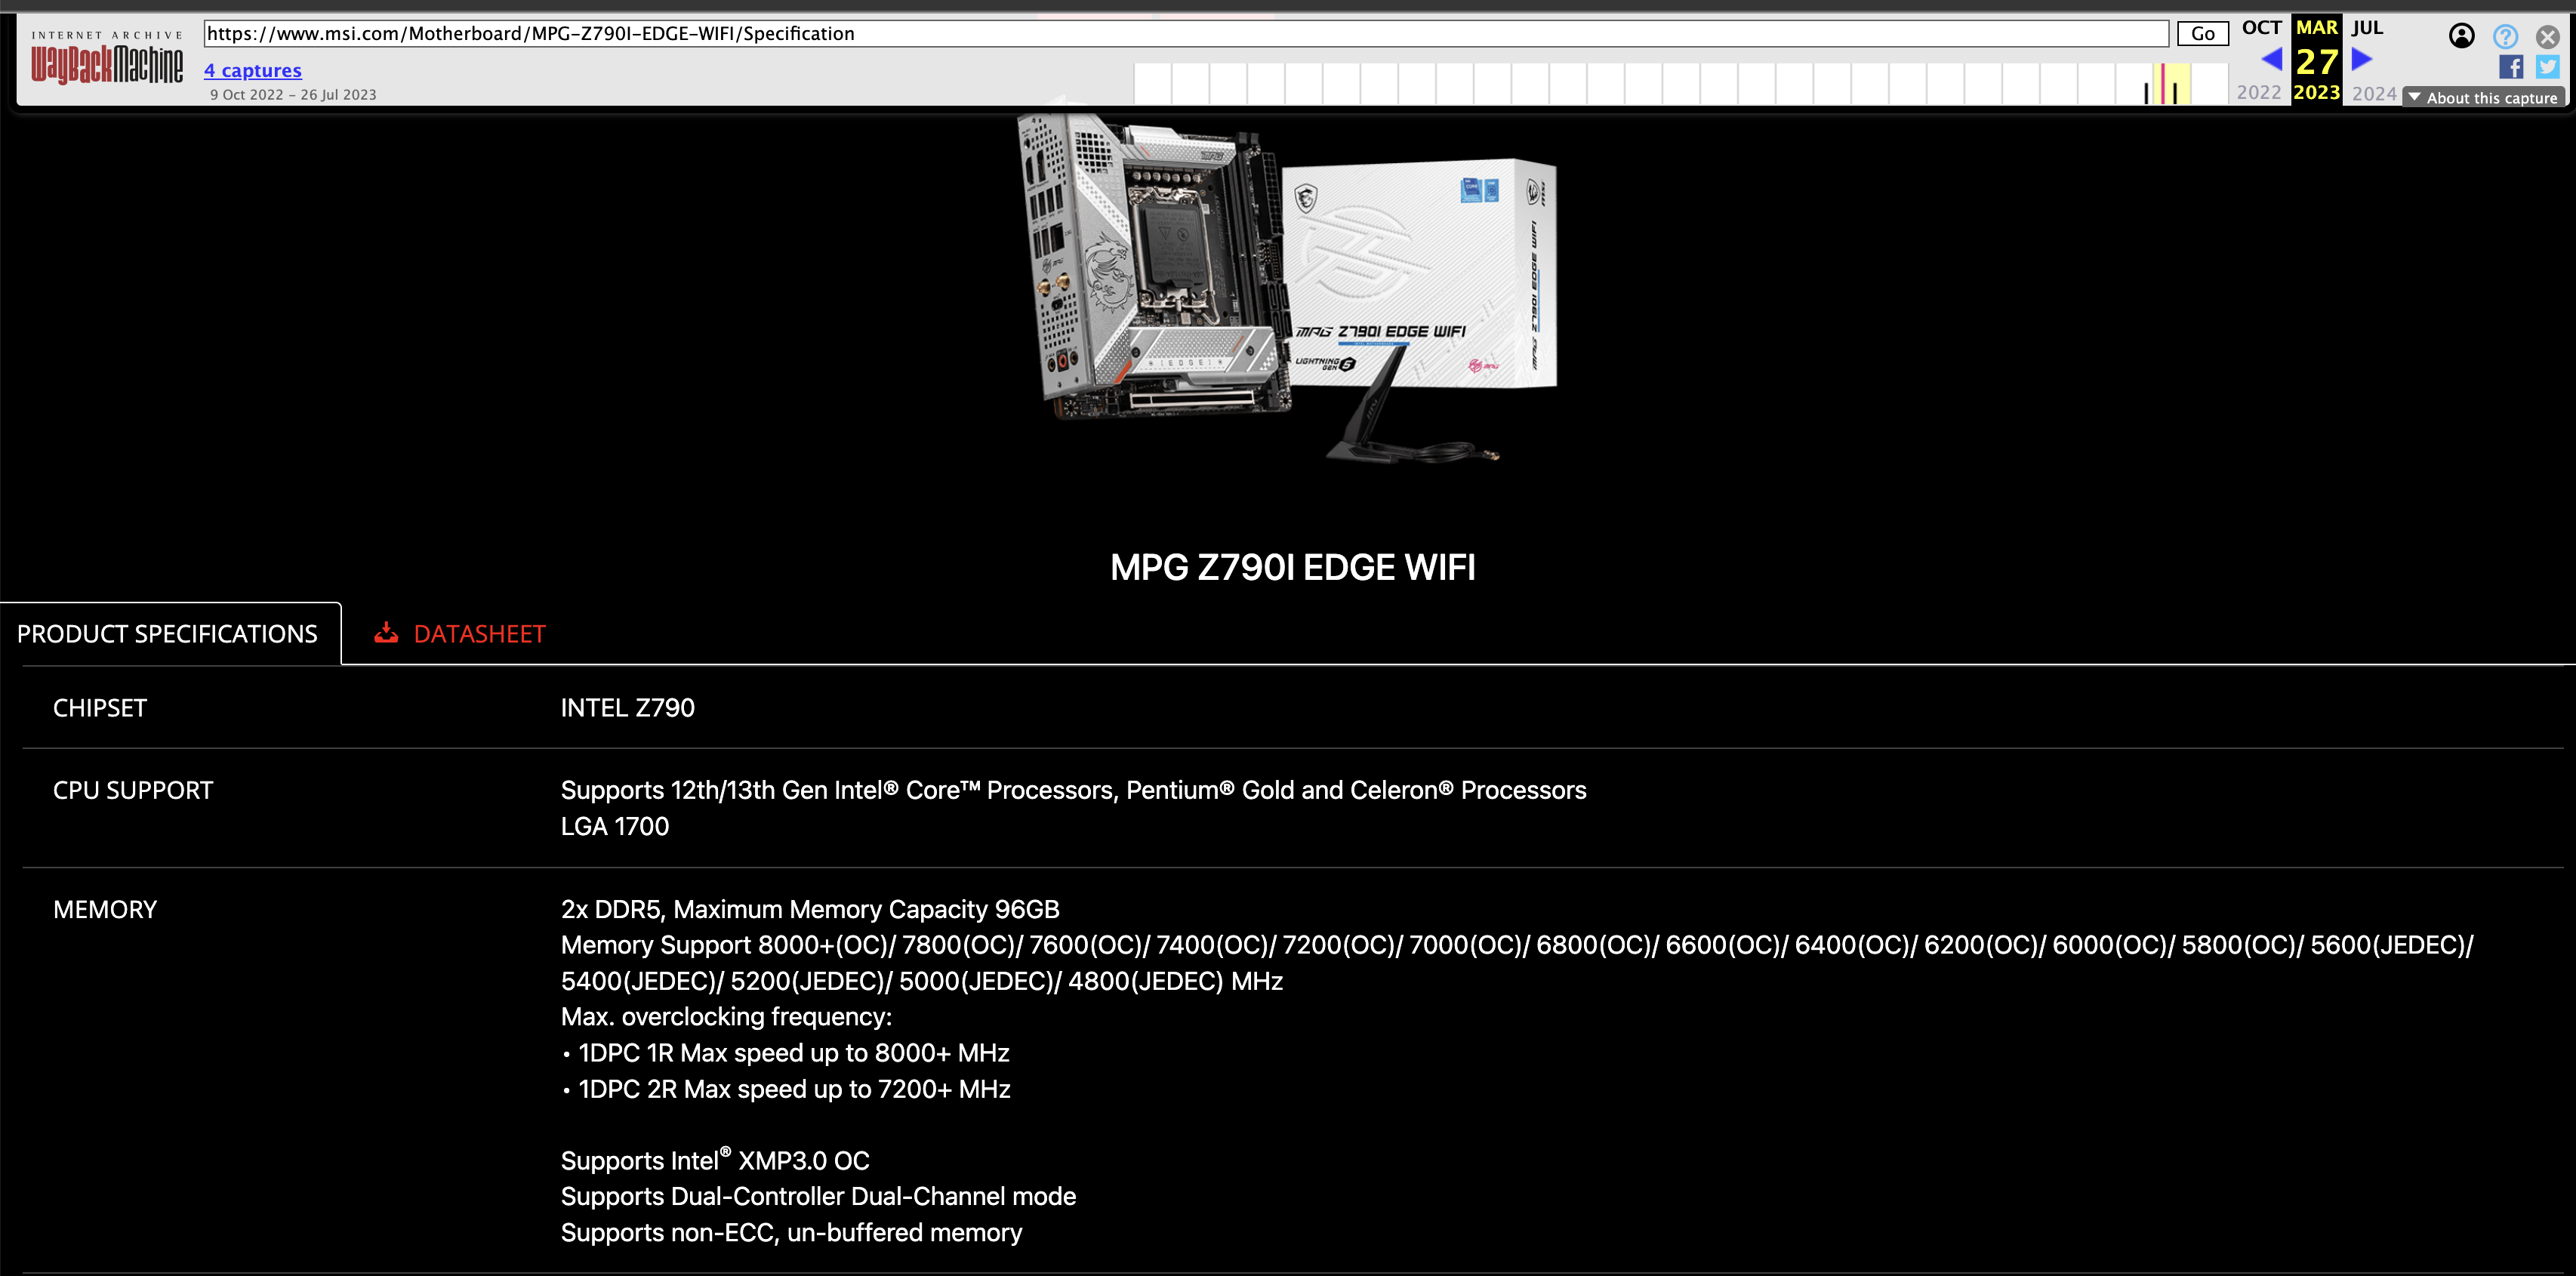
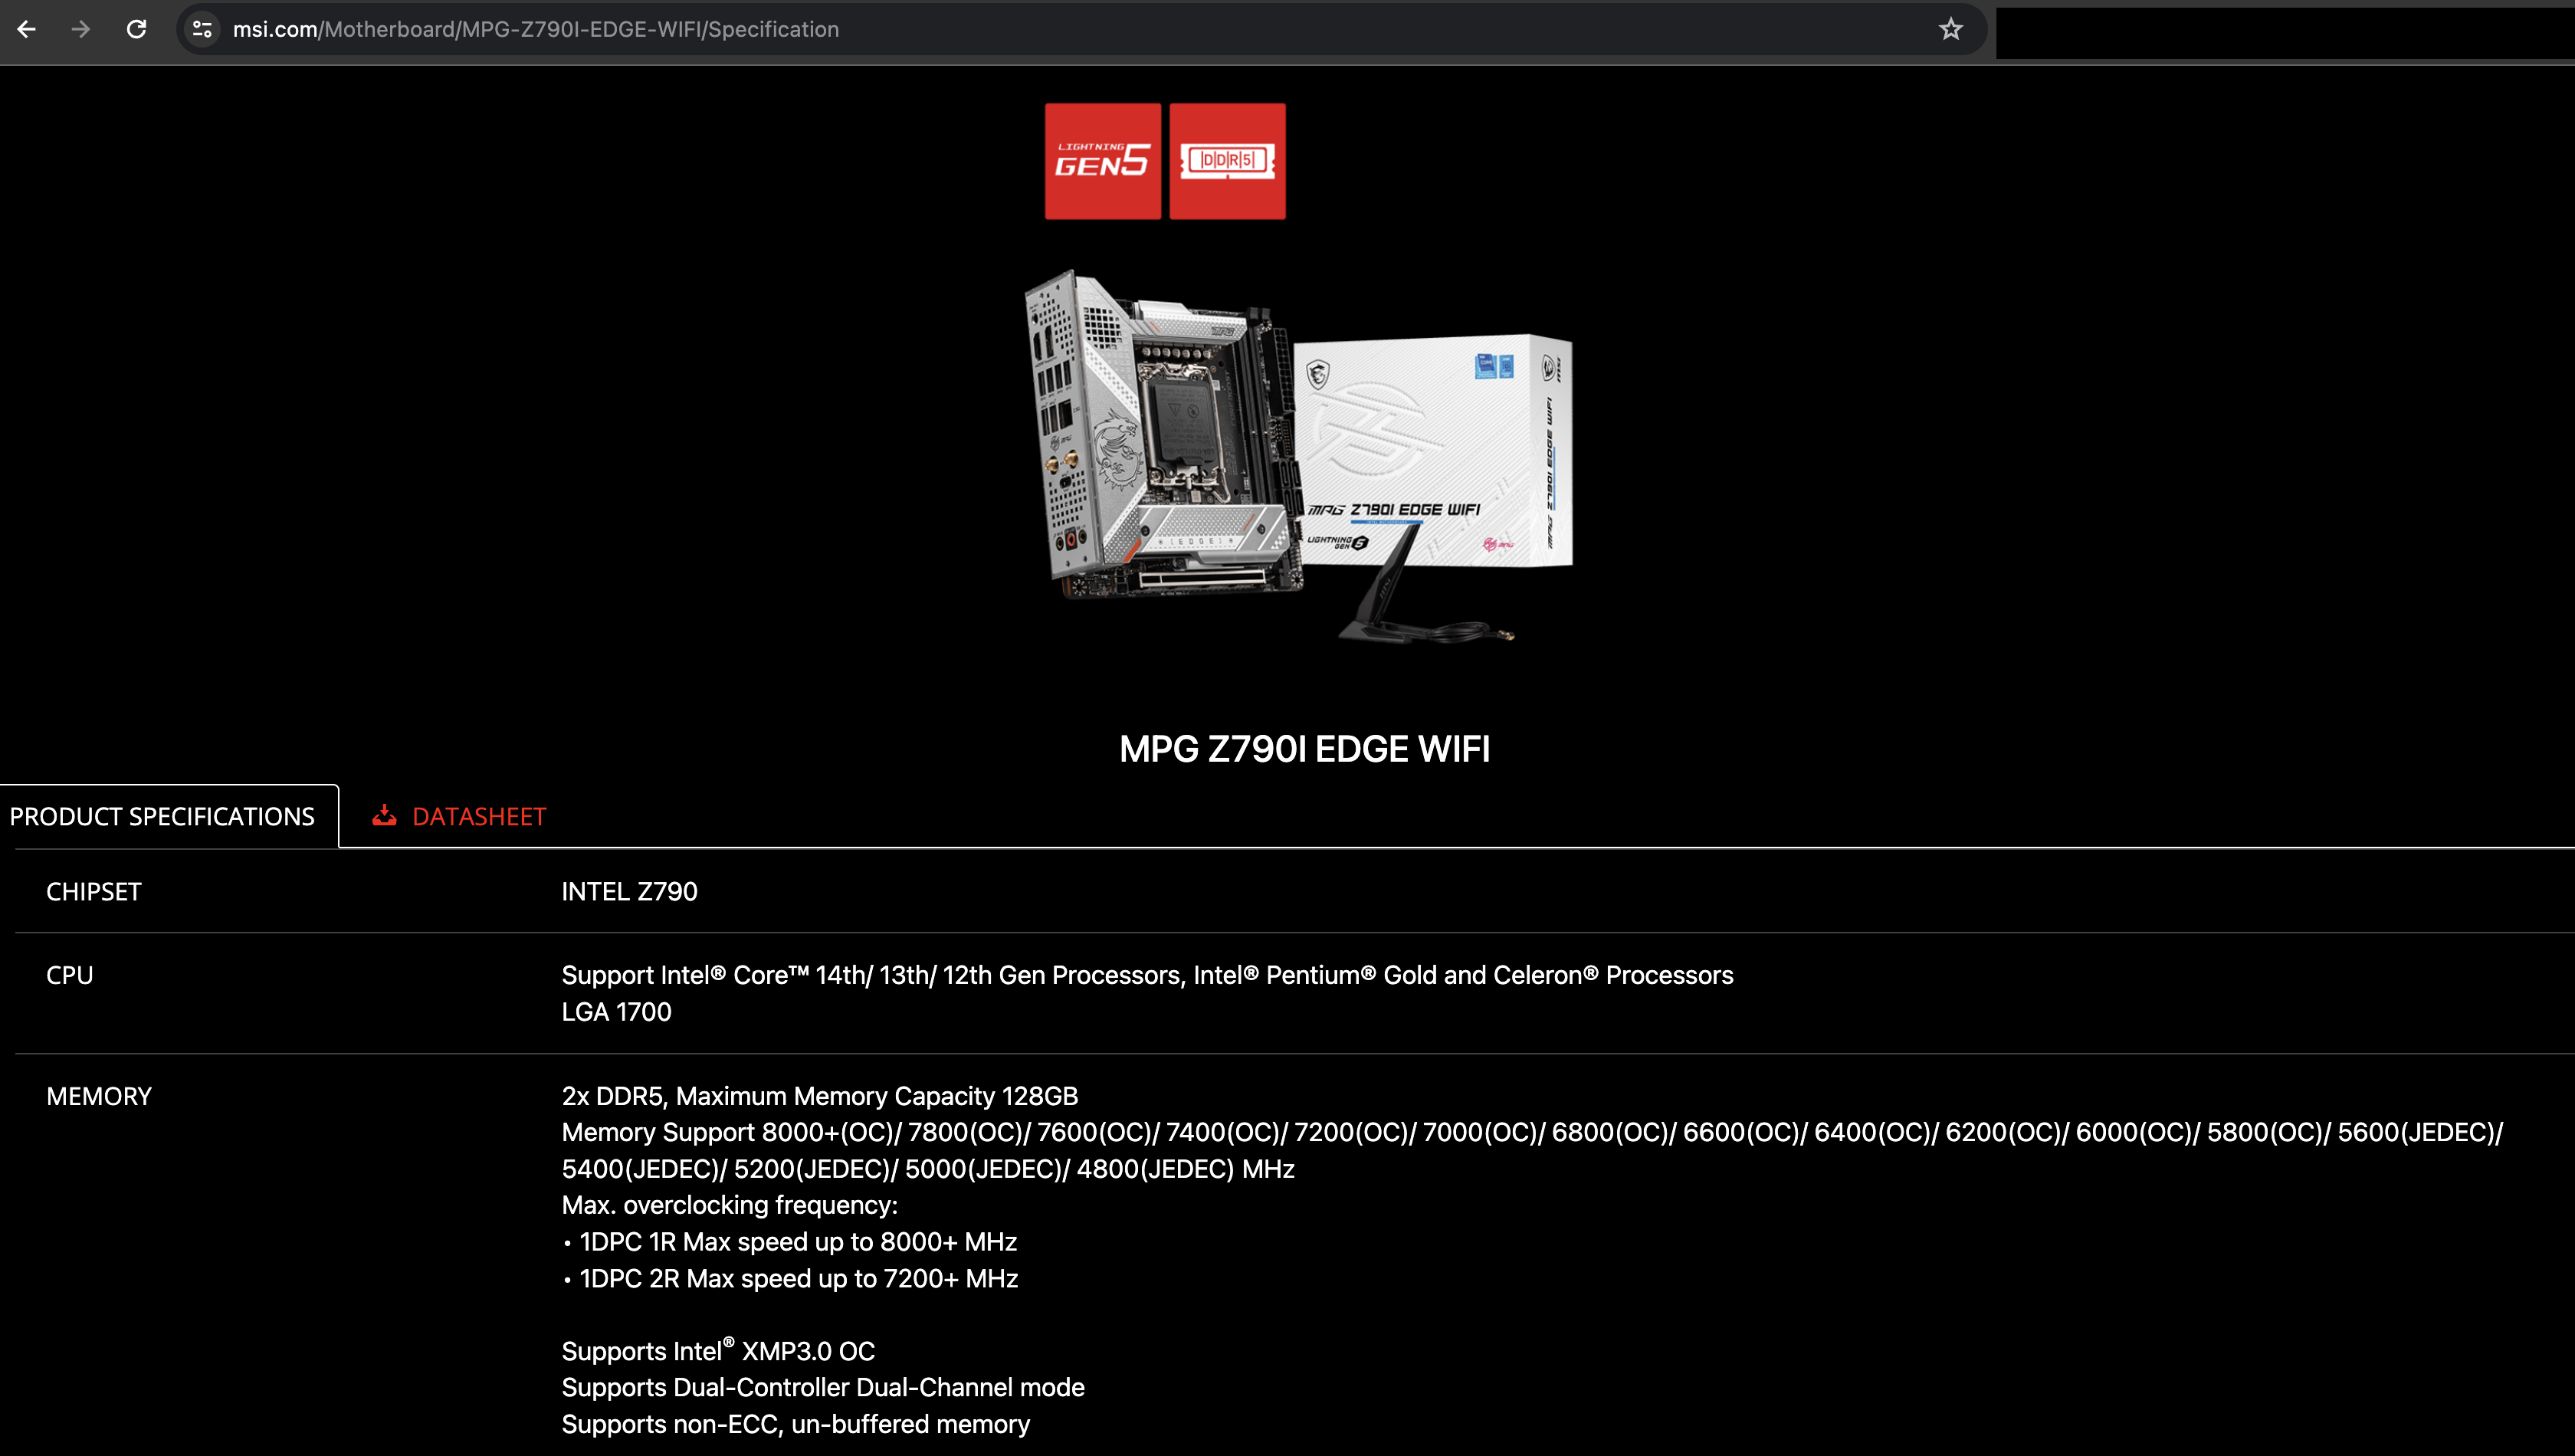
If this interests you and gets pulled for some reason, but you still need the functionality, you can find the beta BIOS here.
Configuring BIOS & Lowering Power Consumption
There were a few things I needed to do to try and get the power consumption down, as well as enable a few extra features.
Primarily:
- Configure AC Power and Restore Power On
- Enable vTPM
- Enable C8, C9, and C10 states
- I need to hit C8,9, or 10 states, due to some other configured BIOS options.
The rest of the options I found here could also help minimize more power consumption than necessary. However, BIOS management is painful on a headless Linux system. I probably have a bit more to do with this, as the system, while running Plex and streaming movies/shows, runs at 120W idle. So, I need to bring this down.
Installing Firmware Updates on SSD, NVME, and Hard Drives
NVME
I had two different firmware versions on my NVME drives. One of those drives had 3B2QGXA7, which was the firmware version that caused potential data/drive issues. After some digging to find the most recent version and validation on what firmware to pick up on which led me to find this Reddit Post about the differences in the drives as well. These two user manuals may also be helpful for you. Firmware Update Utility User Manual and Samsung Magician 8.0.0 Install Guide.
So, I needed to figure out a way to update the firmware, as I didn’t want to reboot the system as a whole. I was in the middle of finishing up a smartctl test on the drives after the flight.
I grabbed the latest firmware version at the time Samsung_SSD_990_PRO_4B2QJXD7.iso and then found four posts that would explain how to fun fumagician on Linux. One here, here, here, and another here.
This ended up updating all Samsung drive firmware, not just the NVME.
SSD
There were various reasons I chose the SSDs as the same brand as the NVMEs, partially for ease of use and accessibility; the other part is that Samsung arguably makes the best flash storage.
Running the process above, I could also update the SATA drives simultaneously with the NVME drives.
HDD
It seems like firmware updates are impossible, which has been disappointing on the WD Red Pros recently. However, my drives came with Firmware Version: 83.00A83, which seems to be the latest release according to various blog posts, so I was fine with keeping this the way they are. Source 1 & Source 2.
Installing Ubuntu 23.10
I would much rather have Ubuntu 24.04, but it isn’t out yet, and I don’t want to install Ubuntu 22.04 LTS as I think the OS has some key components that I want/need that are missing in the older versions of the software repo there. So instead, I chose 23.10 for now and will make a decision to either upgrade to 24.04 LTS when it is available or 24.04 and keep a rolling release with the newest stuff.
Modifications before getting stuff set
Several modifications need to be made. Since the plan was to use Ubuntu Desktop, and not Server for this so that a GUI could be used when connecting certain devices (like Cameras, BluRay Drives, etc.), I needed to install a few additional packages as well to make sure things we were working well. In the future, if I want to move off of the GUI, I can always install the server edition by:
- sudo apt install ubuntu-server
- reboot
- sudo systemctl set-default multi-user.target
- reboot
- sudo apt purge ubuntu-desktop -y && sudo apt autoremove -y && sudo apt autoclean
- reboot
Installation of additional packages
Several additional packages need to be installed:
sudo apt install zsh trash-cli ubuntu-restricted-extras pwgen gnome-extra-icons vim zfs sysstat git trash-cli fzf opensshd openssh sshd ssh ssh-import-id ssh-askpass-gnome ssh-tools ssh-askpass-fullscreen ssh-askpass ncdu htop powertop gh sensor tree hdparam smartmontools inetutils-tools nano nvme-cli nvme-stas wget smartmontools inetutils-tools nano nvme-cli nvme-stas wget iputils-ping iputils-tracepath iputils-arping iputils-clockdiff fwupd fwupdate gparted lm-sensors speedtest-cli speedtest iotop mediainfo inotify-tools subview filezilla bd_info libbluray libbluray-bin perfmon sysstat top whois inuetutils inetutils inetutils-tools brctl bridge-utils docker-ce docker-compose-v2 docker-ce-cli
And a few other packages.
Docker - daemon.json Modifications
To be able to enable both IPv6 and to reduce the broader scope of how Docker creates IP Address Pools on a host (EG: going from 172. X.X.X range to 192.168.X.X range) that could potentially cause collisions, set the following in the file /etc/docker/daemon.json:
|
|
I want to be able to host many different services, but only some of them. Only some services need a full 172.X address range; each service will have 254 scaled functions at best. So, this is a much more suitable default configured for my needs primarily as I segment each network and don’t use the default bridge for all services.
rm vs trash
No one wants to delete a file accidentally, and I have had first-hand experience of doing just that after setting up everything correctly only to, out of muscle memory/habit, delete the wrong thing.
After doing a bunch of research, I eventually concluded that switching the rm command to an alias of another command could end in bad things. Instead, let’s just have rm do this:
alias rm="echo Use the full path i.e. '/bin/rm', consider using trash"
I took this from this stack overflow suggestion.
oh-my-zsh & zsh over bash
ZSH vs. Bash is debatable, but couple the ease of the convenience of oh-my-zsh, its plugins, and zsh over the default of dealing with Bash, and its mods and the theming system as a whole, I would instead use zsh in that case.
In addition, on top of the ZSH set, I find adding the following to .zshrc helpful.
|
|
sysctl modifications
By default, Linux generally caps the watch limit to 4096, which is fine in most day-to-day use cases. However, if I am trying to run Plex, Sonarr, and all these services that watch or manage files, it is necessary to increase that count realistically.
sysctl -p fs.inotify.max_user_watches=524288
|
|
Since I am using Tailscale later on, we also need to set this:
|
|
Setting up ZFS
Modifications for ZFS
|
|
I consulted ChatGPT for information on ZFS and referenced/fed several man/doc pages on ZFS to figure out the best tactics for the pool/downloads namespace. Since this would be slightly different compared to just general storage, for the most part, the general storage defaults work well for my purpose.
|
|
Since the download folder will consist of many moving pieces and bits governed by downloaders, this appeared to be the recommended “best results” for this pool’s folder.
Setting up auto-maintenance for ZFS
So now we get to maintenance and verification of the drives.
First off, we need to set up scrubbing. This is a way to keep the ZFS pools healthy. The below contains the looping script to run through each pool at the beginning of every month and a system service to be placed into /etc/systemd/system/ to automate this process.
|
|
|
|
|
|
Next, I don’t want the system to hang or wait to run everything until the encryption keys are loaded. I like the drives to mount automatically. I did look at TPM storage options for the security keys, but figured that wouldn’t be worth the time - and given that discrete TPMs are primarily useless for desktops, and I don’t trust an onboard chip TPM on the Intel CPUs to function appropriately (part of that is because it is new tech, but, if a BIOS or update screws up the configuration - all data would be gone) I opted just to keep it simple.
|
|
Lastly, I need some way to alert people about smart status issues. Scrutiny seems to be a convenient enough project to do just that.
![]()
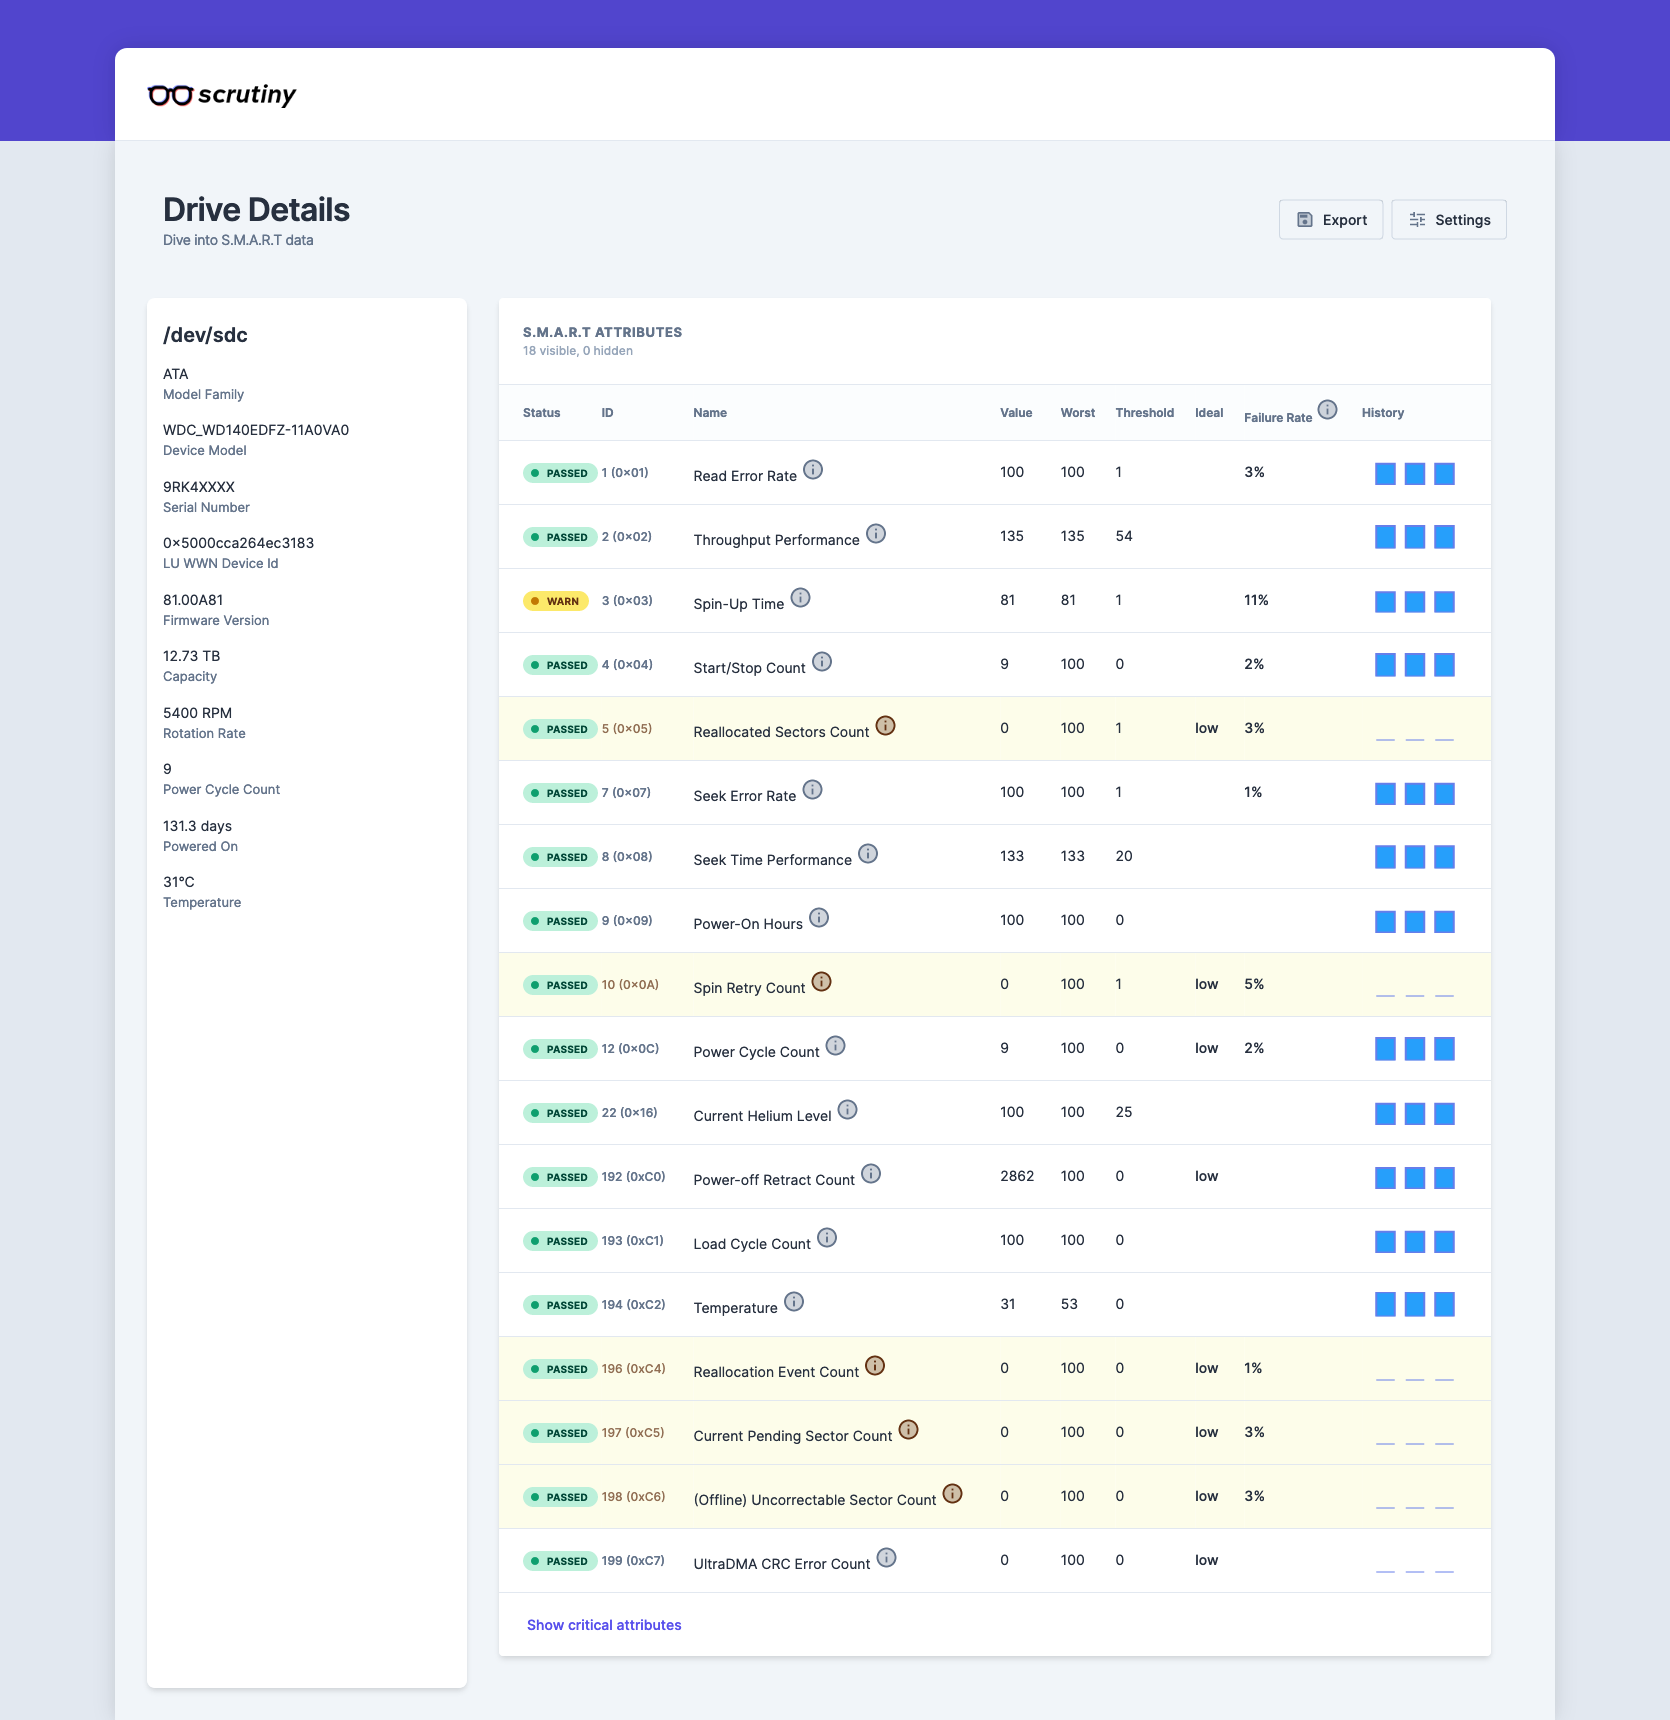
Scrutiny provides a convenient way to get information on the status of the drives. Coupling this behind Authentik/CloudFlare Tunnels, only specific people could access this in a given situation, which would mean either access to Okta & Authentik or access over the CloudFlare Tunnel. So far, the only issue I have had has been this github issue. It is so minimal that I wouldn’t even consider it a problem with the use case. It’s a great little tool.
Installing Tailscale
I previously tried to get Tailscale set up as a container but, unfortunately - I was never able to get it to work in the way that I wanted it to; either it worked sometimes or never. So, in this case, I resorted to installing it on the host.
Setting up Docker & Services
I had a few requirements for this:
- I want to be able to use and serve pages over IPv6 from a front-end perspective but not use IPv6 for each container or from a unique server perspective.
- I also want to be able to use docker-compose over various subfolders that would host each service.
- I wanted to be able to use multiple YAML files, not a single monolithic file of 3000+ lines.
- Wanted to be able to add or remove services incredibly easy
An example of this setup:
|
|
So, how will I split some parts of the configuration across multiple services? A global .env file:
|
|
The code above is the shared configuration across all docker containers, with each service using it and a separate env file for its use case, as shown in the .env file in 01_db.
So then, let’s get into the code and setup:
With either the pull or up (or down) file, docker-compose files can be called anything, as long as it has an extension of .yaml or .yml, and any file with an extension of .env will get picked up for recognition in the docker-compose command.
This is then easy enough to expand out to other services that you want to run. Each service can be pulled in to it’s own folder service and then configured as desired according to the service itself.
1 Month Later
For the most part, everything has been working seamlessly. Though I have learned from a few mistakes, that would be fine without any long-term issues so far.
Dynamically updating ddclient vs CNAME in Cloudflare
Previously, I had set up several A records for each DNS entry I needed to use in Cloudflare, and to ensure all of that was automatically managed through the client - I needed to create a script that would automatically add the needed entries into the client’s config. I created this script:
Then, after about a month of this and trying to troubleshoot some of the issues with it, I realized that I was overcomplicating that and it would be much easier to have a single A and AAAA record, with additional CNAMEs that pointed back to the A/AAAA records where Nginx could just response.
That eventually led to exporting all records, manually deleting all of the records in the zone, and modifying the zone export and rearranging some bits to upload.
Now, updating DNS records with the setup is less of a hassle and overhead.
Guacamole/GuacD no longer works with Ubuntu 23.10
I had everything working perfectly… and then some Ubuntu updates broke Guacamole and Gnome’s RDP Session.
Then I found this on the Guacamole Mailing Lists. I found a Gnome Bug Tracker Issue by the same author called “Connecting from Guacamole to Gnome-remote-desktop”, which was closed instantly by the Gnome Developers, as they state “there is no problem from Gnome remote-desktop”.
It’s a bit of a bummer, so basically, this service no longer works as it used to - and the only reason seems to be an updated library or package being included in Ubuntu / Debian.
I believe what might have occurred is something that occurred when gnome-remote-desktop or freerdp had an update released between January 1st and January 29th that broke Guacamole’s support function server side. We can see that a new package version was released on launchpad.
|
|
This was the last freerdp upgrade since the issues occurred. I can roll Guacamole back to 1.4.X-1.5.X and am still unable to connect to Ubuntu. So, unfortunately, this has been hopeless. I am honestly not even sure where to file a bug report since the initial bug reports were closed - but the problem exists in libfreerdp. Somewhere.
Docker Compose v2 Issues
The only other issue I had appeared about a week before writing is that docker containers randomly fail to join a network. This also seems to be happening to others based on this Github Issue. This should hopefully get fixed soon, so not too worried about it in the long term.
Power Consumption
I managed to get power consumption down to an eventual 70-80 watts per hour at “idle”, and for me, idle would be low-usage, eg: Nothing playing on Plex, minimal to no disk activity related to user usage (nominal disk usage due to downloads, media, or otherwise).
Plan for the next several months
I would say the next steps for me are to figure out how to restrict and reduce more of the power consumption from the system.