Introduction
Okta Identity Engine (OIE) announced what seems like forever ago, if I recall, sometime back in 2019 or 2020. Three years later, it finally became Generally Available (GA). This was exciting news; Okta’s Device Trust previously used Python running, but that required Active Directory, which goes against the ideologies of being Cloud / SaaS Native First, “On-Premise” Secondary.
What continues will be the ideas and the concepts applied when running an OIE Upgrade Process, a FastPass Rollout (and configuration plan), and a Device Trust configuration over the following months for ~2000 - 3000 employees and 2 - 3x (between 4,000 and 9,000) as many devices. Unfortunately, I won’t be able to show all configurations or photos of the ideas behind this process.
- Introduction
- Using a testing tenant
- Okta Identity Engine Upgrade
- The Day for Preview
- The Day for Production
- Enabling Password-less authentication
- Enforce Device Trust
- Some challenges with our rollout and what we learned
- Summary
Using a testing tenant
When joining, I discovered multiple tenants, Prod and Sandbox (of course), and a third testing tenant precisely for OIE. It was beneficial as testing beforehand was helpful to get a better understanding before rolling this out in our sandbox and production environment.
Okta Identity Engine Upgrade
In January of 2023, Okta offered to begin discussions to upgrade the Okta tenants to OIE. Before we initiated any discussions with Okta, I ran through some of the tasks on Okta’s OIE Eligibility Tasks. This put us in a good spot. However, there is a better way to determine if your environment is hitting any blockers. Search through the Okta Help Center. If you search for OIE Upgrade Blockers and OIE Upgrade Requirement.
As the team already had a list of items from the search based on the Eligibility Tasks, the reactive/proactive steps the team took helped reduce the number of things to just 2-3 actual issues that needed to be fixed.
Okta Blockers in the Environment
Of the two items that Okta listed, the team knew about them already:
- Okta Mobile
- Okta Mobility Management (OMM)
There was one item that the team did not know about:
- Email Optional Enrollment
Okta Mobile
Okta has made it very clear that Okta Mobile was going away in multiple different postings, even from various discussions in #okta and its subsequent channels on OktaAdmins and MacAdmins. Generally, this was not an issue, as when running the commands that are generated from Okta’s support pages:
To help locate users who are still using the Okta Mobile application, here is a System log search: Okta mobile on IOS:
client.userAgent.rawUserAgent co "com.okta.ios.mobile"Okta mobile on Android:
client.userAgent.rawUserAgent co "Dalvik/2.1.0" and client.userAgent.rawUserAgent co "OktaMobile"Is there additional training or information I can use to help me with this remediation? Yes, https://help.okta.com/oie/en-us/Content/Topics/identity-engine-upgrade/om-on-oie-end-user-experience.htm
These steps allowed the team to determine that three users, who all recently joined, were using the app. So, it was easy enough to stop them from using the application by simply stating that the app would no longer be usable after “enter date here” and suggesting an alternative.
Okta Mobility Management (OMM)
OMM was the precursor to Okta FastPass. It was clunky, relied on Active Directory, and worked best with VMWare Workspace One (because this is what Okta uses internally for their management tool), Python2, and the functionality generally best served by other products with better integration. Okta has already stated its intent to End of Life (EOL) the service in May, with only a few months of lead time to find an alternative.
Arguably, this is a move to force people into OIE from Okta Classic, especially as they strive to provide more SKUs & gain more revenue; they wouldn’t want to support an older version of the product.
In any case, with the project, this was part of the desire to move over to OIE & FastPass. So, this was a non-issue. However, it did lead to other minor problems as the team moved ahead, and I will get back to that later.
Email Optional Enrollment
Email Optional Enrollment states that in OIE, Email is either a Disabled or Required factor and can’t be marked as optional. This page goes over a rather large explanation. In this situation, setting this to Disabled was of no consequence, as the email is already in place but not used with authentication policies. Depending on authentication flows and how your company would like to proceed, I recommend reading the linked page about its efforts.
Unknown environments
What is helpful is that Okta provides you with all tenants associated with your company’s name or domains. I found three unknown environments related to the org in some way. This was a surprise, as before joining, I was only aware of 2, and then I found a 3rd that the team was using for testing OIE. The OIE testing tenant was incredibly helpful before configuration. These were eventually shut down and deactivated.
However, back to the OIE testing environment, before you begin updating your preview or production environment, I would highly suggest creating a random environment to play around with.
Thankfully, those tenants were only used for something meaningful or in production.
Before the Upgrades
Setting up a baseline of your goal will greatly help before any testing or planning. Post-upgrade, it was determined that there was a need to tweak a few things to change the expected behavior vs the actual behavior of some of these differences after the upgrade in a “real world” situation rather than testing. Below is a template or key points that could be useful in planning your upgrade, baseline, and expectations.
Set your goals and achievements
Setup a project plan for your goals and achievements, obtain a rough draft that is fairly basic but thorough, and then expand to something more like below:
Phase 1 - Prep goals
- Gather a list of all devices ever purchased within the company, and make sure that the devices either:
- Exist in your management system
- If they do not exist in your management system, create individual tickets for each user affected or device
- For those deployed, meet your company’s minimum requirements (Security, OS, Encryption, Windows Hello, etc)
- Remove devices that have not been purchased from the management server (if applicable, EG: BYOD Devices)
- Exist in your management system
- Set up the Device Integrations (SCEP, Device Assurance Policies, App Configuration, etc) as soon as possible once the initial upgrade has been completed
- Note that Device Assurance policies still seem to be hit or miss, but it is a good idea to set up the baselines or what you want from them in writing before you start completing them.
- Advertise and start requesting employees to set up Okta Verify for Desktop and enable Okta Verify’s FastPass function for Mobile
- Grab the Download Links from your preview environment (or ask around for a production environment link) and deploy or provide it to employees
- This could be done at a later stage, but the more employees you have on board once you are ready to turn it on, potentially the smoother it goes
- At this point, you could keep track of the managed state, but it makes sense just for them to get signed in or enabled for the time being
- Clone an existing Authentication Policy you want to test, and add FastPass (and ultimately Device Trust) based rules to the policy.
- Confirm the scope of the employee base that will have these policies applied, and create a group that applies to that scope.
- You only want managed device-based authentications to apply to devices you have full control over, which usually means Full-time, part-time, interns, etc.
- Subsequently, confirm the scope of the employee base this will not apply to and create a group that applies to that scope.
- For example, you want to apply only some of the managed device setup (EG: managed devices) to devices that you are unable to manage in the first place (EG: Service Providers with external Infrastructure, Consultants, Contractors, etc).
- Another example is Service Accounts. Depending on the circumstances, there may be situations where Service Accounts are unable to log in from a managed device.
- Maybe you have “VIP” employees that you want to white glove support.
- Finally, create a third group that scopes to no one but will be your staggered rollout plan so that if something goes wrong, you don’t affect everyone or every app at once.
- How do you want to define Temporary Exceptions to the FastPass and managed device policy for
- VIPs
- Device Issues / Registration Issues
- How long should those Temporary Exceptions be for (time-based)?
- When is the deadline to no longer provide temporary exceptions (date)?
- How do you want to capture metrics over the next however many months you decide to follow or plan to validate success?
- Do you want to use Okta as a CA or Use your own?
Phase 2 - Actual Milestones (Ongoing)
- Enable the “Sign on with FastPass” button in the Global Session
- Apply the Authentication Policy Changes to 1 or 2 applications and limit it to a group of internal testing employees who have volunteered and know that they will be authenticating differently.
- Test both managed and unmanaged, and any authentication policies that you may need to set up (for example, Registered devices for specific employee groups)
- Once the internal testing policy goes well, change those 1 or 2 applications over to a wider subset of employees
- Confirm the scope of the employee base that all of these changes will apply to, and create a group that applies to that scope.
- You only want Device Trust-based authentications to apply to those devices that you have full control over
Phase 2 - 1 Month Review (Ongoing)
I didn’t mistakenly put Phase 2 twice. It’s there purposefully. Phase 2 envelops two actual phases—the milestones and the assessment of those milestones while they are ongoing. While you could potentially call this Phase 3, and the following phase, Phase 4 - it would be foolish to wait a whole month to also not make iterative minor improvements to policies and processes, as you see things either going well or going wrong or to collect that data for the minor changes at the “2-week” and “4-week” mark. For example, your Managed Device status may directly affect how you want to approach the actual enforcement of only allowing Managed Devices (Phase 2, Phase 3, or Phase 4, etc, roll out).
- Collect and Review
- System Metrics
- Completion of Managed Devices daily, weekly, or monthly.
- Most common authentication policies or rules that are being triggered or used
- The most common global session authentication policies and rules that are being triggered or used
- Authenticator Usage over time for trends
Phase 3 - 3 Month Review (Ongoing)
- Follow through with Exemption Removals
- Follow through with enforcing only Managed Devices
- Follow through with any final authentication changes (such as “failing closed” on the catch-all rule)
Sit down with Security
Sit down with security and make sure that the entire project is planned with a focus on both the employees’ experience and the overall tenant’s security. Your security team might care about the following:
- Lack of “traditionally understood” 2FA
- Getting rid of Passwords as a main authentication system
- What the rollback plans look like
- Go over the proposed authentication policies and rules
- Go over the pros and cons, and discuss everything, and I mean everything.
- Go over how you plan on enrolling new devices due to being in a race condition
- For example, Jamf can’t enroll devices if you put a Managed Device Authentication Rule on Jamf, but Jamf is also something you don’t want anyone to be able to access from any device. So, how do you work around this limitation?
- Review what upper management approval will look like and who the key contact points are.
Ensure that they understand that there may be situations where unexpected behavior may arise and take potential login attempts to services more seriously during the project’s time frame. The project will hopefully make their lives much easier once complete!
Sit down with Compliance
If you have a compliance team, make sure that any adjustments to application sign-ins or the overall global session policies (EG, Enabling Password-less Authentication) do not break any compliance requirements within the company. If you need a compliance team, sit down with your security team or someone outside your main team.
If you have a global compliance team, ensure that the team understands in great detail the risks associated with this type of project.
Usually, this is all that would need to be verified so that any information stated externally is updated or re-informed to customers, clients, or other parties.
Otherwise, the last thing to determine is that any points of contact within Compliance have signed off on the overall plan and that everyone is on board in terms of documentation, policies, and procedures in the future for how to react and deal with situations.
(Multiple) Meet(ings) with Tech Support Team
Depending on where you sit within your organization, you may be in Tech Support, trying to move to the next level, in Technical Operations and Planning, or Managing those team members.
Have multiple conversations with your Tech Support team no matter what level you are. I mean multiple. You should discuss:
- What SCEP Certificates are (Windows, macOS)
- How SCEP Certificates are being handed out to your platforms (Windows, macOS)
- What Managed Application Configurations are (iOS, Android)
- How those Managed Application Configurations are being distributed (iOS, Android)
- What changes occurred when your environment was upgraded from Okta Classic to Okta Identity Engine
- Such as how logins are evaluated, how factors change between each environment, etc
- How and what Global Session Policy changes are, and how they get evaluated during the sign-on process
While some of these subjects may be like throwing things at a wall and watching what sticks, it will be helpful to make people comfortable.
The Day for Preview
The initial schedule for the Okta Preview upgrade was at 7 PM Central European Time. I hunkered down, thinking that it would be a challenging process (this was also because I was only a few months into learning a brand new environment). Surprisingly, it was pretty seamless. I could have waited till the next day because nothing broke.
- I followed through with the goals outlined and deployed the preview environment to those in the testing team.
- Unfortunately, there was minimal usage from the testing team on the upgrade. However, those that did test were very thorough.
- Setup Application Bookmarks pointed to the production environment applications to test the authentication policies against what was proposed for existing apps.
- Example: Sandbox Google Mail is a bookmark application that redirects to the Embed URL of the Production Google Workspace Mail App
- This allows you to “clone” the application into a sandbox in a very rudimentary way, but it is enough that it allows testing against the auth policies, which is the end goal.
- Then, set up the authentication policies and rules on the sandbox and informed everyone to log in to the production environment’s applications that were being tested before attempting to sign in to the preview and testing environment.
The Day for Production
While I have made suggestions on how to approach things before this, what follows are some suggestions and tips from what I discovered going through our deployment. This is not in any particular order but just a general order or what makes sense to me as the author.
Grabbing a list of all employee records
Some companies have various types of employees and different ways to receive access to company services. This could be based on Job Title, Contract Type, Region, etc. Each may have different requirements.
If you still need to begin using HRIS-based profile sourcing, you should start. It generally allows for a much easier workflow across the entire company.
Regardless of whether you are or not, prepare to do the following:
- Obtain a list of employees from both your HR team and a complete list of all Okta Users
- Prepare to go over the following
- Missing, Incorrect, or Mismatched Data
- Accounts missing from one system or another
- Review your key attribute data points, whatever you have decided will be used for rolling this out, across both data files to make sure they are accurate
- Prepare to discuss this with whoever is responsible for maintaining your Employee Records
- Usually, and this should be your HR or People team
- Correct any incorrect data
- Began the process
Starting with our Internal Testers
I have or will mention using an internal testing team throughout this blog post.
Internal Testing Teams (outside of Tech Support, but not excluding them) are helpful when validating and checking this. Be mindful, though, that they have their own workloads and are not a team you should abuse but a team that you should build a relationship with and encourage to provide feedback to you all. Whether you want to include VIPs in your team is solely up to you and your team, but at least give them knowledge ahead of time if bumpy roads are expected. If the worst-case scenario is that your CEO is unable to do anything for one week, that won’t look good on you, the team, the CEO, and, worst of all, the company. Be sure to make this an opt-in and automated workflow so that all they have to do is “choose to take part.”
The reason for running through this with them:
- You can test the changes you expect in scope prior to doing a massive switch for Device Trust and Password-less authentication.
- You get direct feedback when a change occurs
- You can get more targeted technical details from those assisting you rather than having to go through 2 or 3 levels of support channels and conversations
You can name this whatever you would like; however, I usually name this something that stands out - such as:
$companyName-internal-testing-team
It’s concise and descriptive enough. Ideally, link the description or another group attribute back to the task that is created in your project management section so there is a track record of the work for those who are new or have to pick up the work afterward.
Creating all Device Integrations
For us, this basically relied on us:
- Replicating the existing configurations from testing and updating the relevant links, secrets, and identifiers where necessary.
- Replacing the preview environment’s Managed Application Configuration and deploying production’s configuration.
There are several different deployment methods with this and admittedly, TravellingTechGuy goes into fantastic detail about them here and Jamf also has written an awfully impressive explanation of SCEP and Challenges here. We chose the following.
I have outlined my recommendations below (at the time of our deployment).
SCEP Deployment with a dynamic challenge
Dynamic Challenge offers slightly more security (at least in my opinion), as the credentials for the initial piece of the challenge are stored in Jamf or Intune, which then requires two pieces of information to obtain a certificate. If you were to use Pre-Shared Static Keys, and they leak, it would be easy to generate a certificate. In this way, it would be slightly more difficult to generate new SCEP certificates if the Key leaks for the device.
With that said and done and the SCEP certificates deployed - it’s time to move on to the next steps.
Hopefully, one day, ACME will be supported in place of SCEP, maybe even through Okta Verify. Since SCEP has its issues, ACME is a more robust and, hopefully, future-proof technology.
Crowdstrike integration
If you don’t use Crowdstrike, feel free to skip this section of the blog, as it won’t be relevant to you.
By default, Crowdstrike does not enable the necessary files for the Crowdstrike ZTA setup to work initially. This is outlined in Okta’s blog post here. With that said, I totally missed that in their documentation. You or your Crowdstrike Administrator should reach out to [email protected] or [email protected] (depending on your Agreement and Products being used) to enable this integration.
However, note that a company’s ZTA score may not necessarily transfer in use to another company. When asking for a specific understanding on the implementation to be able to make an educated and valid decision on what to use as a ZTA scoring methodology, Crowdstrike provided the following response:
Unfortunately there is no particular static formula or equation used when these scores are calculated that we can provide. ZTA scores themselves are dynamic and based entirely upon your organization’s configuration, which is also why we cannot provide information on what constitutes a good or bad score.
While this does come with the downside of not being able to provide much insight into the true “definition” of a score, it also means that the values themselves are much more tailored towards your organization and it’s particular configuration.
Because of this, your org or team needs to determine an internal scoring method internally and project to be used - which means starting from a low score, and “increasing it” every ten intervals to determine if or when issues start to appear or what the desired risk score is. This is very dependent on the internal business requirement and should be treated carefully - after assessing all clients over a significant time period to make sure that number stays manageable and is just right. Refrain from expecting Crowdstrike to assist here.
Creating / Configuring Device Assurance Policies
Device Assurance Policies are a simple and straightforward concept.
- “User A” tries to access “Application X” from a Windows 10 device that is unencrypted.
- You have a policy that states only Windows 11 devices that are encrypted are allowed to access “Application X”.
- “User A” can’t access the application.
So, as I mentioned, this is a fairly basic concept, and Okta’s original Device Assurance Policies were, let’s be honest, very basic. Some examples are shown below:
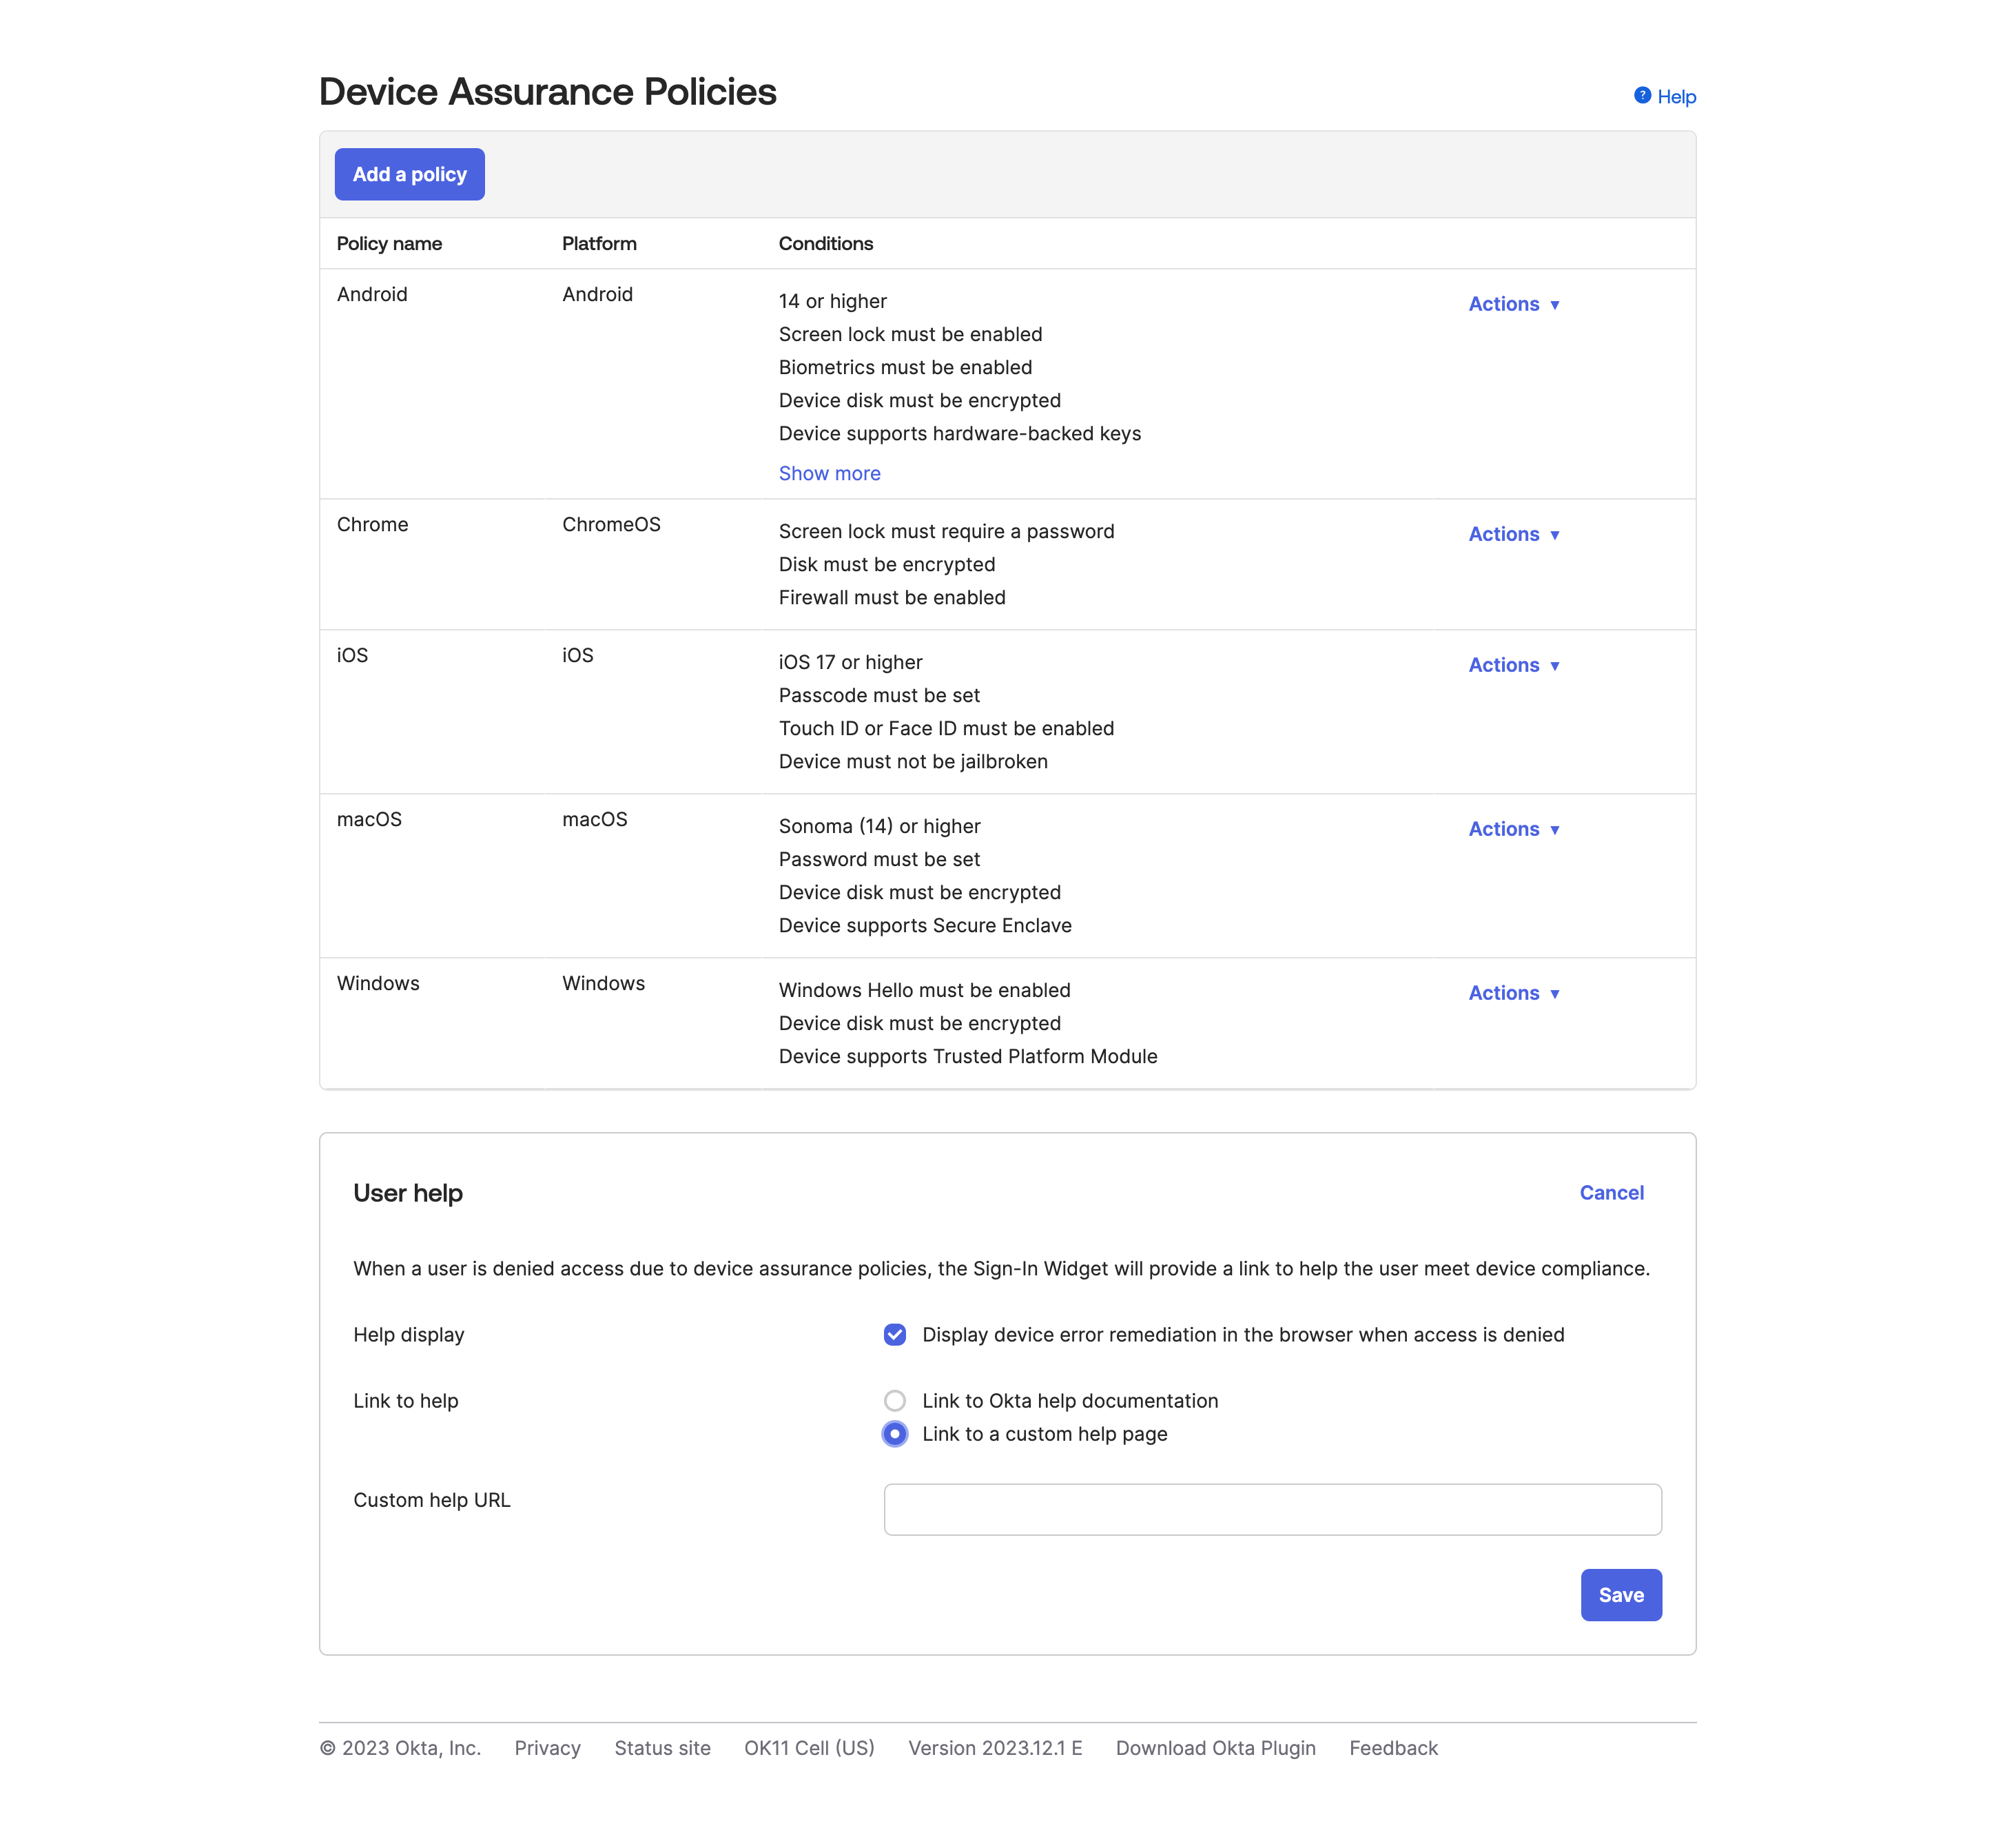
However, since the release of the ChromeOS Integration, this allowed a massive expansion of services and checks based on what Chrome (or ChromeOS) requires. For example, ChromeOS specifically now has:

Within Windows, for example, once the Device attribute provider(s) for Chrome Device Trust is selected, you can specify the following baselines:
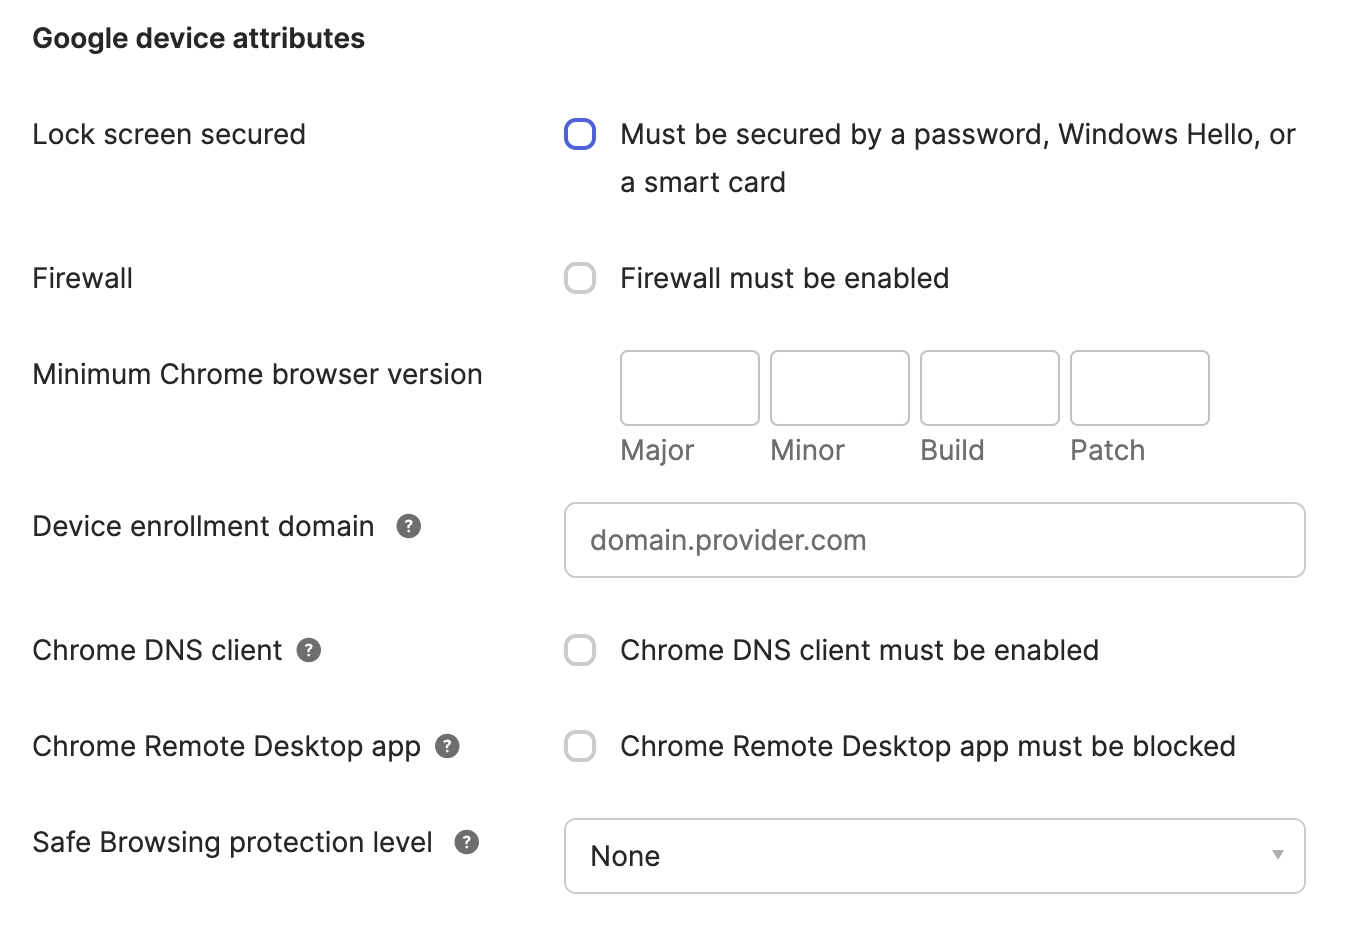
And then subsequently, either using Okta’s “guided” pages or use an internal KB Article around for issues that they may encounter and more user-friendly documentation.
Update 2023/12: There are some potential things to consider here.
An example, if you specify a Device Assurance policy for macOS of 14.2.1, which was released 2023/12/18 and you attempt to login with a device on 14.2, Okta will not flag the device as being blocked by the assurance policy. You can check those details by https://domain-admin.okta.com/.well-known/ov-configurations, and you might notice some unfortunate items. Primarily, the Operating Systems listed here are not always “up to date.” When checking my personal tenant configuration, I saw the following listed for macOS:
|
|
Now, if you take a look at the last line here, Okta has stated in their configuration that they added 14.1.2 at the beginning of December and updated it on the 15th. If you take a quick browse over to the macOS Sonoma Wikipedia Page (maybe not the best use of source, I know, but… this is a tangent), you will see:
|
|
This means that there is a lack of automation around Okta & Apple’s OS Information Update procedure, or maybe the last bits need manual approval, but even after a week, they still need to be done.
Okta’s Device Assurance Policies need several attribute collection details, in my opinion, which make it difficult to actually use to prevent access to a service or application. For example, you have a third-party vendor that needs to access your device. For example, you need to detect if the user has ssh, airdrop, or public file sharing enabled on a device - while the company says they do not allow it, there may be some misconfiguration for a subset of OUs or intentionally configured that way. Neither Okta’s nor Chrome’s Attribute information collects those details (not to mention Chrome would only work if it is attached to your company’s Google Workspace environment).
This also means that Device Assurance is a part of the AND condition, meaning that if they do not meet that condition - they will skip over that rule and continue on to the next one. This means that you have to have a very specific authentication rule flow if you plan on using the Device Assurance policies.
In general, I think it would be better to look at alternatives that also provide not only overall better experiences but also better details to the end-user, testing against a larger subset of attributes and providing for custom attribute collection. Some examples of this are:
- Kolide,
- Rolling your own and setting up a service similar to Pinterest’s)
Creating Authentication Policies
Initially, the plan that was proposed involved multiple levels of the authentication policies, at most 2 to 5, based on trust relationships associated with each of them. However, this backfired, as there was no conclusive agreement on what apps need to be placed into what authentication policy could be made. So instead, the good idea is to opt into two Authentication Policies initially.
- Device Trust - Not Required
- Device Trust - Standard (Default)
So what does this mean?
Device Trust - Not Required is not required for the applications listed in the first policy, and these applications are things like Learning Tools, non-Sensitive Data, etc.
Device Trust - Standard (Default) is the standard authentication policy for all other and new applications. If an application gets created, it automatically falls into Device Trust so that you do not run into any situations where data leaks occur due to a mistake in the assigned authentication policy for the app.
So, what does this mean in reality?
Let’s look at the authentication policies I have set for Device Trust - Not Required in a testing tenant:
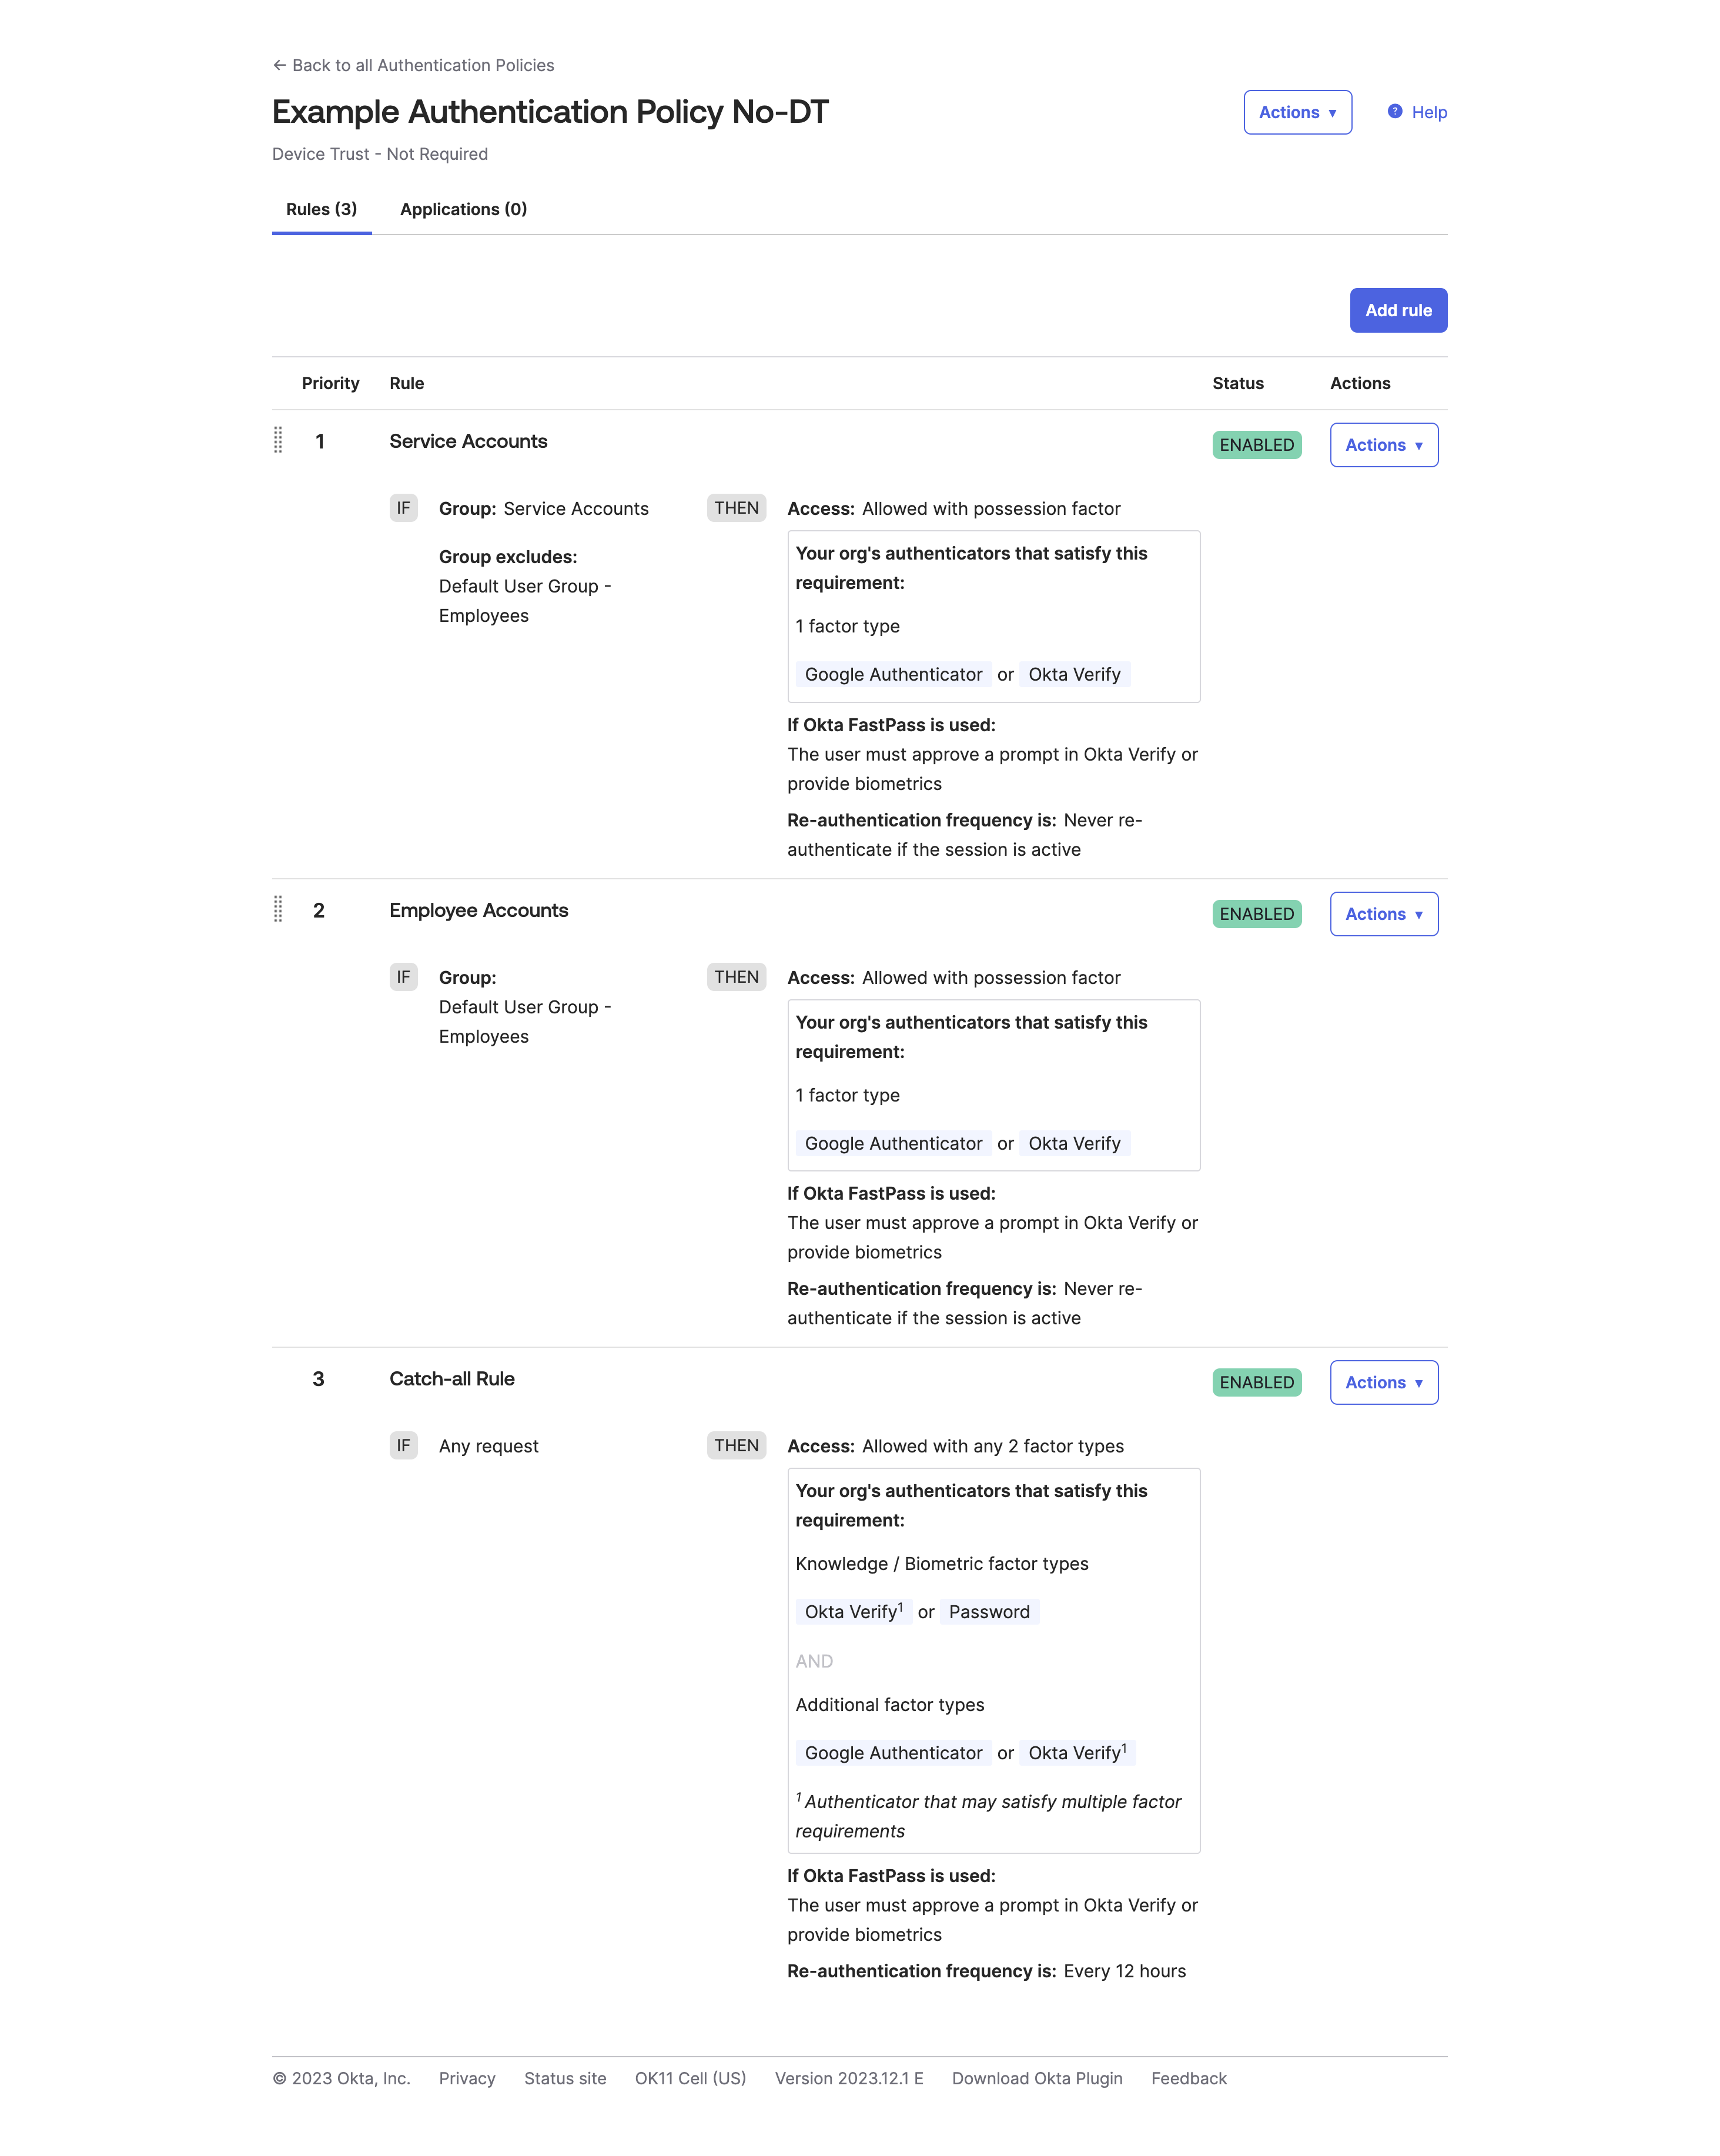
This is a very bare minimum authentication policy, and you can, of course, expand on this with Security Contexts, the ZTA score, etc. What can you see from this authentication policy?
This policy does not specify any device criteria; it sets the criteria to ‘Any’, allowing all devices, regardless of their source, to access applications and services behind this authentication policy.
So, for device trust, what if you only wanted to allow the device that was accessing the service to be able to approve the Factor requirement?
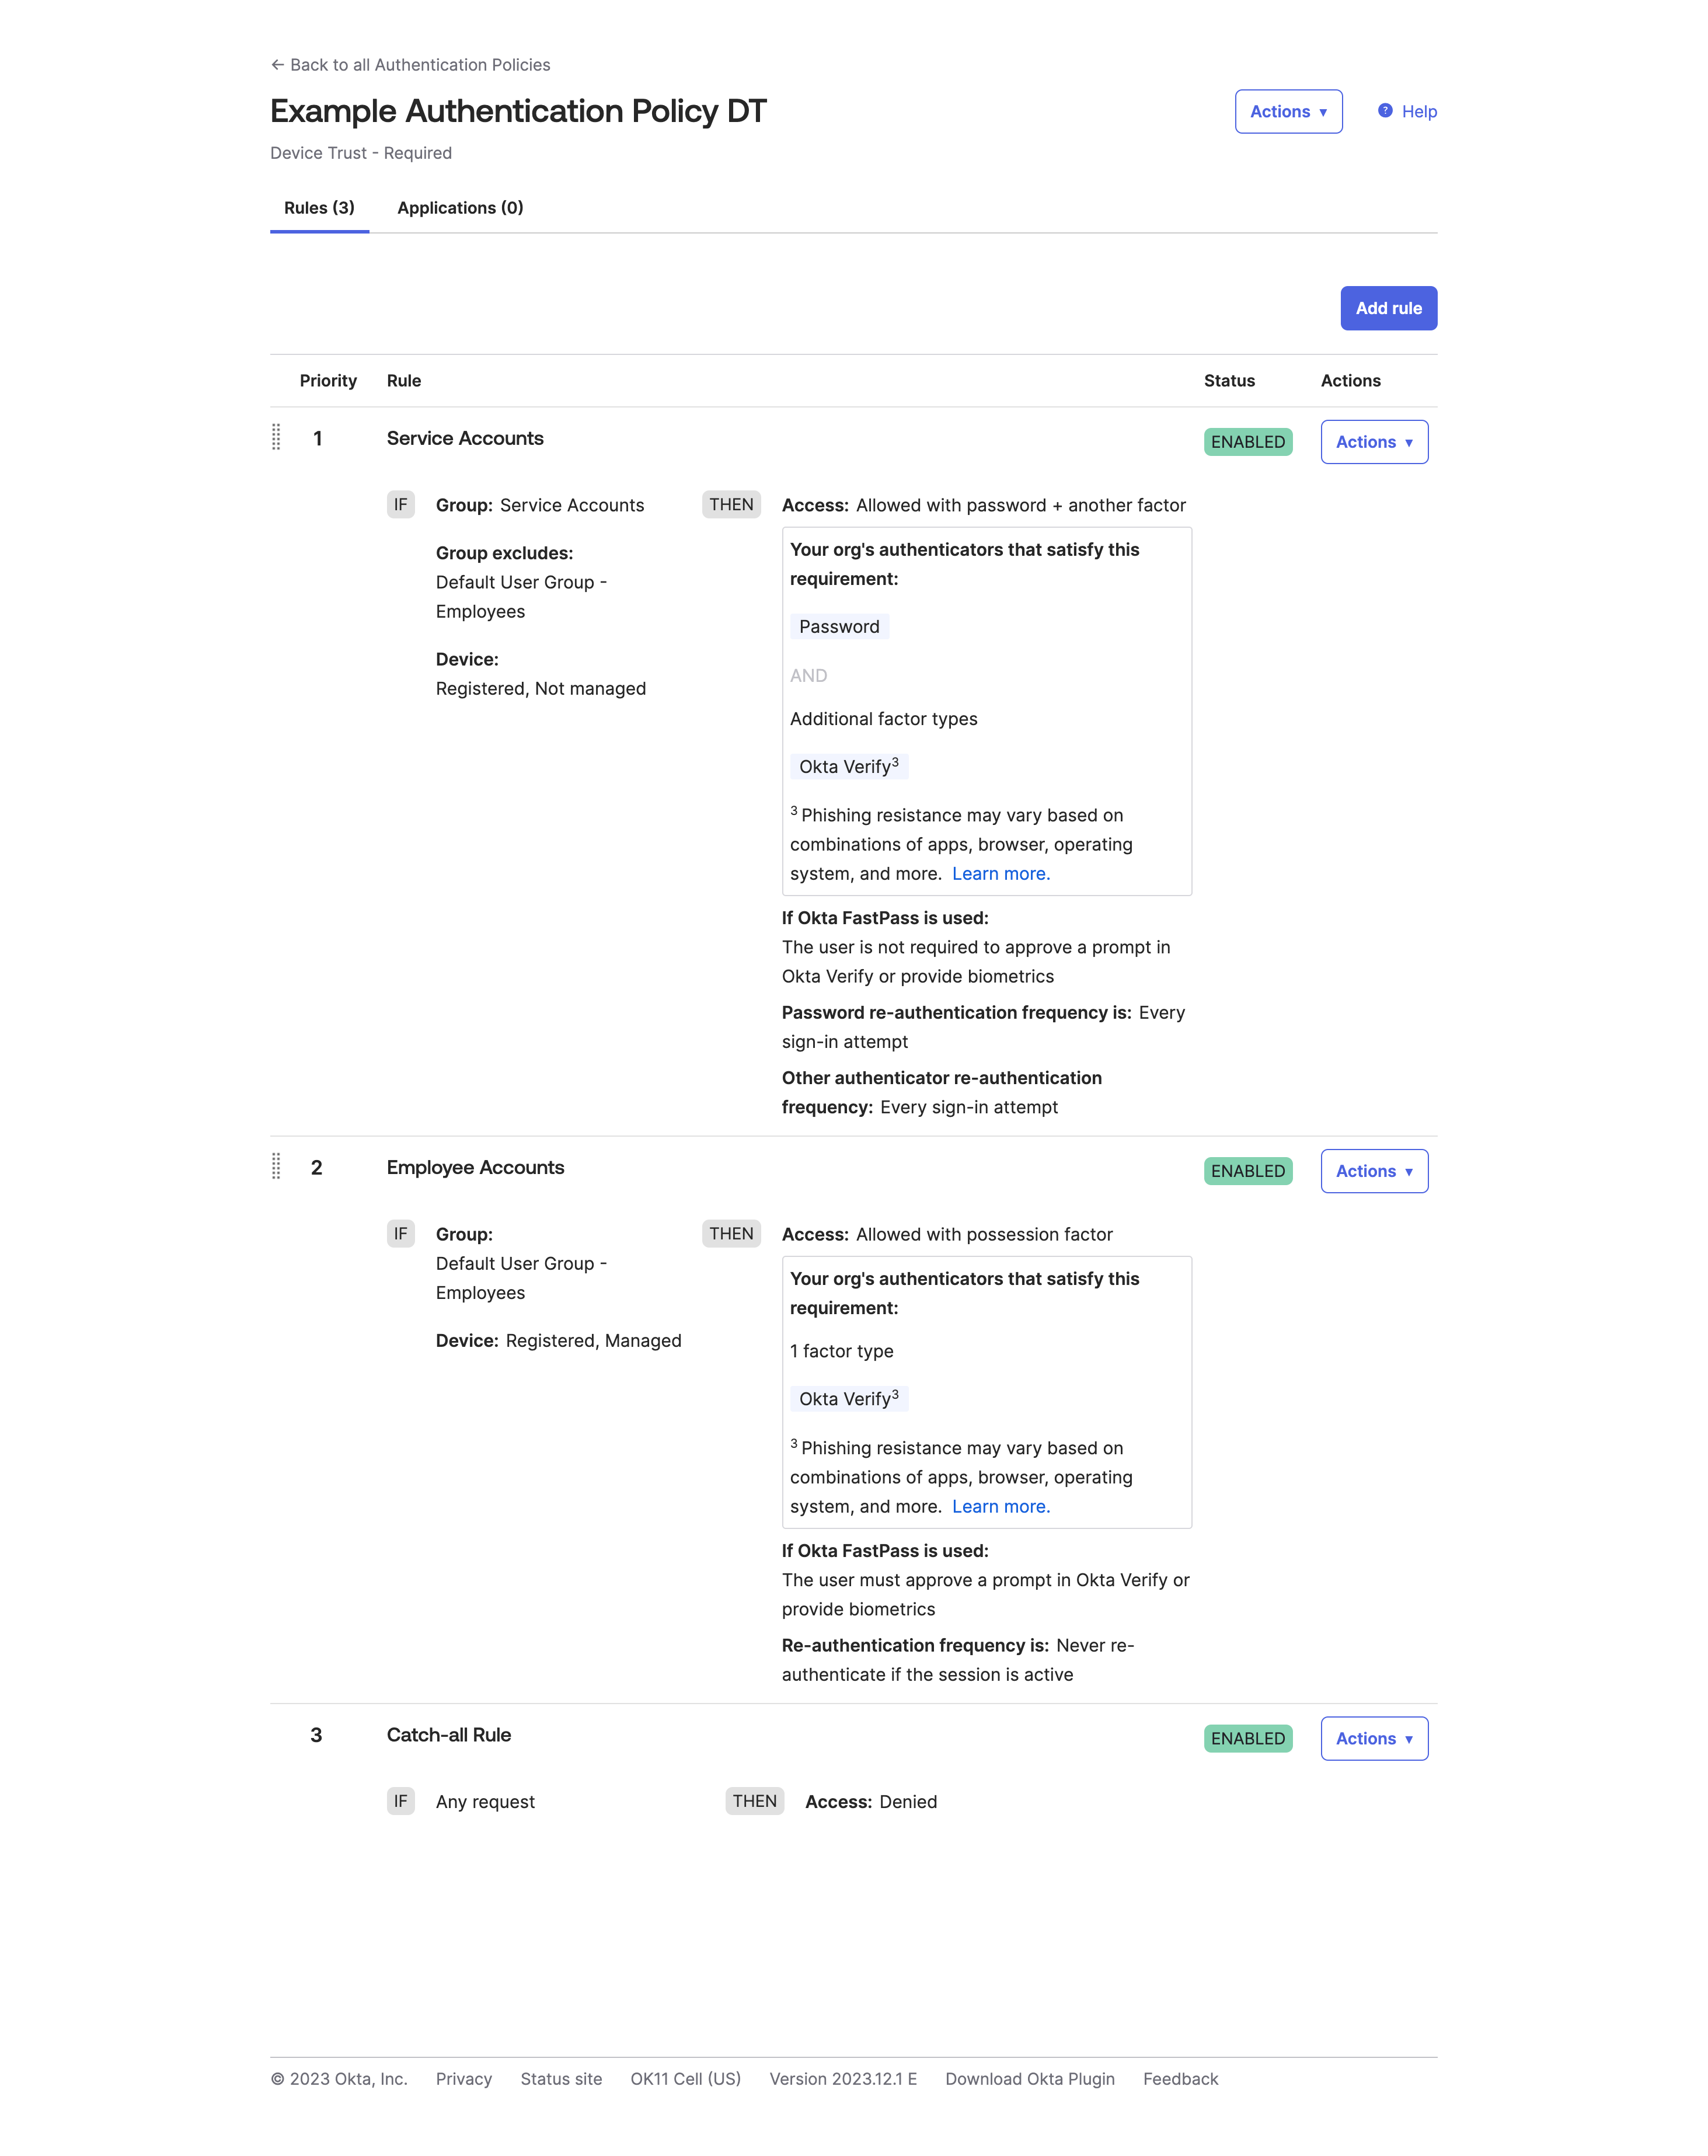
Update 2023-12: After the October hack that took place against Okta, Okta also now, more pointedly at least, recommends the use of Phishing Resistant Factors as a preferred method. Honestly, this is something that should have previously been shouted on the airwaves from the get-go, if it was not already being done, for all authentication policies and applications.
Personally, I would recommend you also enable Hardware Backed as well, just to provide the best security aspects around logging in. This does come with some caveats; for example, traveling on a plane could pose latency or lag issues when using FastPass. However, OTP codes can be used in relay attacks, and push notification fatigue is a real thing. When on a plane, Push Notifications would exhibit the same issue since maybe you don’t want to (or can’t) pay for both devices to be on WI-FI at the same time.
I would also recommend while doing all of this against an upgraded tenant, that you leave your existing policies as is and either clone (if your original policies are simple or few in number) or create a single authentication policy. From there, then:
- Create new rules above the original rules that conform to your Device Trust Policies that you have planned ahead of time
- Scope them to only members of the Testing Team
- Configure the scope of the authentication policy and the factors you would like
- Disable the Device Trust Policies on creation so that you can modify
- Once ready to test
Lastly, remember that the Okta API holds some secrets and additional configurations on what you can do with Authentication Policies that are, as of writing anyways, not possible to do via the GUI. For example, only allowing specific Authenticators to be used in a Sign On Policy, such as only allowing Okta Verify SIGNED_NONCE (EG: Biometrics+WebAuthN), instead of Push notifications being usable through Okta Verify.
Note on Device Assurance Policies
When adding a Device Assurance Policy to the Authentication Policy, make sure that the device state is registered at the very least.
Note on Behavior Detection Policies
Update 2023/12: Originally, at the time of writing and the deployment that was performed, Security Context information outlined on Okta’s website, was not available. Now that this is true, I would recommend re-adjusting your authentication rules to shift the behavior detection from the global session policy to the authentication policies if you are attempting to perform a password-less authentication flow.
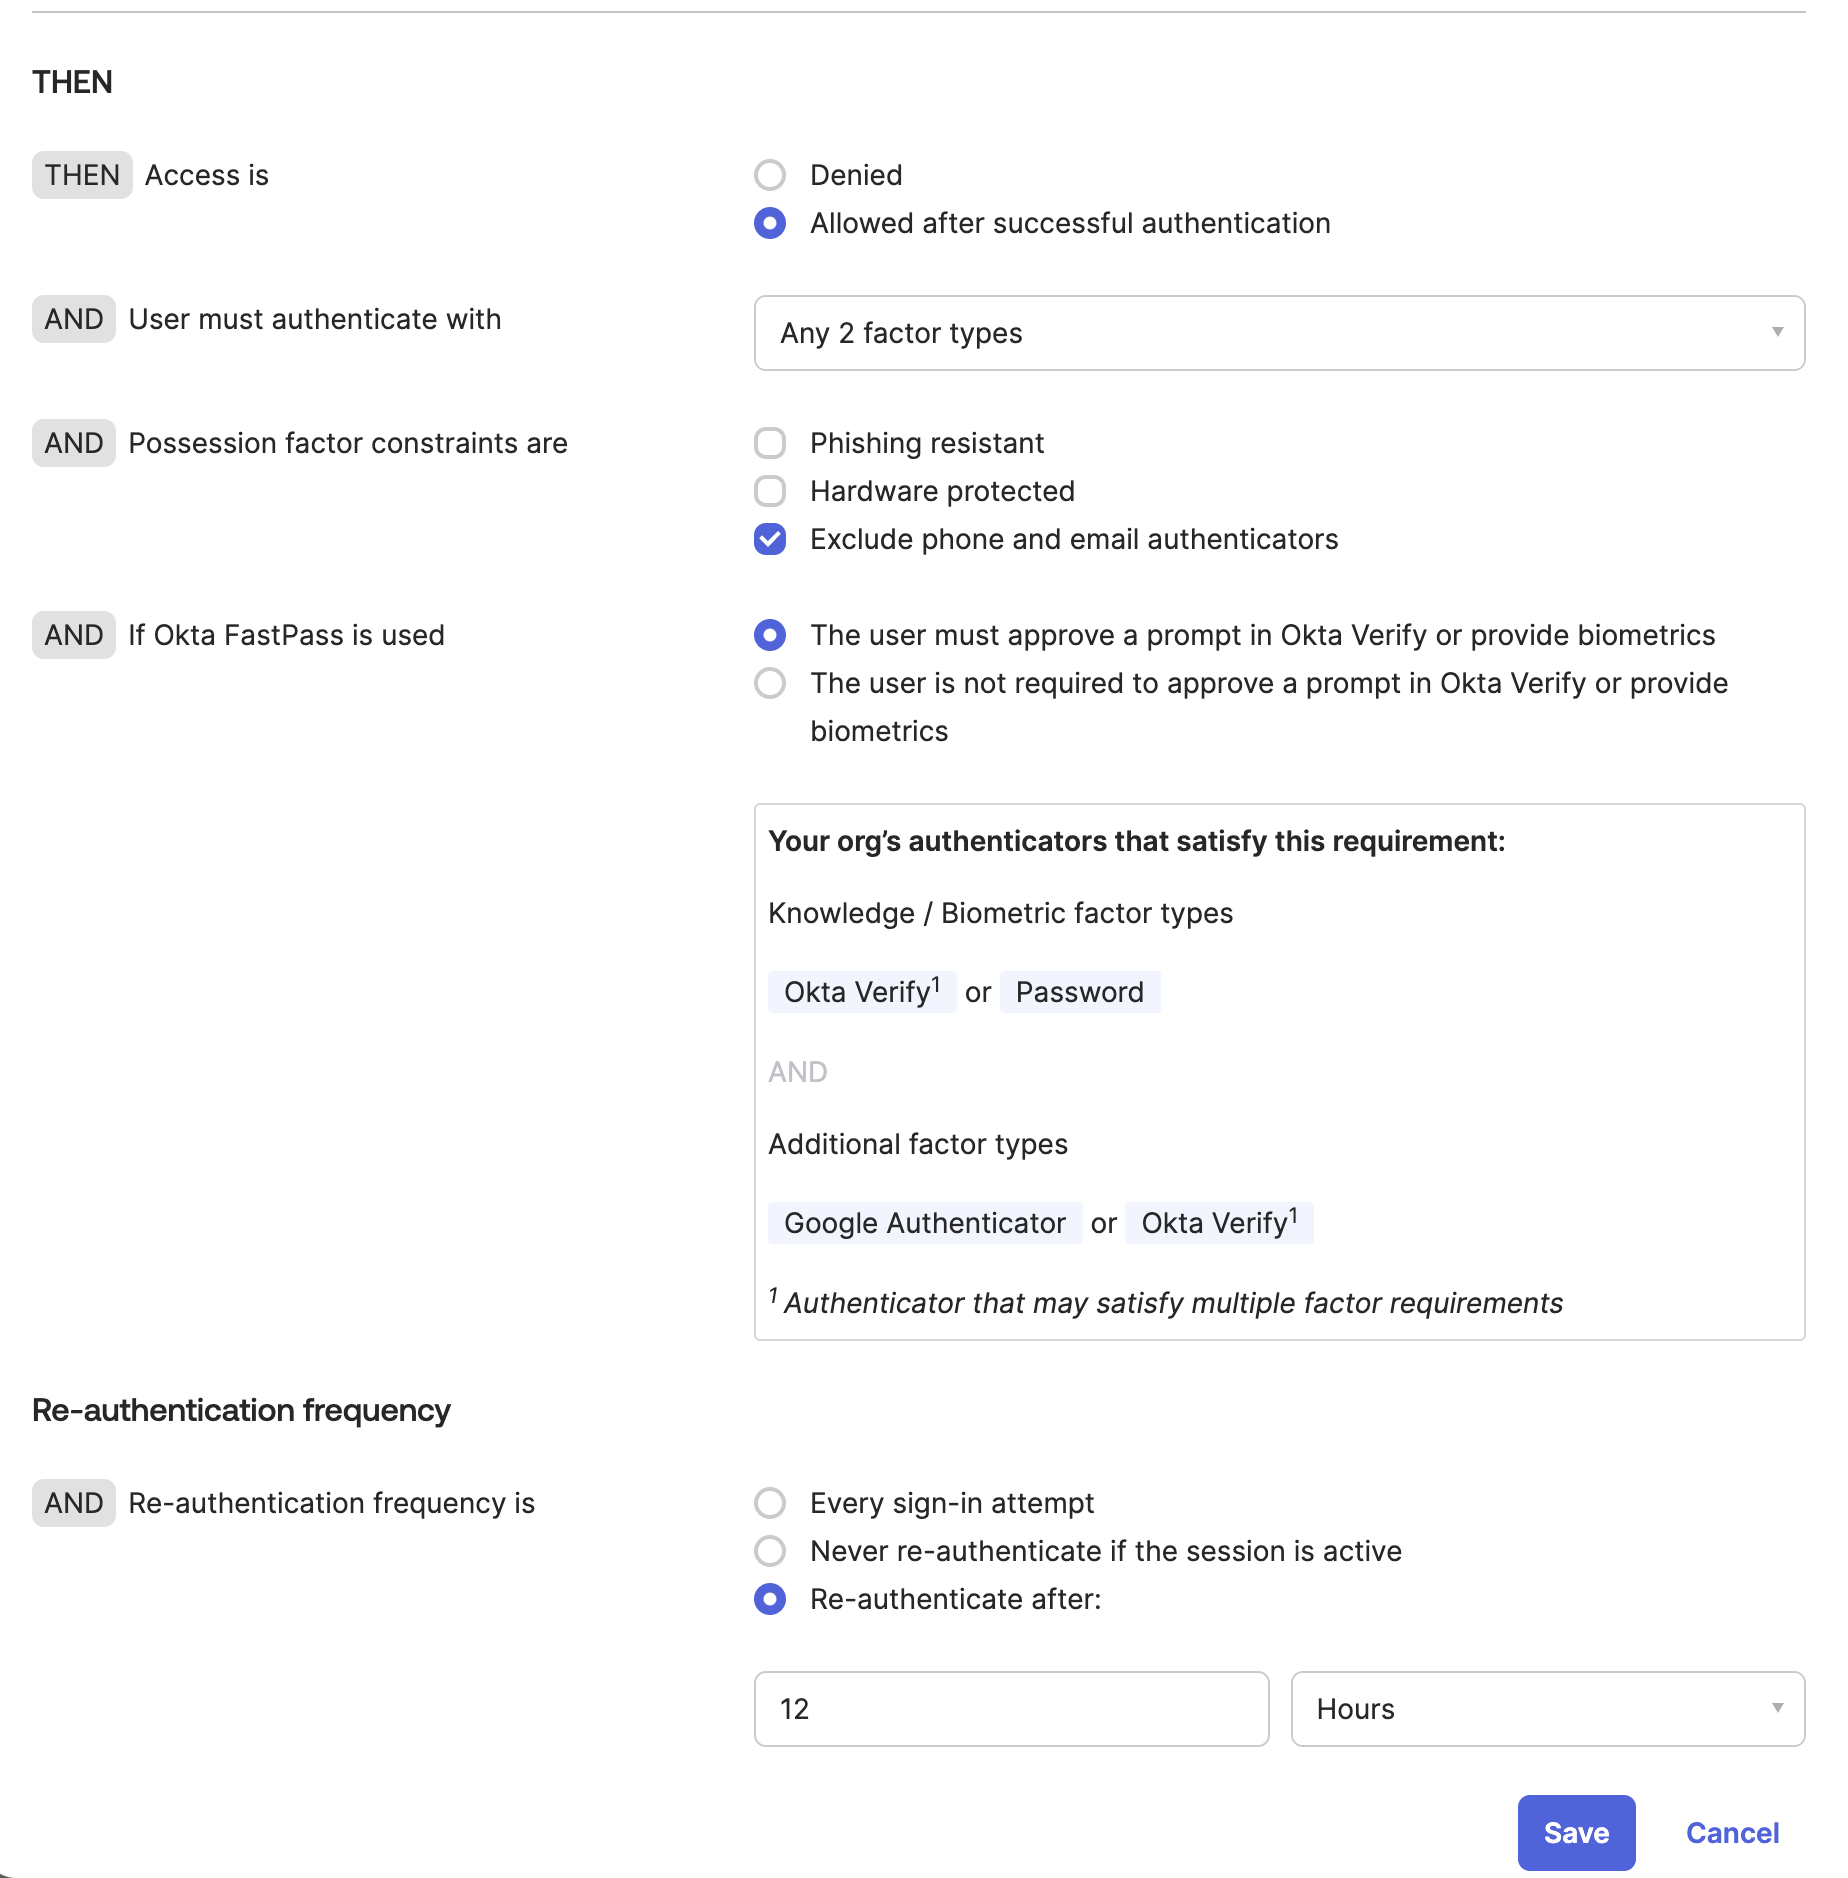
Changing the Catch-All Rule
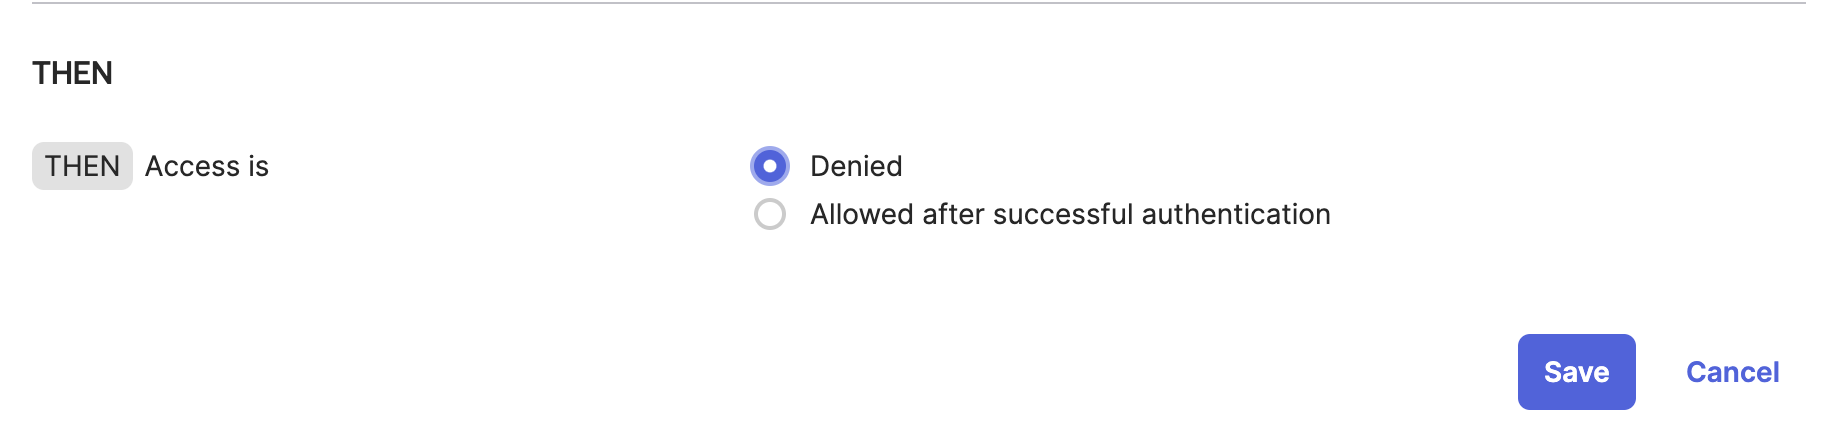
As a reminder, remember that the Catch-All rule fails to open (EG: Allows all users to access an application if they do not meet the above requirements). In real-world scenarios, you would want to set this from Allowed to Denied to prevent this behavior.
Before:
After:
This has caught me up multiple times in testing environments, even though I know that the rule should be changed. Personally, I feel that Okta shouldn’t be including a default rule in a brand new Authentication Policy, as you want to define the new Authentication Policy yourself without any requirements. It also creates some issues with automation aspects (EG: Think Terraform).
Changing Authenticator Policies
This is under the assumption that you do not have any special authenticator requirements (such as Duo, On-Prem MFA, RSA, Smart Cards, etc) and that you want to narrow down to only one or two authenticators based on usage.
For accounts that people use, the ideal experience is only needing to use a single authenticator or something that is a seamless experience. You want people to do something other than OTP code, FIDO, and Okta Verify.
Ideally, the two authenticators you want to use in a given scenario are:
- Hardware Authenticator / WebAuthN (EG: Yubikey, Google Titan, etc)
- Okta Verify with Biometrics
Hardware Authenticator’s will always be superior, and this shows if you look at various sources
For scoping service accounts, including the above, there is a third option you would possibly want to use:
- OTP / Google Authenticator codes
The reason for this is that while Okta Verify keeps track of what device and user is registered to a service account when using FastPass, the experience becomes degraded when using it for two accounts on the same domain. Frustratingly so. For example, when you have an admin and non-admin account in Okta since you can only select one user per Okta tenant to be the primary fast pass user, a lot of times, Okta will automatically attempt to log you in as your main user account when trying to perform admin scope duties. Since service accounts are generally shared between a team anyways, and since Okta Verify no longer allows for shared OTP codes as they used to prior to OIE, and it is a safe bet that someone will likely need this - it’s generally a good idea to turn this on as a backup method but leave the other options available if needed.
Outside of this, if you have other requirements, of course, implement those where required, but even in very regulated environments, this should be suitable.
Of course, if you are using something such as Kolide, you’ll deal with a fourth type of authenticator:
- IdP Authenticator
However, this will be covered outside of this post. Look out for another post soon once I have the chance to test and implement that service.
Consolidating all Application Sign-On Policies
As I mentioned previously, OMM was in place, and one of the tech support employees had set up dozens of different configuration policies. All meet the needs of specific requirements for each application. Unfortunately, some of these apps shared some configuration policies. This resulted in a merge of about 60 authentication policies after the OIE upgrade. Trying to verify roughly 60 different auth policies and the intricacies within each was a huge pain. Thankfully, this was an easy but slow resolution.
If you end up in a scenario like this, my suggestion would be to attempt to do the following:
- Identify Critical Applications
- Identify critical dates in the upcoming weeks that could be problematic when changing Authentication Policies for an application (EG, Any big meetings, shareholders, or proposals to companies).
- Identity-dependent applications (For example, do you use Cloudflare ZTA to access Applications?)
- Break down all applications into a spreadsheet and date them as applicable with their old and new authentication policies.
- Announce to all system owners the dates and changes that will occur
- Announce to all employees that changes will be occurring over the next few days or weeks
- GO!
- After 2 to 3 weeks, delete the old authentication sign-on policies to clean up your instance.
This way, you can roll back an app or the plan, if necessary, rather easily without any major issues.
Enabling FastPass
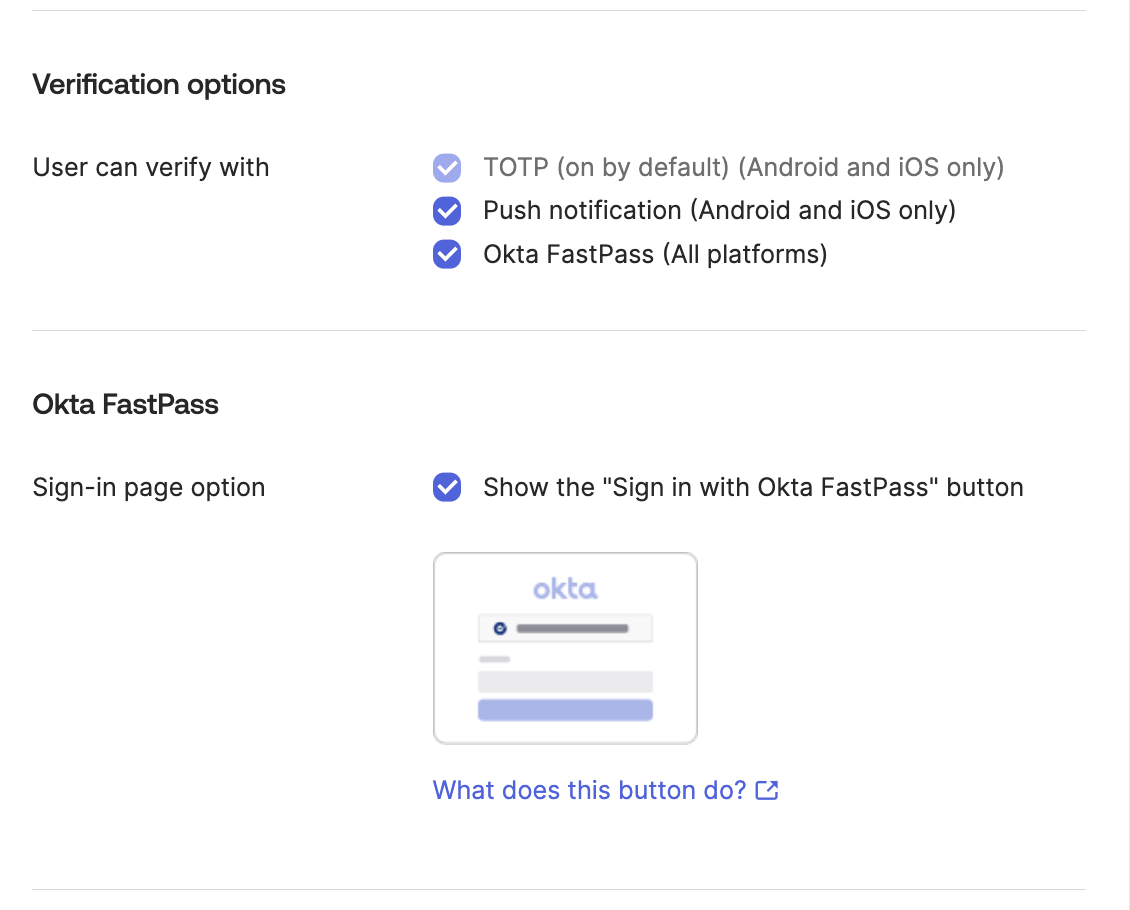
Unfortunately (or fortunately), the FastPass button is a global setting and cannot be modified individually or at a group level. So, you will want to do this after configuring several things above and before attempting to enable password-less authentication.
With that said, enabling FastPass is quite easy; just make sure all of the options are ticked below, and then set your User verification setting to either Preferred or Required (the best choice) when you are ready to go.
Using Automation To Determine the Rollout of FastPass and Device Registration
You will likely want to see and determine a way to monitor:
- How many Devices have registered into Okta’s UD
- How many of those devices show up as Managed vs Unmanaged
- Make a report based on department, team, management state, unmanaged state
There are various tools to do this; you could use:
- Gabriel Sroka’s Console add-on and various JS scripts that he has posted in #okta on MacAdmins, for example here
- Use my Okta Workflows Automation
From there, cross-reference the CSV with the full employee list, MDM inventory, or asset inventory database to make sure all devices are getting registered.
Enabling Password-less authentication
Initially, you’ll be looking to set up password-less authentication to try and “sell” the upgrade to our employees and make their (and, let’s be honest, our) access easier. However, to do this, you’ll want to make sure everything is properly configured and set up into Okta Verify at the least.
At the point in time of rolling this out, a very helpful resource was the japanese blog post that had more guidance than Okta’s own page.
However, since then, Okta has released a video outlining the “How To” in several situations. It makes for a great initial understanding of Password-less Authentication.
Because of this, it might be beneficial to do the following:
- Created a new Global Session Policy that is dedicated to a specific group of employees for testing
- Create another Global Session Policy that applies to a rolling group that will be added over automation
- Once your rollout is complete, change this Global Session to the Everyone group or the group that is necessary for your environment.
- Configure “Any one factor” as an option for login with specific rules on Risk Level based situations (please see Update note below)
For High Risk Scenarios, always require Password & MFA| Please see the update belowFor situations like noted in the behaviors below| Please see the update below
- Once complete, update the rolling group to apply to Everyone
The rolling group is used when adding users via Okta Workflows after a specific date or time based on the criteria from collecting employee accounts and details when everyone was comfortable turning on password-less authentication for the employees. This method will also come in handy as you attempt to get employees to sign up for device trust as well (though this will have to be done with a different named group).
Update 2023/12: As mentioned, when initially writing this and reading the documentation for Okta, Behavior Context was something that was undocumented for use in Authentication Policies at an App Level. Now that this can be done, it is much better to include that in the Authentication Policies rather than the Global Session Policy. Then, apply the behavior for what you feel is necessary per the high-risk situation.
Enforce Device Trust
Are you still here? This is already a long blog post.
Now that we have all of our configuration options done and completed, It’s time to switch on Device Trust. Arguably, you can have Password-less authentication after or before Device Trust, and it likely makes more sense to have it after. However, it is an easy way to “sell” configuring Okta Verify correctly to those that you need to set it up with.
Sitting down with Security
Now that you have the structure of everything set, it’s time to sit down with security and double-check that:
- The intent and plan are still good to go
- The overall configuration is approved and signed off or verified as being okay It never hurts to get a second set or more eyes on the policies and changes you have done
If they approve everything, double-check with the next team.
Sitting down with Compliance
In the same way, double-check that everything is still approved and that the process or any regulations have not changed. Get their sign of approval (if needed).
Again, Sitting down with Tech Support
Lastly, sit down with Tech Support and explain how this change will affect them and the employees they support.
- Devices not in your MDM will be unable to access access services that they need to login to going forward
- And eventually, a plan to log employees out of services they are already logged in to will take effect.
- How to assist employees with Device Trust Issues
- Why employees can no longer log in to services from personal devices
Verifying all Devices are company owned
Now that everything has been configured, you likely have a lot of new data and devices that you were surprised to show up on Okta’s Devices UD page.
Device Clean Up from Jamf & Intune
In addition, now that you have all of this data, you can set up a project to spend time cleaning up and getting old devices returned to you, whether that is from MDM, ITAM, or another service.
Verifying the use of Windows Hello PINs and or Apple FaceID/TouchID on devices
Depending on your choices, it is also helpful to remember that employees will need to remember their Windows Hello Pin if they use it over Windows Hello Face Recognition. In the same category, Tech Support will also need to make sure that employees are using FaceID or TouchID on Apple Devices based on the biometric requirements you have configured.
This could be as simple as just asking an employee when they stop by the Tech Support “Bar” or office: “Hey, when was the last time you used a PIN code to log in to Windows?”. This is something non-judgemental and non-confrontational, and if the employee doesn’t know the answer or says they forgot their password, you can easily set them up with a new code before Device Trust is turned on for them.
Getting devices properly enrolled in MDM
Deploying the MDM Profile in Jamf and Intune at the user level made us work through our devices to make sure that they were set up properly with users capable of receiving user-level scoped certificates.
For example, some situations that occurred while we were rolling this out:
- An employee had an ongoing/existing project to deploy Jamf Connect on Mac devices that would initiate during Setup Assistant. This led to us contacting the affected employees to send out user-scoped certificates to about 40-60 devices in our fleet, as the initial user creation with Jamf Connect does not make them MDM capable. This was solved by having the employee re-run
sudo profiles renew -t enrollment. This is all well and fine, but employees shouldn’t have to experience this to begin with. For example, Platform SSO (within Okta, known as Desktop Password Sync) should be sufficient for most use cases, especially as V2 of Platform SSO continues to roll out and improvements are made (such as JIT/automatic user creation). - Double-check your VDI infrastructure if you have one, and confirm that it is working as expected. This might involve the use of ProServ if it does not.
- For example, our Windows laptops work perfectly, but for some reason, VDI systems did not want to cooperate even though the configurations were applied.
- Double-check that your MDM Deployment explicitly excludes devices that followed a “Bring your own device” path
- Unfortunately, sometimes the easiest way to fix a problem is not necessarily the correct way. This can be a common problem, mainly due to needing to be made aware of the differences. In that situation, educate your employees on the differences and how it affects the overall rollout.
If you have more ideas, feel free to leave a comment below.
Informing employees
It’s best to inform employees in multiple ways; some examples:
- Global Slack Messages in announcement channels, with instructions on what to complete on their Okta Verify client before the rollout
- Inform employees of the day that the Device will start
- Video All Hands announcements to complete these changes
- 1:1 Slack Announcements: communicate this as a DM directly to the employee
- Finally, an email
- First, directly to the employee
- Second, after a few days, to both the employee and the manager
This should be a sufficient plan as long as your internal documentation and “how to” guide are straightforward and simple.
Problem Employees
There is always that one. Or two. Or 30 in this case. What are you going to do? I don’t think that is a bad ratio, though.
Using Automation Tools to auto-add employees to Device Trust
Most of what you have seen so far has all been done manually; however, adding 3000+ employee accounts by hand to enable device trust is not fun, and neither is potentially locking 3000+ people out of their accounts all at once.
So you’ll likely want to deploy this in a staggered manner across different regions, types, etc. You will also want to be mindful of the Service Desk-to-region ratio and responses. \
First, enable those previous Device Trust rules that were set up and disabled (or enabled for the testing group); now add your Device Trust-based rollout rolling group to those policies and confirm they work by placing your Tech Support Team in them. Ask the Tech Support Team to either log in from a non-managed device or work together and try removing the certificate from their device to test the expected behavior.
Because of this, I developed a very simple Okta Workflow Automation for a one-off approach that:
- Reads data from a Google Spreadsheet
- First Name
- Last Name
- Slack Username
- Department
- Region
- Day of Roll Out
- Adds user to the required Okta Group for the Device Trust Policies
- Sends employees a Slack message notifying them that their account is now enabled for Device Trust, and if they have any questions, they reach out to their Local Tech Support team
You can find the Okta Workflow for this here.
You will need to update the relevant areas where green notes or $VARIABLES are located.
Access Testing Tool
Update 2023/12
Okta, since writing this, has released the Access Testing Tool. It is super handy to help determine issues within an Authentication Policy, or configuration. However, it does not account for things like Behavior Detection.
There is another caveat: Employees with Custom Admin Roles may be unable to use the Access Testing Tool. It is a bit of a setback if you have limited Tech Support’s capability to perform only the functions they need.
That said, I have found this tool very helpful since its release. I would highly recommend using it wherever possible in your environment.
Some challenges with our rollout and what we learned
Our path to getting devices into a management state in Okta was more of a struggle than required. This boils down to several things, but ultimately, two things:
- Tech Debt
- Communication & Listening
- Aggressive Timeline
I won’t go into all the details (primarily because I am still working here). Still, I learned how to handle some new situations, how to approach new topics, and the mutual trust that people have in you (both above and below) & autonomy to execute can go a long way (especially, if it wasn’t given to you in past jobs when it was lacking). I am super thankful to work where I do now, and it’s been an awesome experience so far! I wouldn’t trade it for anything.
I will go into one, though, which I think is relevant no matter your industry.
Communication & Listening
After completing all the prerequisites to turn on everything, even after months of communication, multiple messages in company-wide channels, direct messages on Slack, video announcements, zoom meetings, and finally warnings stating that they would lose access if they hadn’t followed directions - there was a 50% adoption rate of the way through based on our statistics and numbers of our devices after 3 to 4 months in.
Communication is a 2-way street; no matter how much you have communicated this change (and no matter from whom), if people don’t want to listen, they won’t listen.
Updated 2023/12: Maybe this could have been solved by turning on Device Trust sooner and “letting it ride”, but Okta’s non-managed or fail-closed device trust message wasn’t exactly super intuitive to the end user when the rollout was being performed and didn’t allow any customization, now this does. You can link to an internal page for support links or communication.
Summary
If you would like to review any other aspects of what I have learned, please contact me directly over various channels. You can primarily find me on MacAdmins or Okta Admins (unfortunately, no Slack Invite link).
I hope this post helped in some way. Yes - it was hella long (also why it took so long to write; motivation was lacking several times), but hopefully, it provides you a meaningful way to hit the ground running with Device Trust, assess your roll-out plan, potentially think of hurdles, and also see how to roll out FastPass (still going to keep calling this Device Trust, no matter what Okta’s terminology says) and Password-less Authentication.
Learn from my mistakes, help others learn, and share info when you can.