
Introduction
Update 2023/12:
I would not recommend the use of this anymore. Look at https://servarr.wiki
I have been utilizing this configuration for a long time, nearly two to three years now. However, I just went about restructuring it to work completely within Docker. My biggest hurdle was rclone and mergerfs (which looking back at it, were not that big of a hurdle, but, wanting to make sure that everything was worked out and properly configured in a stable configuration) without breaking the system 5000 miles away.
- Introduction
- Requirements
- How it all works
- Conclusion
- Awesome resources
Requirements
Where to obtain media
- Library
- Stores (such as Best Buy, Media Markt, etc)
- Digitally (iTunes, etc)
- Any other means
Automation tools
Servers/Players
- calibre
- calibre-web
- Plex, emby, kodi (Your choice/favorite - will focus on Plex here)
Other
- rclone
- mergerFS
- youtube-dl
- nginx
- Let’s Encrypt
- Google Workspace Enterprise / G Suite account
- JDupes
- Various scripts
- FUSE installed on the host
- screen
- Ubuntu 20.04.3
- Docker
- Docker-Compose File
How it all works
I am going to assume that you already have the docker-compose file up and running. If you do not, I assume that you have some knowledge of how to configure docker-compose files. This is mainly used as a reference for those that may find it helpful - this is not intended to be a full on guide.
Host System
I have a host system running the following:
- 48 GB of ECC RAM (yes, I know this is overkill)
- 12 Core CPU (yes, I know this is overkill)
- ZFS Array mounted at /mnt/pool
- /mnt/pool/storage - not relevant to this guide, bulk storage array.
- /mnt/pool/media - 8 TB staging environment, media files that have been processed and are ready for upload to Google Drive.
- /mnt/pool/downloads - 16TB processing environment, you can make assumptions as to what this is for.
- 1TB SSD Cache Drive
- /mnt/cache/ - Includes a config files, rclone cache, etc.
- FUSE
FUSE
This is pretty simple, just run apt install fuse from the command line, and then edit the config file like so:
|
|
JDupes
One of the only tools that I have not seen a properly documented docker image and open source repo for. Also - I don’t believe this would work super well as a docker image as it would have to be cron scripted. To install this, run apt install jdupes.
JDupes is a tool to find duplicate files and either remove or hard link them.
I use this in combination with screen, mainly to be able to reattach if the search runs long. I stick this in crontab and it looks like:
|
|
This recreates all files found as hard links, which should help reduce the overall size of the Plex Server. You can fun this across multiple application instances if you want. My Plex server is my largest concern however - as at one point, it was taking up the most space with images.
Docker
**UPDATE 2022-10-25: I have posted a new docker-compose file after cleaning up some things and optimizing some new services. I have not updated the rest of this blog with any of those details.
I am going to break this down, in how I think this should be planned and how the docker-compose file is written. Starting from storage, then proxies, then applications - as to me this makes the most sense when planning out a system or service file.
Planning a path structure to use throughout all services will come in handy - as the more sane/structured the paths are, the easier it is to build upon. Using several different paths results in potential problems, and then you end up with some of the volume mounts I have listed - just to make sure things are backwards compatible. So plan out the folder structure first. See the Servarr wiki for a very robust/ideal guide on how to handle this.
rclone
I searched for quite some time through blog posts, and using Google (which maybe my googlefu sucks) on how to integrate, and at the time I attempted to to do this about a year ago, this rclone docs page didn’t exist in the way it does not. Admittedly, this walk through does not use the volume storage (EG: Docker volume overlay) to describe the mount point area, primarily because my entire system is not still a mix of both SMB shares for local sharing and running certain scripts off files to validate things are how I want them to be. This configuration or explanation can be found here - on the rclone docker docs.
What I am doing instead is sharing the volume to the host. Yes, this might be a cardinal sin with docker, however, my first step was only to just validate that rclone and mergerfs were even compatible with a media automation system where the rclone and mergerfs mounts didn’t reside solely off the host using systemd or manually run.
Configuration / Trials & Errors
Initially, I tried using the MumieHub’s Rclone Mount container. This worked, however, I was receiving tons of IO issues, which would eventually lockup my machine due to Docker Volume Overlay problems - which then required the machine to be power cycled. This is more than likely something I did wrong to induce the problem, but - it ultimately didn’t work for me. I made the switch to hotio rclone container.
Now the biggest thing I have an issue with with hotio’s releases, is the utter lack of documentation / additional information that can be found on their docker containers. As an example. Yes, most of the base information you need is there, but it isn’t a very welcoming page. I use docker a lot, but, that doesn’t mean I haven’t wrapped my head around every little piece of detail associated with the tool.
Creating the config file
First, start creating your config file using rclone config on another machine. Ideally this machine has a web browser and a graphical interface to be able to authorize the oAuth approval for Google.
Once the config file is completed, transfer it to the host system where your rclone config folder/configuration file will be placed. In my case, I am using /mnt/cache/rclone on the host system and mapping that folder to /config/ in the docker container.
Creating the docker-compose section
So lets explain the docker-compose file below.
We are using the hotio image hosted on Github, as specified by the image: line.
We are specifically calling the container something relevant to the purpose (EG: rclone-gmedia as opposed to rclone) of the use-case and container.
We are calling in the environment variable to specify where rclone will read it’s configuration file, so if you need the ability to adjust it to somewhere other than /config or use a different file name compared to .rclone.conf or rclone.conf and would like to use storage-backend-gmedia.conf that can be possible.
We are adding the equivalent of “root” to this docker container so it can add mount capabilities and perform other functions required for the docker container to start correctly. This is generally a bad practice, and I believe would likely be solved by the the inclusion of using the volume driver to a degree. You can see why this is from a stack overflow post here.
We are preventing/removing the AppArmor confined limitation within Ubuntu, which is described here in Docker’s support/documentation page. Unfortunately, using the default docker security opt profile, prevents rclone from mounting onto the host. This is likely solvable by using the rclone volume backend driver, or by creating a custom apparmor configuration as described in the previous link.
We are allowing the container to access a “device”, in this case fuse. This is outlined here in the docker-compose documentation.
We are attaching our host folder path to volume mounts within the container. You will notice that there is a :shared label on the end of the first mount. This allows the mount point to be operational in both directions. The Linux Kernel documentation website outlines how this works, and in my opinion, has a better example of how this is described - compared to the docker documentation.
Finally, since hotio’s entrypoint is rclone, we can specify specific options and append it to the entrypoint by using command: and then the equivalent CLI command. So in this example below, we are going to be mounting the “gmedia” storage backend, directly to a folder that exists on both the host and inside the docker container (and indicating to Docker that it is shared to the host by using :shared).
I did find a slight problem (when I actually had the volume mount for my log folder listed), that I couldn’t get log files to write, this is very likely a permissions problem, but, considering that the log is output to stdout anyways, it is a non problem for me, as eventually, these will be taken and fed into a logging and alerting tool.
You will notice there is a logging option here, that is not in use at the moment - this will come when I finish the monitoring aspects of my system.
|
|
Note, that some of these command options may not be best for your setup. Please adjust them to your needs.
mergerFS
We are utilizing mergerFS to make a cohesive and easy to use file system between filesystems. If you have not already checked out the project, I would really recommend doing so - it’s a pretty cool piece of software and the developer is super friendly.
Configuration / Trial & Error
There was not much trial and error here, as once I had a better understanding of how specific containers worked with hotio, this was pretty straight forward - but none the less let’s go over the entire configuration and why we did it this way.
Creating the docker-compose file
To explain the example below.
Again, naming the service something appropriate so that it can be referenced logically/understandably in the future. Given that I have three of these in use for two services, it is important that they be named correctly.
Pulling the latest image from hotio for mergerfs, in a stable/production environment - it would be helpful to tag the release with a specific version. But I like to live on the bleeding edge and go fast.
If the container exits for whatever reason, we want it to restart.
Again adding the System Admin capability as described in the rclone post, not the best idea, but I do not have a good way around this at the moment. Open to suggestions from the community however for alternatives.
Again, adding access to the fuse device, and security opt, and an unused labels function, that will also be utilized once the monitoring systems come up.
Again, with hotio’s, the entrypoint is literally the binary - so, we can utilize any existing command line entry or shell script, and attach everything that you had after mergerfs. In this case, I prefer to mount the local disk first - because I don’t want to run into:
- Speed / Upload delays to write full data transactions to Google Drive
- Want to make sure my staging array is the default folder location for all files, so if I am doing something new, I can examine my mistakes before writing anything to the cloud in encrypted storage.
In addition to the above, I am using the following mount spaces here that I have found work best for my system and internet setup (given that the rclone mount is live streaming and caching files locally).
Again, we are utilizing these mount points so that the container can read and make the mounts accessible into the host. However, there is something different about the mount point here - we are using :slave. In a similar explanation as earlier - we are utilizing this to make the mount accessible in only one direction but if something is remounted inside the docker container, it doesn’t remount or make changes upstream to the original mount path. This may be overkill, but I figured it was necessary in case some issues happened with the mergerfs mount at the root of the /mnt/rclone paths. Again, the Linux Kernel documentation has the best explanation of this, and I would highly suggest reading this here.
Finally, we have the depends_on: function. Obviously, we can’t mount any of these folders into the command, if they are not actively up. What this does is wait for the following docker containers to be in an started, so that we can then start this container. If we wanted to go into more detail and ensure that the containers would also be up by the time the mergerfs mount container started, we would need to look at the following.
|
|
Nginx / Let’s Encrypt / SWAG
Initially, I used a docker-compose file that looked like this:
|
|
While this worked pretty well, it was not very easy to use - and consisted of a long shell script to automate the initial configuration. Least to say, it was not ideal. Now, I have switched to LinuxServer’s SWAG.
Changing the index and 404 pages
The first thing I changed - which I was absolutely not a fan of - was the hideous default 404 and index pages. As they are not only an eyesore (some bright yellow page), they are customized for LinuxServer rather than just using the default pages. So I promptly removed those and added some blank .html pages in their place.
Enabling proxy-conf files
Since this container automates the certbot configuration (EG: Let’s Encrypt SSL Cert & Renewal) and comes preconfigured in a secure manner, I figured this would be a better use of my time in the long run, and as they have several functioning proxy-configuration files already pre-made (or made so that you can edit them easily) it seemed like the best option.
With the default configuration file located in this case under /mnt/cache/docker/config/swag/nginx/site-confs/default, it will look for two places for config files:
|
|
|
|
Meaning that all we have to do is move the files from /mnt/cache/docker/config/swag/nginx/proxy-confs that are called *.subfolder.conf.sample or *.subdomain.conf.sample to *.subfolder.conf or *subdomain.conf, like so:
|
|
Now that the configuration file has been renamed, it should be picked up by swag and you can use the service as you desire. Be sure to check out the config file however - if you need to rename anything, better to look it over. For example, if you are running multiple Sonarr or Radarr instances, you would need to adjust the Sonarr.subfolder.conf (or subdomain) file to point to container name being used for that instance (will show this later).
Now, in this situation, we don’t have to really create a Docker-Compose file, as the compose files are generally already created by LinuxServer.io. However, I wanted to add a few add-on feature (or as they refer to them as “mods”).
So my docker-compose file looks like this:
|
|
As you can see, there are two “mods” in use here:
-
Primarily, swag-auto-reload. This basically watches for file updates and automatically reloads the web server in case a file changes. As an example, this could be configuration files. To me this is pretty important, because if I make a change, I want it done in realtime, I don’t see a large need to restart the server once it is done, it should dynamically update - if this were more critical, than obviously some change management would need to be involved and live reload would not be enabled.
-
Second, you can see a geoip2influx that is currently commented out. The reason for this, is to hook into the monitoring system that I will be using going forward. Might as well get prepared.
As we will be relying on swag to be online or up to serve contents, one of the primary ways to guarantee that services will start without issue, is to depend on the mergerfs container starting correctly and subsequently have our downstream apps depend on swag.
In my use case, I prefer the subfolder in most situations, which means, for all downstream applications - we need to write a base url in the settings for each app. To make this simple, just use the container name/service name as the base url.
Sonarr & Radarr
This information listed here is similar for all the *arrs but I am going to focus primarily on Sonarr and Radarr, as those are the two most common applications in use. At this point, we only want them to be brought online so that they can be integrated with other applications.
Docker-compose configuration
This can be generalized for most of the *arrs.
Some key things to be aware of:
- Hardlinking issues with broken volume paths / default volume paths on linuxserver.io images. See servarr.wiki or TRaSH for more information.
- Configuring quality profiles to not capture “extras” - Radarr and Sonarr.
- Use naming schemes that match towards Plex’s new Metadata Agent - Radarr or Sonarr.
Some of these things are easily fixable. As an example, don’t use the default volume mounts provided by LinuxServer’s compose file, instead, make your own.
|
|
I have /downloads and /media volumes listed for backwards compatibility reasons, however, you should be using the /pool so that you can do Atomic Moves if they are on the same file system.
So now that this is configured, I would recommend getting your API Key now so you don’t have to jump back and forth.
To retrieve your API key:
- Open your Sonarr web interface (EG: https://domain.org/sonarr or https://domain.org/radarr).
- Navigate to
Settings, and thenGeneral. - Your Sonarr/Radarr API Key will be listed on this page under the Security section.
Prowlarr
Configuring Prowlarr will be very helpful to you. The reason for this, is because it will manage all the indexers you require to manage inside of the other *arr applications. You will not need to setup the indexer’s for each downstream.
First, remember to change the base url in settings if you want to access this via a subdomain.
Indexers
I won’t go into how to configure Indexers - you can find out how to do more of that here, however, I would suggest adding tags towards indexers. At the time of writing, Prowlarr doesn’t currently support syncing to Applications by Tags, however, it is supposed to be a planned feature. Currently, I am using tags that have two purposes:
- The indexer/tracker acronym or shorthand
- The purpose/main use of the indexer/tracker
A list of indexer acronyms / shorthand can be found here and here. I do not support the purpose of these sites for their (obvious) use. Remember, invite selling, trading, and other activities will ban you from private trackers. However, these are the only acronym lists that I am aware of.
So the purpose of this is two fold.
-
Let’s say I want to individually sync an indexer down to an application but the main purpose of that indexer isn’t purposed for that app. This allows for the ability to dynamically map an indexer back to the application.
-
I want all purposed trackers to sync down to the application. If the indexer supports movies, I want all movie apps to sync that tracker down.
Adding *arr applications in Prowlarr
Now that we have added all of the indexers we need, let’s get to adding Applications.
Use the previously copied API keys from the *arr in question.
- Go to Prowlarr’s settings here
- Configure Sonarr (as an example) like so:
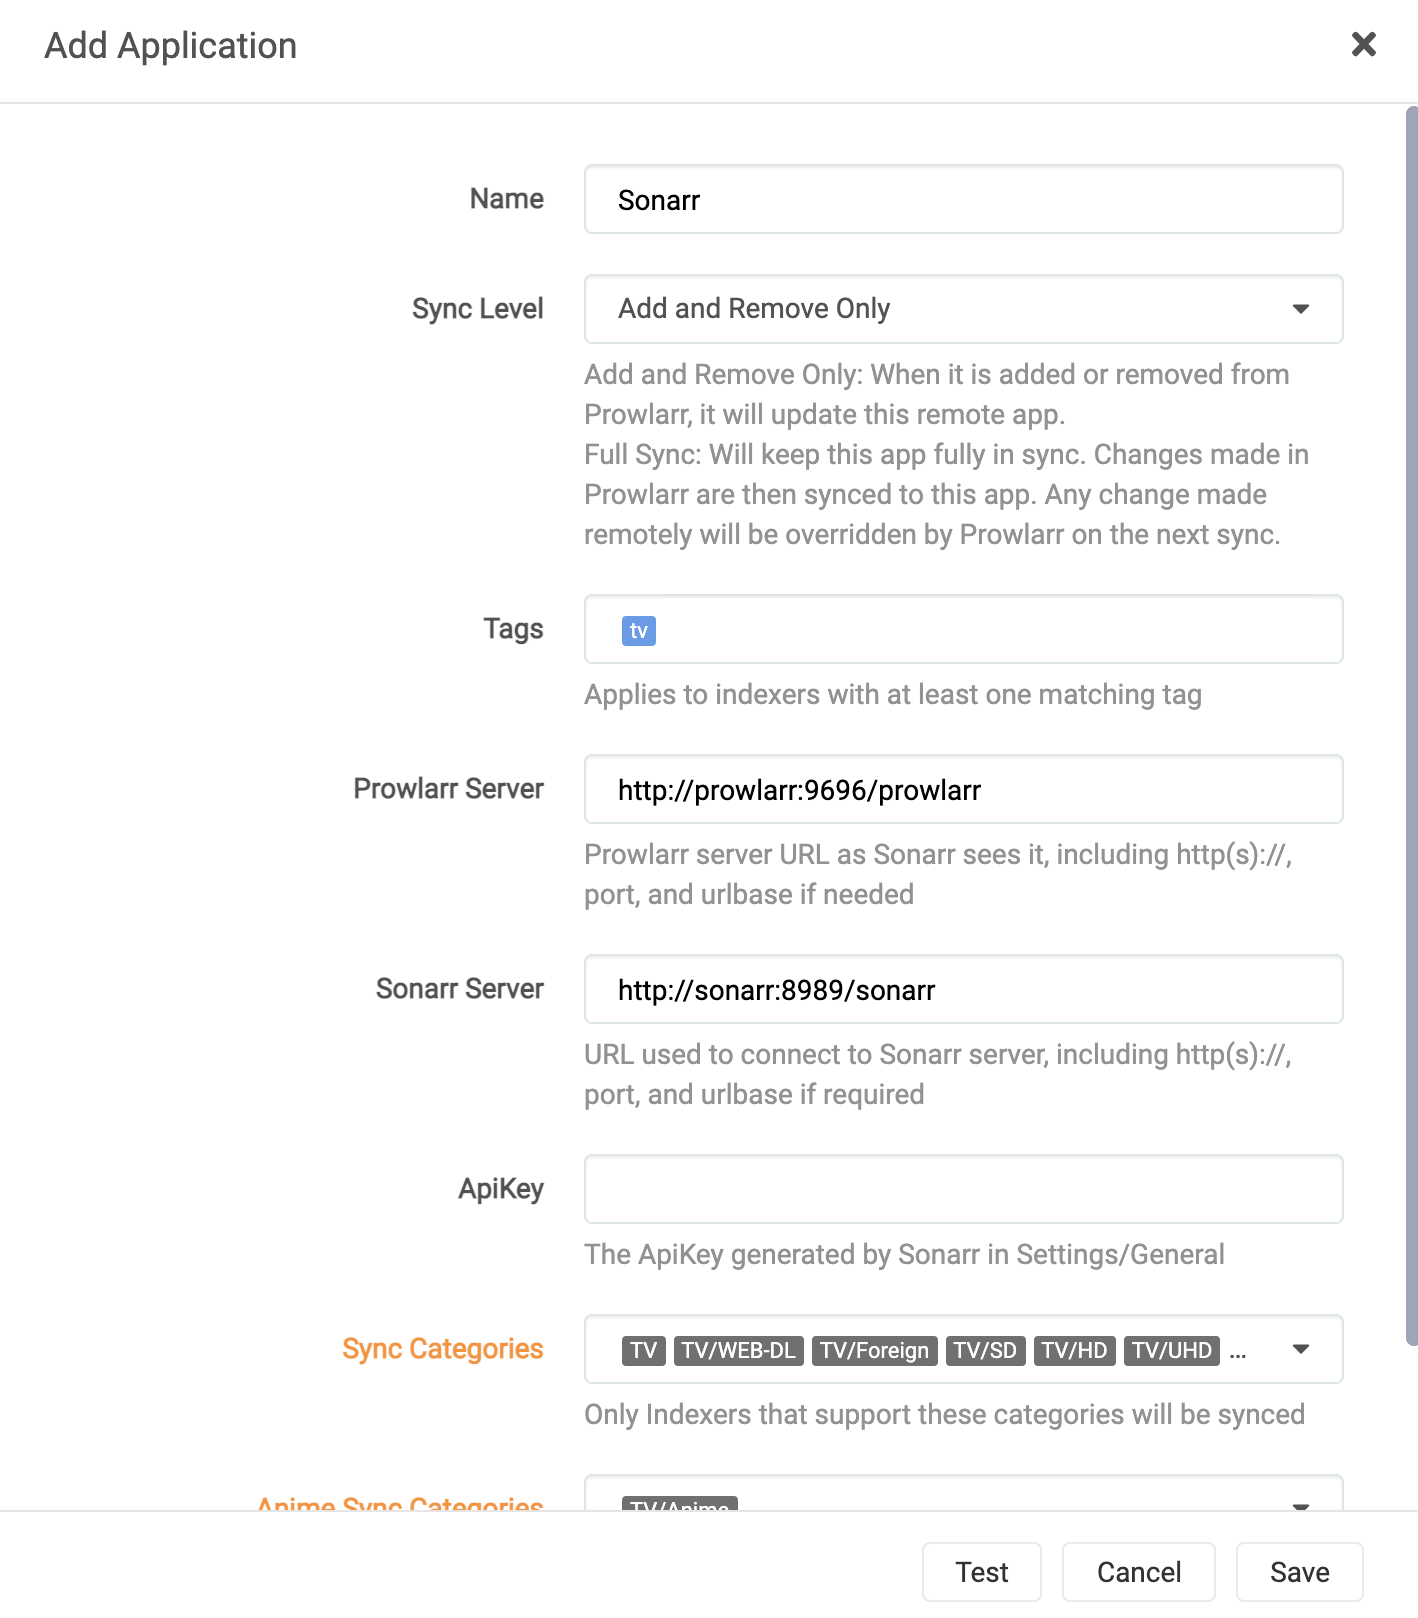
- Click
Save
I would really recommend leaving it to Add and Remove Only until Prowlarr is more feature rich. That way you can do some fun tricks in Sonarr & Radarr later on.
Download Clients in Prowlarr
Now we should add Download clients, so that whenever you need to do a manual search through all indexers, you can pass that data directly to the download client.
Please note, however, that download clients will not sync down to *arr related apps. This feature is tabled for the future. You can do this by following the below (for qbittorrent):
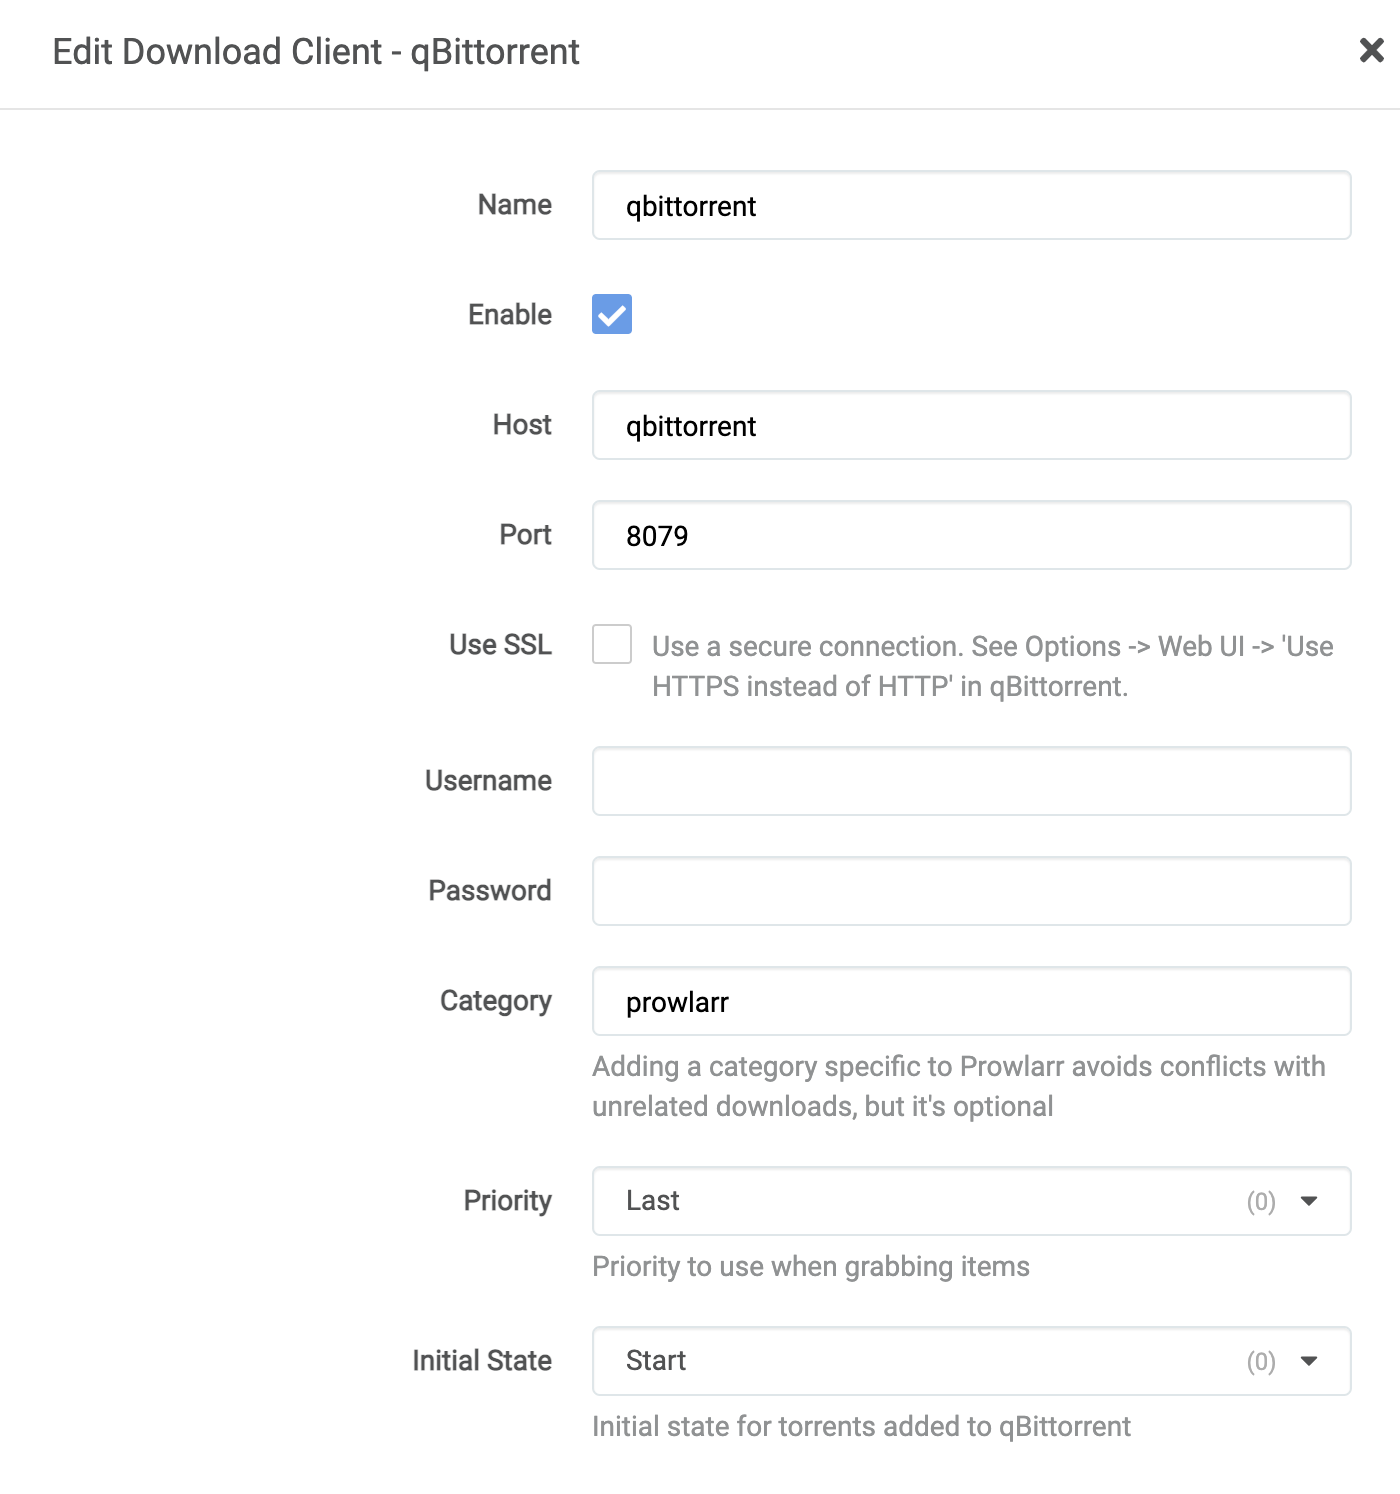
As these are one off downloads that will need to be managed, leaving the category as is should be fine.
Further configuration of Sonarr & Radarr
Configuring Indexers
So now that we have Sonarr or Radarr configured, let’s go to the Indexer’s URL for Sonarr or Radarr.
You should see your Indexers now automatically configured in the application.
Now, there are a few details here that causes some constraints. Since Prowlarr can’t add Indexer Flags or Seed Times, we need to configure this ourself. To start, click Show Advanced. Some of this may need to be up to you determine, but I will explain what I did with my indexers here.
First, I have indexers that support specific tags/parameters (such as G_FREELEECH or approved uploads). Now those indexers should take priority over a generic search. So I duplicate the base indexer into several and then add additional settings as necessary (Required Flags, changing the Indexer Priority, specifying a download client - though this should not be necessary).
Second, to not only not prevent H&Rs - the entire purpose of seeding data is to provide others access. I do have limited disk space however, and so I focus on supporting movie data over TV data. Because of this, I set Seed Time requirements for all indexers. For movies, I do this for two years (which is 825600 minutes) and for TV series, I do 1 month (which is 43800 minutes). This is done as TV Series download at a much faster rate/release, given that episodes release usually once a week. Movies however, only release once.
Now that we have these configured in the appropriate way you need/want, let’s add our download clients.
Adding download client to Sonarr / Radarr
Add a download client like below:
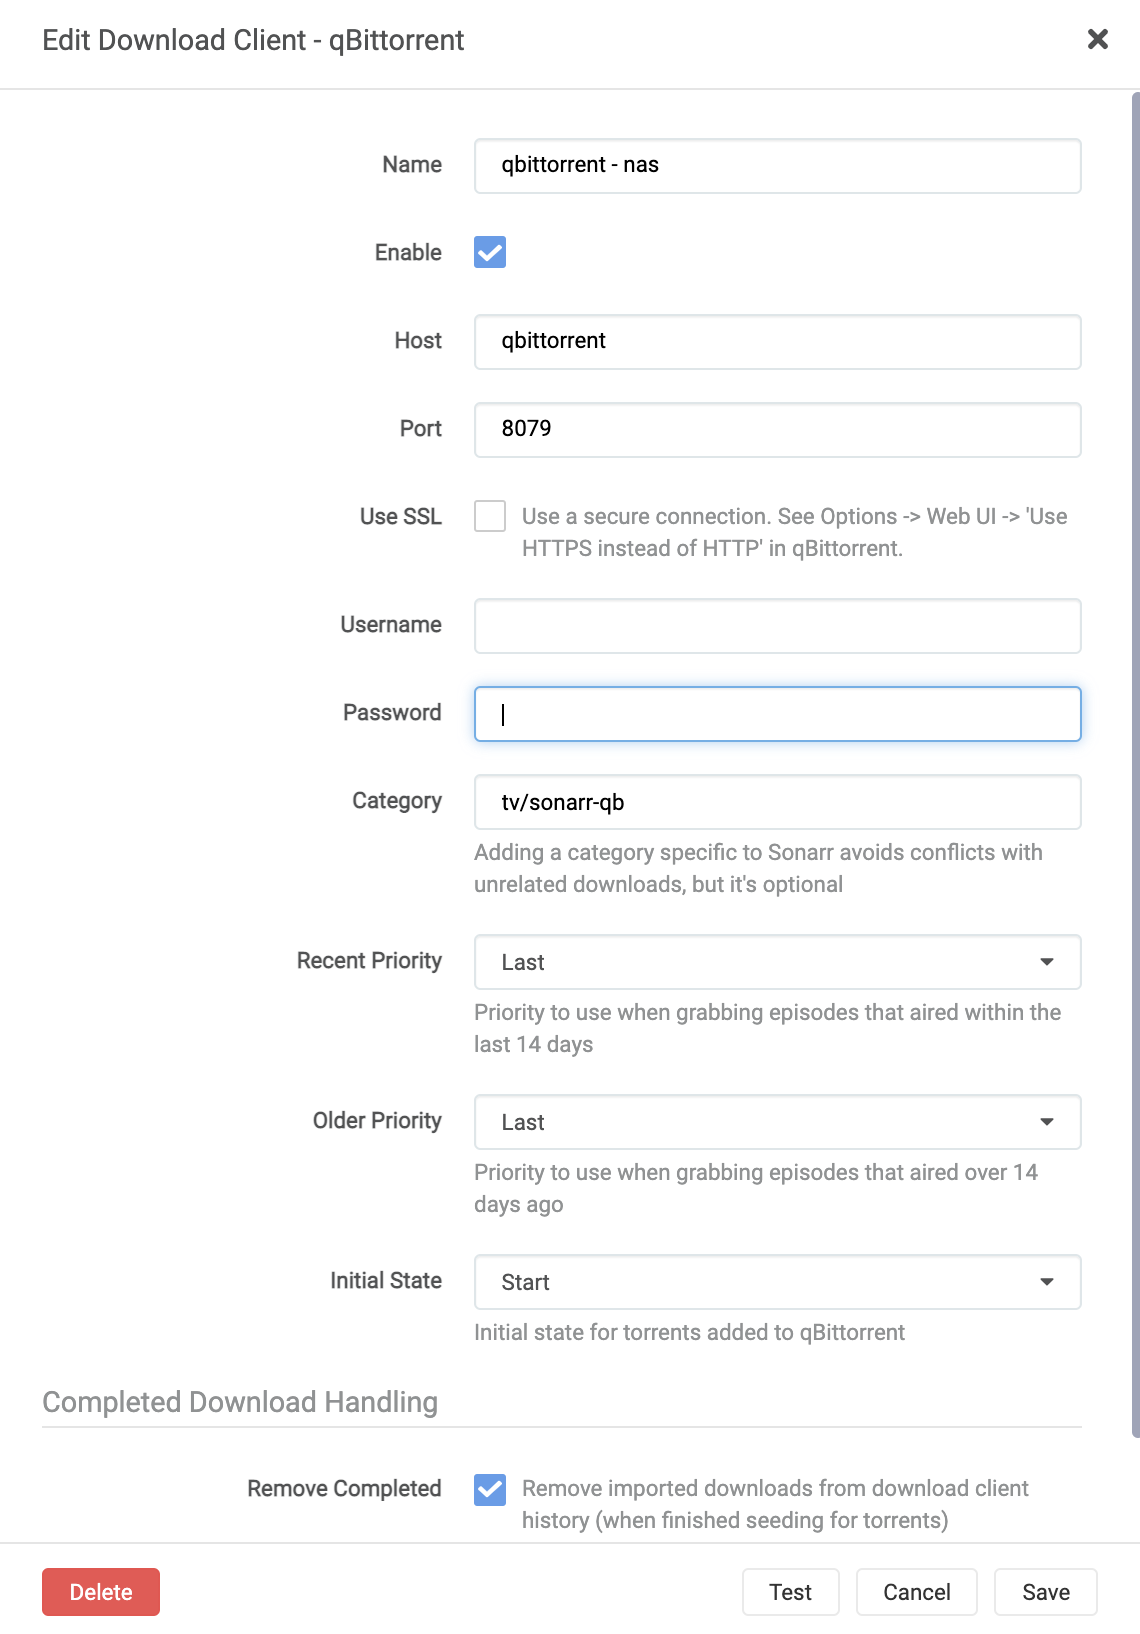
Fill in your username and password that are configured for qbittorrent. I have modified the category, to break down downloads into folders, meaning a more organized structure. This function exists in both Sonarr and Radarr. The categories that I use are as follows:
tv/sonarr-qb- TV Directory / Sonarr Download from qbittorrentmovies/radarr-qb- Movie Directory / Radarr Download from qbittorrentmovies/radarr-4k-qb- Movie Directory / Radarr 4K Download from qbittorrentmovies/radarr-4k-rt- Movie Directory / Radarr 4K Download from rtorrent/rutorrent
So as you can see, there is a pretty common naming scheme that can be used here.
Tweaking Drive Aggressiveness
It is recommended to disable Sonarr & Radarr’s drive scanning features, as they are generally pretty aggressive and the schedule task time frame causes issues with Google API limitations.
- Go to Sonarr or Radarr
- Go to
Settings, and thenMedia Management - Click
Show Advanced - Navigate to these two options and make sure they are set to the photo
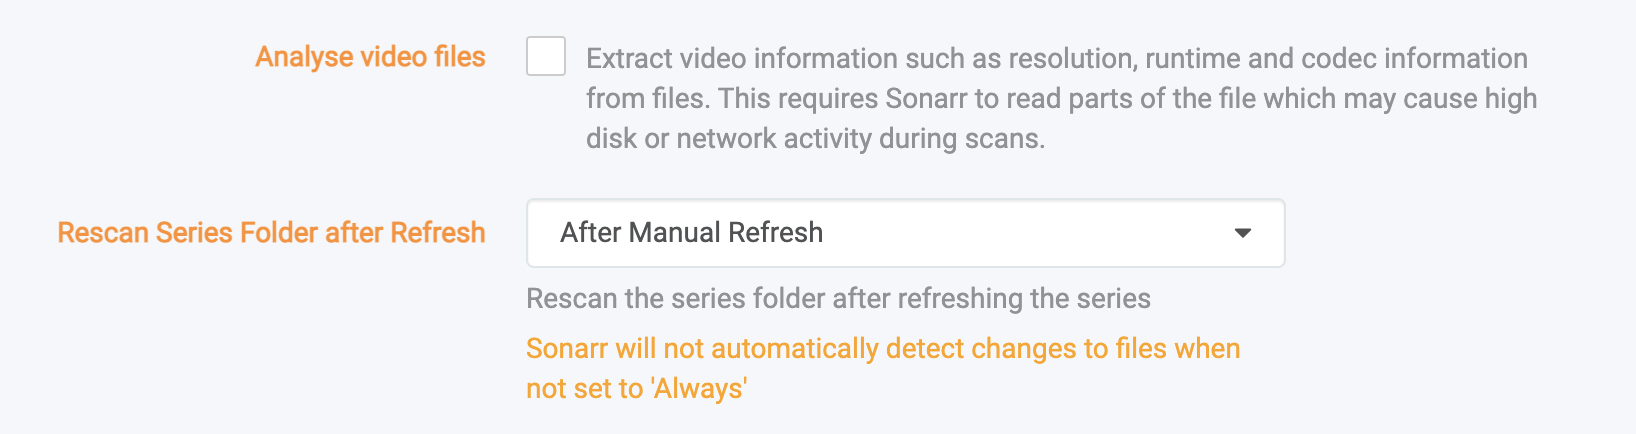
- Click
Save Changesat the top of your screen.
Configuring Trakt Lists
I have this setup in two ways:
Sonarr / Radarr Lists Feature
If you have a trakt.tv membership, I would highly let this automate new TV series you want to watch. This will automatically pull in trending, recently released, or other series from a list that you or others maintain. That way, you do not have to manually add any series to Sonarr or Radarr.
Traktarr Integration
I also use Traktarr, as this allows for more configuration towards the filters you want to use to import into Radarr or Sonarr.
For example, lets say I want TV series from several lists - but only of specific languages or countries, of specific years, etc. Traktarr provides slightly more functionality compared to the Sonarr & Radarr lists that work in this way.
Traktarr
The Traktarr Github Repo sample configuration file has a pretty strict criteria for adding data, so I would modify it to be a bit more welcoming of other networks or shows that you may want to add. Once we have the config.json file ready to go, we will want to place it where it can be read, which would be linked to where the /config folder would be. That will then automatically start pushing content into Sonarr and Radarr.
I am using the container from eafxx, which I believe is pretty well documented, and supported. I have had little to no problems with it.
The docker compose file looks like the following:
|
|
Plex
So now that we have the bulk of our automation tools configured and setup, let’s get on to Plex.
For the most part, the Docker container is pretty easy to get up from the get go. I have a Plex Pass subscription, so I purposefully utilize the Plex Pass docker image to get the latest image that is available.
Scaling Issues
As I have a scaling problem with my Plex Server, I need to host multiple instances. This is due primarily to Library scans and the time frame it takes to scan a single library from scratch if something goes wrong with the Plex Database. So I have three plex instances spread out - a Music Server, an eLearning server, and a Movie/TV server.
Add your libraries
You will configure your Plex libraries to point towards the proper Movies or TV Show (or other) content. In the case of the example of the docker-compose file below, that would be /data/mergerfs/Movies or /data/mergerfs/TV Shows.
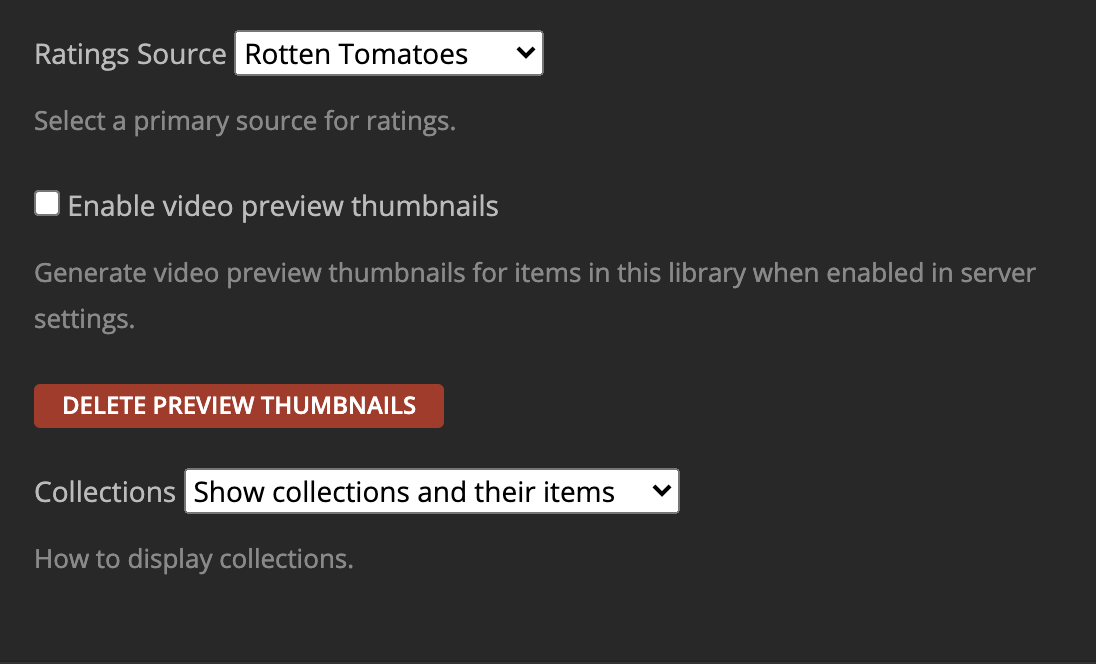
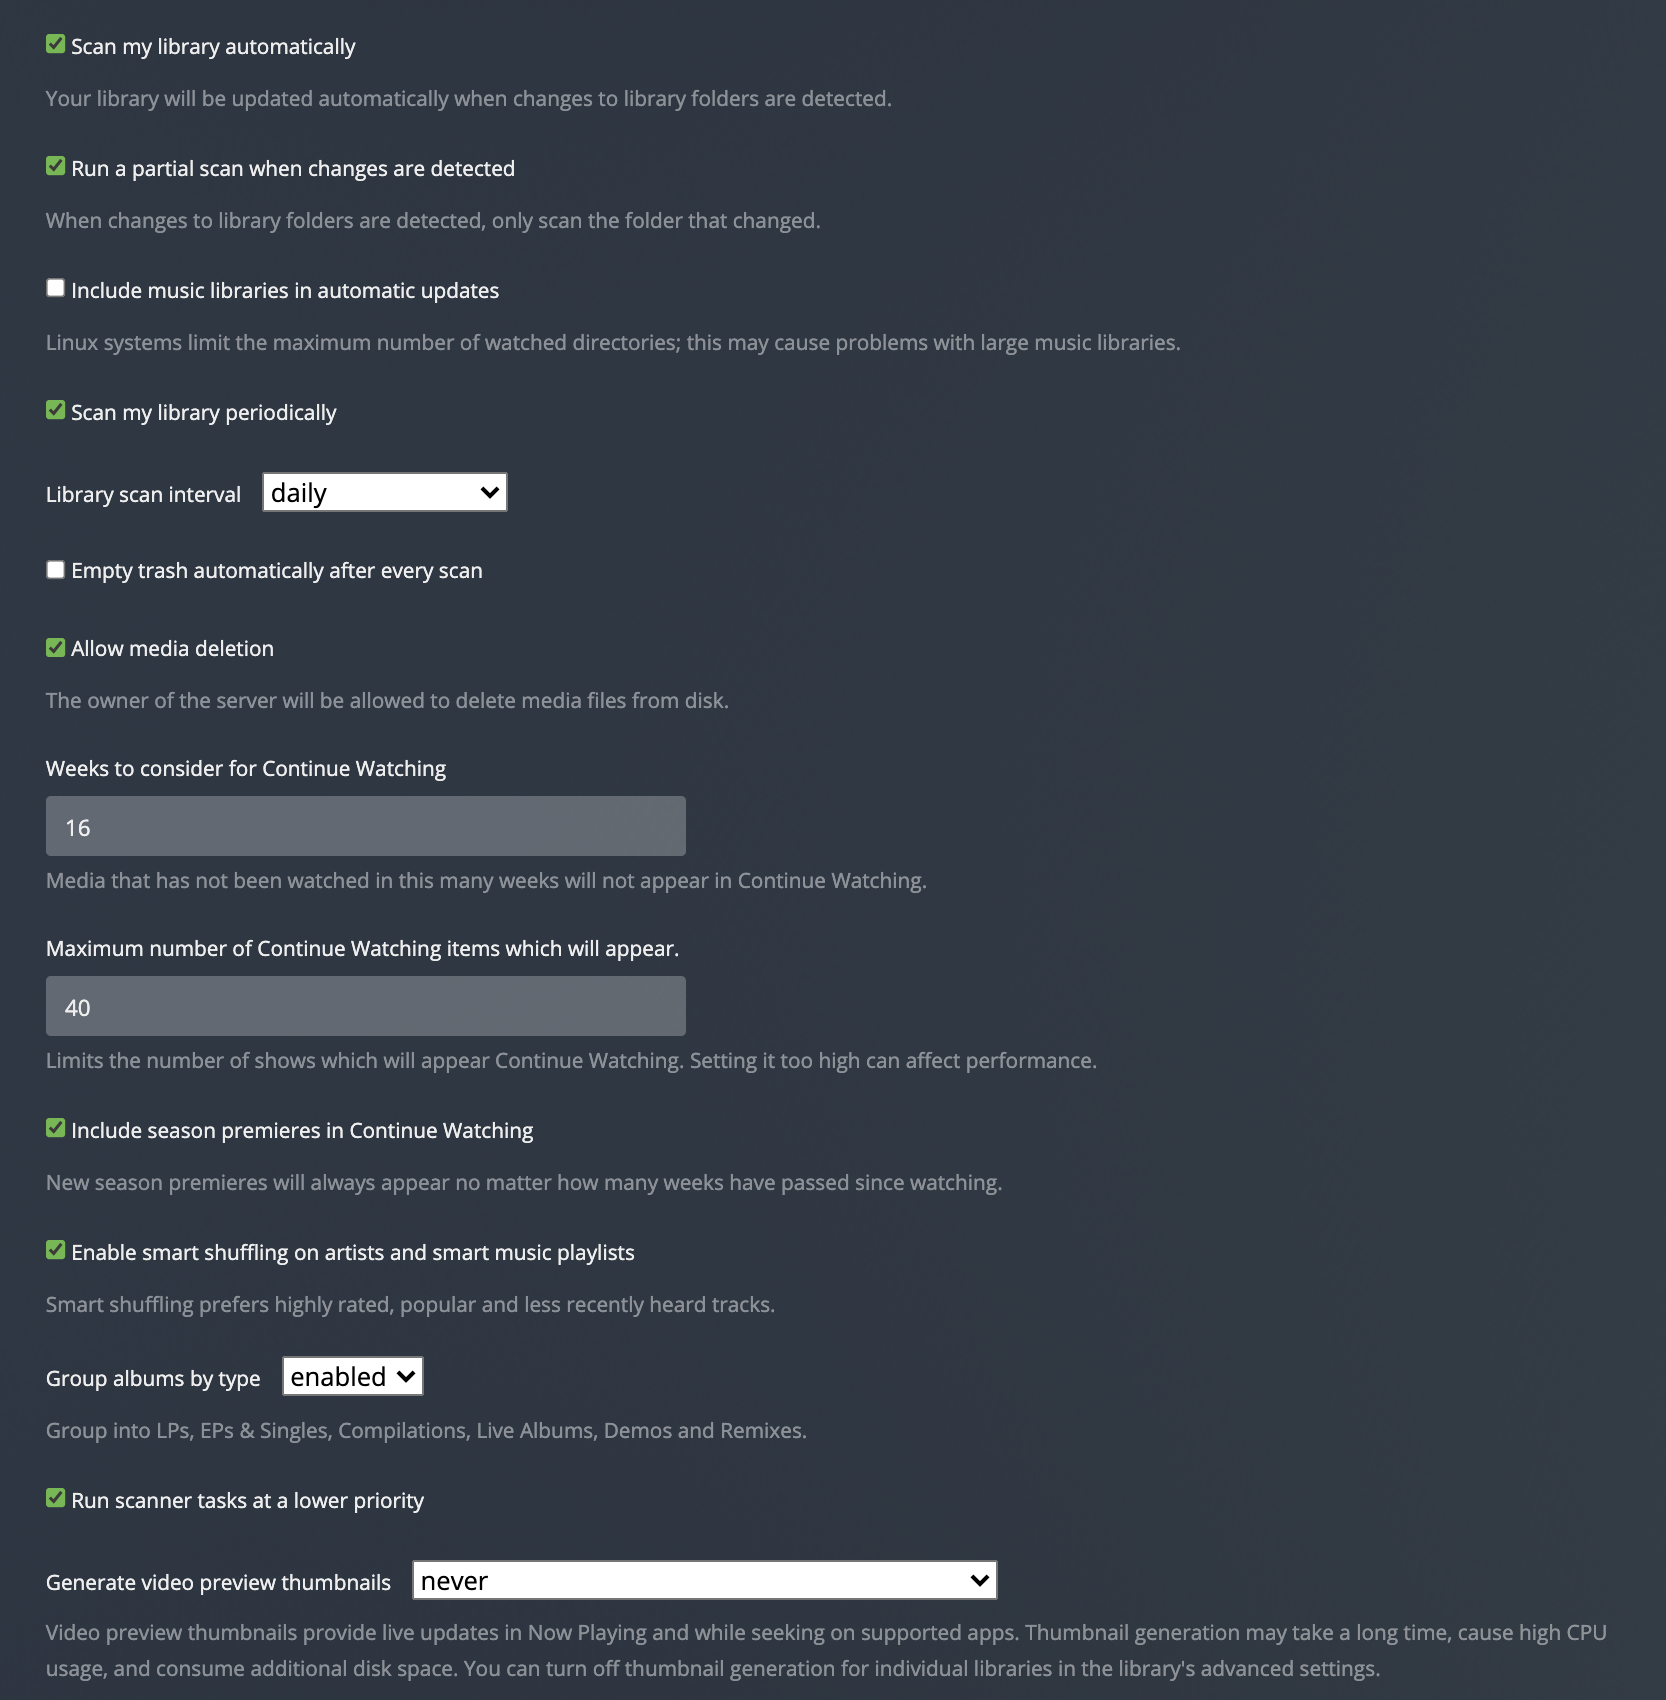
Tweaking settings
We now need to make a few tweaks depending on the size of your library, as some of the features of Plex will use rclone and subsequently the Google API to a large degree. Currently, I have my settings page managed so that it prevents less stress on the rclone backend storage and local storage.
Library settings should be modified so lower stress the storage backend.
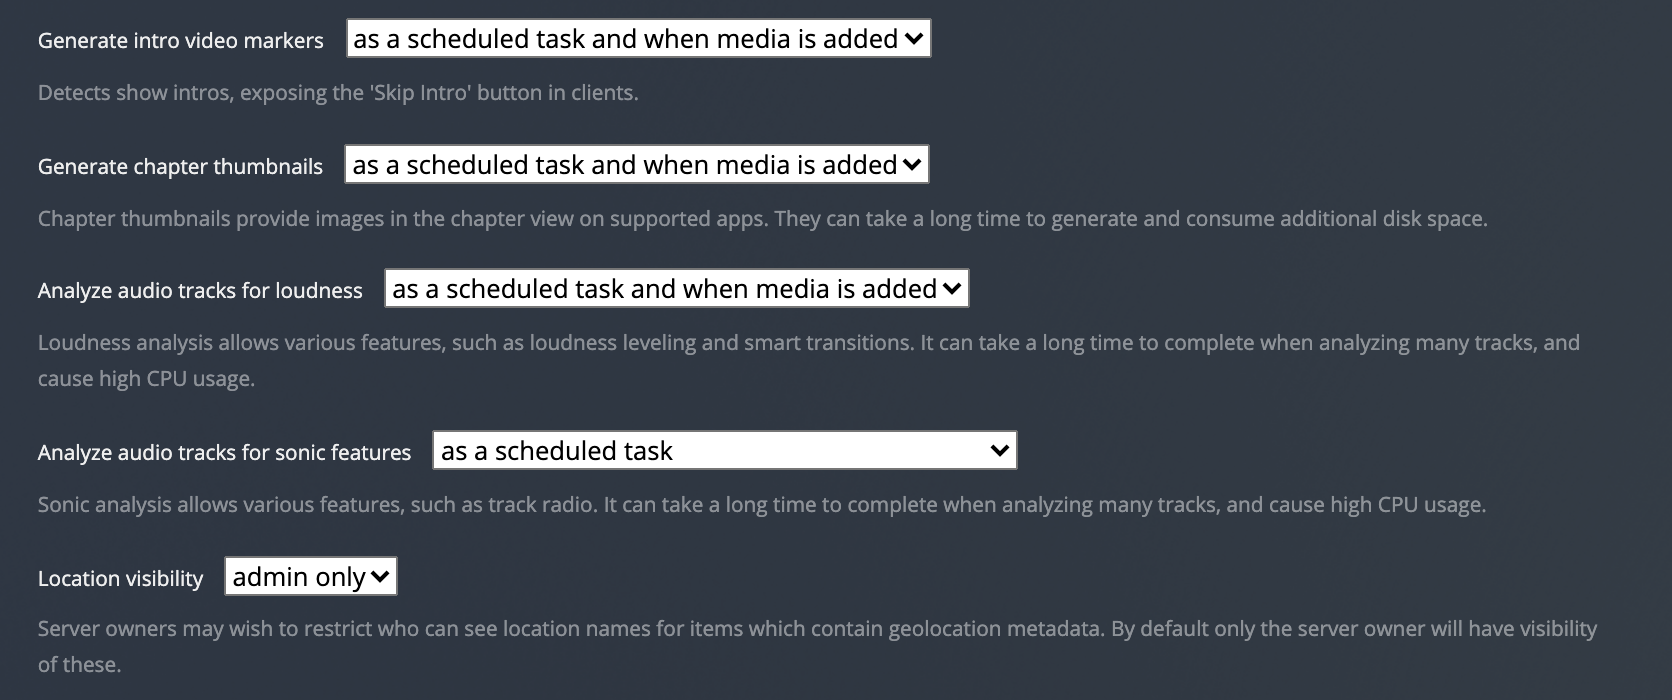
Finally, scheduled tasks may need to be tweaked as well.
Three Dots Next to Library > Manage Library > Edit > Advanced:
Settings > Scheduled Tasks
|
|
Overseerr
Allowing friends and family to setup requests and point out issues to media that I host is super important to me. Not only do I want them to be happy, but, if I am planning on watching a series or movie, and there is an issue with the media (EG: choppy video, dropping audio, file shows that it is available - but isn’t, etc).
Initially, I used ombi - but, ombi did not seem to be able to deal with multiple Sonarr or Radarr systems without also setting up another ombi server. So because of this, I opted to use Overseerr, which can handle multiple Radarr and Sonarr instances without any issue.
It appears as Overseerr will attempt to become a replacement for both Ombi and Tautulli in the long term. So because of this. So it may be helpful to mount the Plex Logs in the future. For now, I really look forward to the growth of Overseer.
Using Overseerr with SWAG
Note, that Overseerr does not currently support subfolder access to Overseerr. Meaning that you have to open up a subdomain. You might have noticed in the SWAG docker-compose file, that there was a subdomain called request. The purpose of this is to interact with Overseerr. If you cannot set up a subdomain, you are likely out of luck for the time being, but, if you can, I would recommend making something easy for your friends or families.
Once Overseerr is connectable, go to Settings and select the checkbox for Enable Proxy Support. This will allow it to receive IPs through the proxy correctly.
Connecting to Plex
- Go to the Settings page
- Click the
Plextab - Click the Refresh button to grab the list of servers

- Once the server list has been obtained click the drop down and select the server of your choice. I would personally select the public ip address of the plex server.
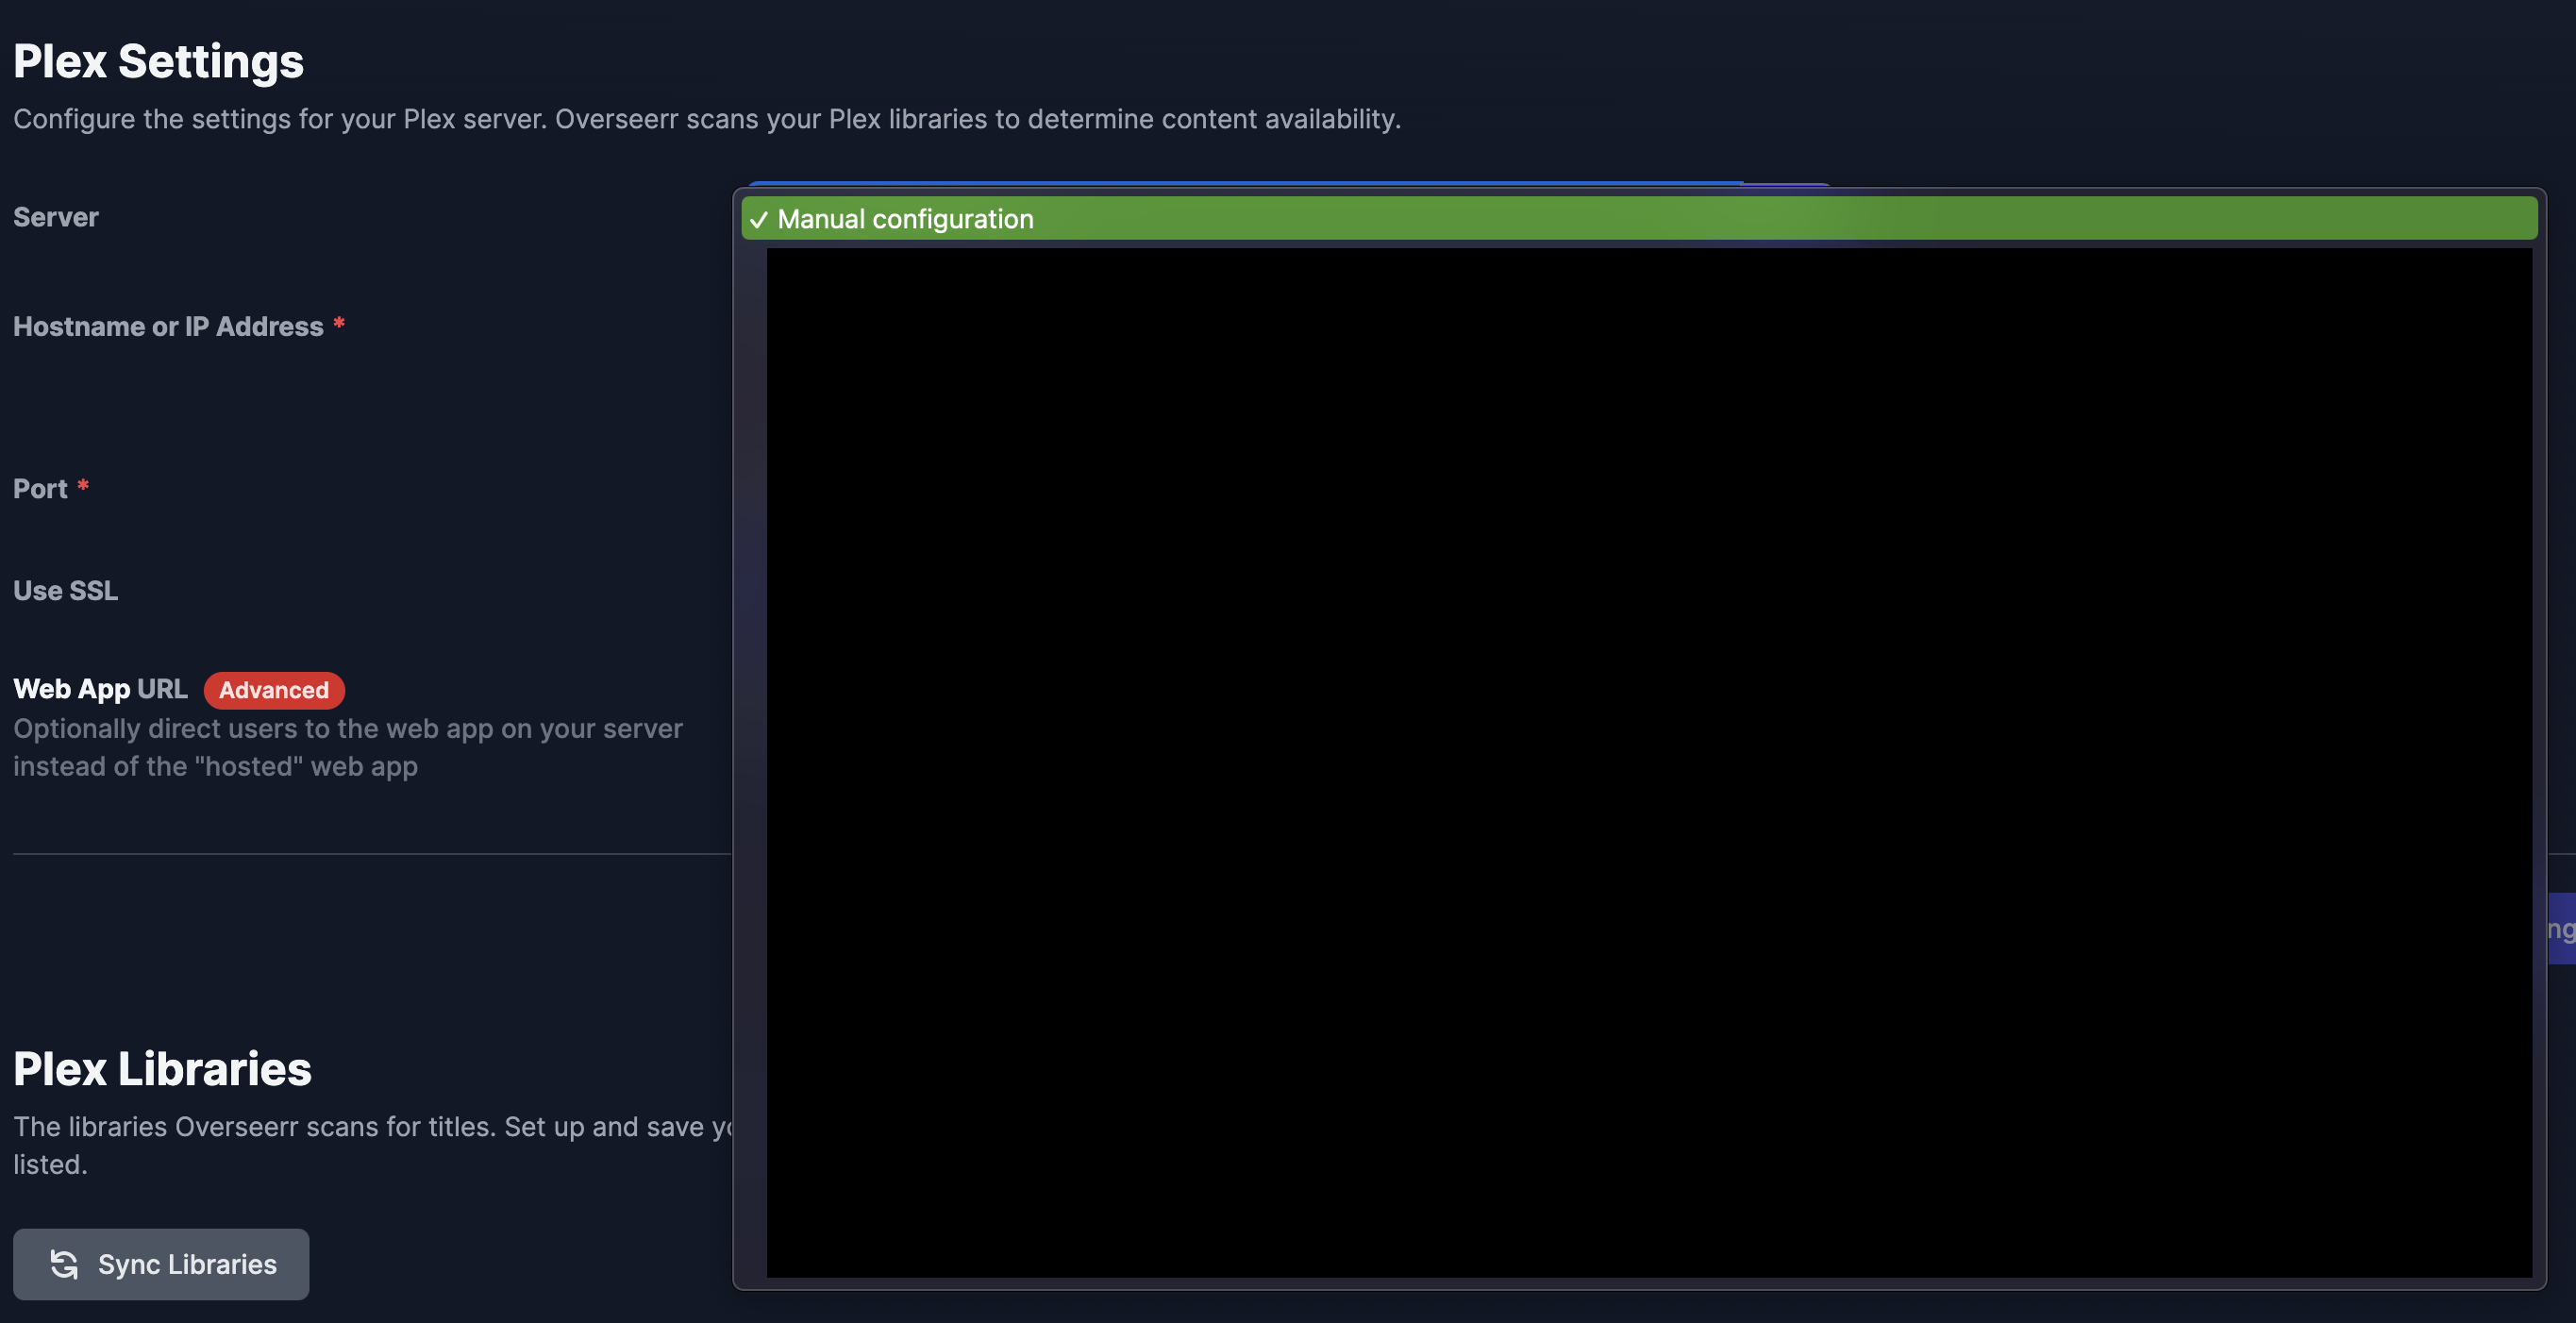
- Click
Save Changes - Scroll down and then select
Sync Libraries - Enable the relevant Libraries
- Click
Save Changes - Then click
Start Scan
At this point, your library should be loaded into Overseerr. Now your friends and family know what you have available, and can double check before requesting something.
Adding Sonarr and Radarr
Since Sonarr & Radarr can have multiple servers, we can set defaults (EG: we can set a default 1080P< and a 4K> instance). If we do that, we can request both a 1080p version and/or a 4K version and specify which Radarr server they connect to.
- Go to Settings page
- Click
Services - Add Radarr or Sonarr:
Radarr:
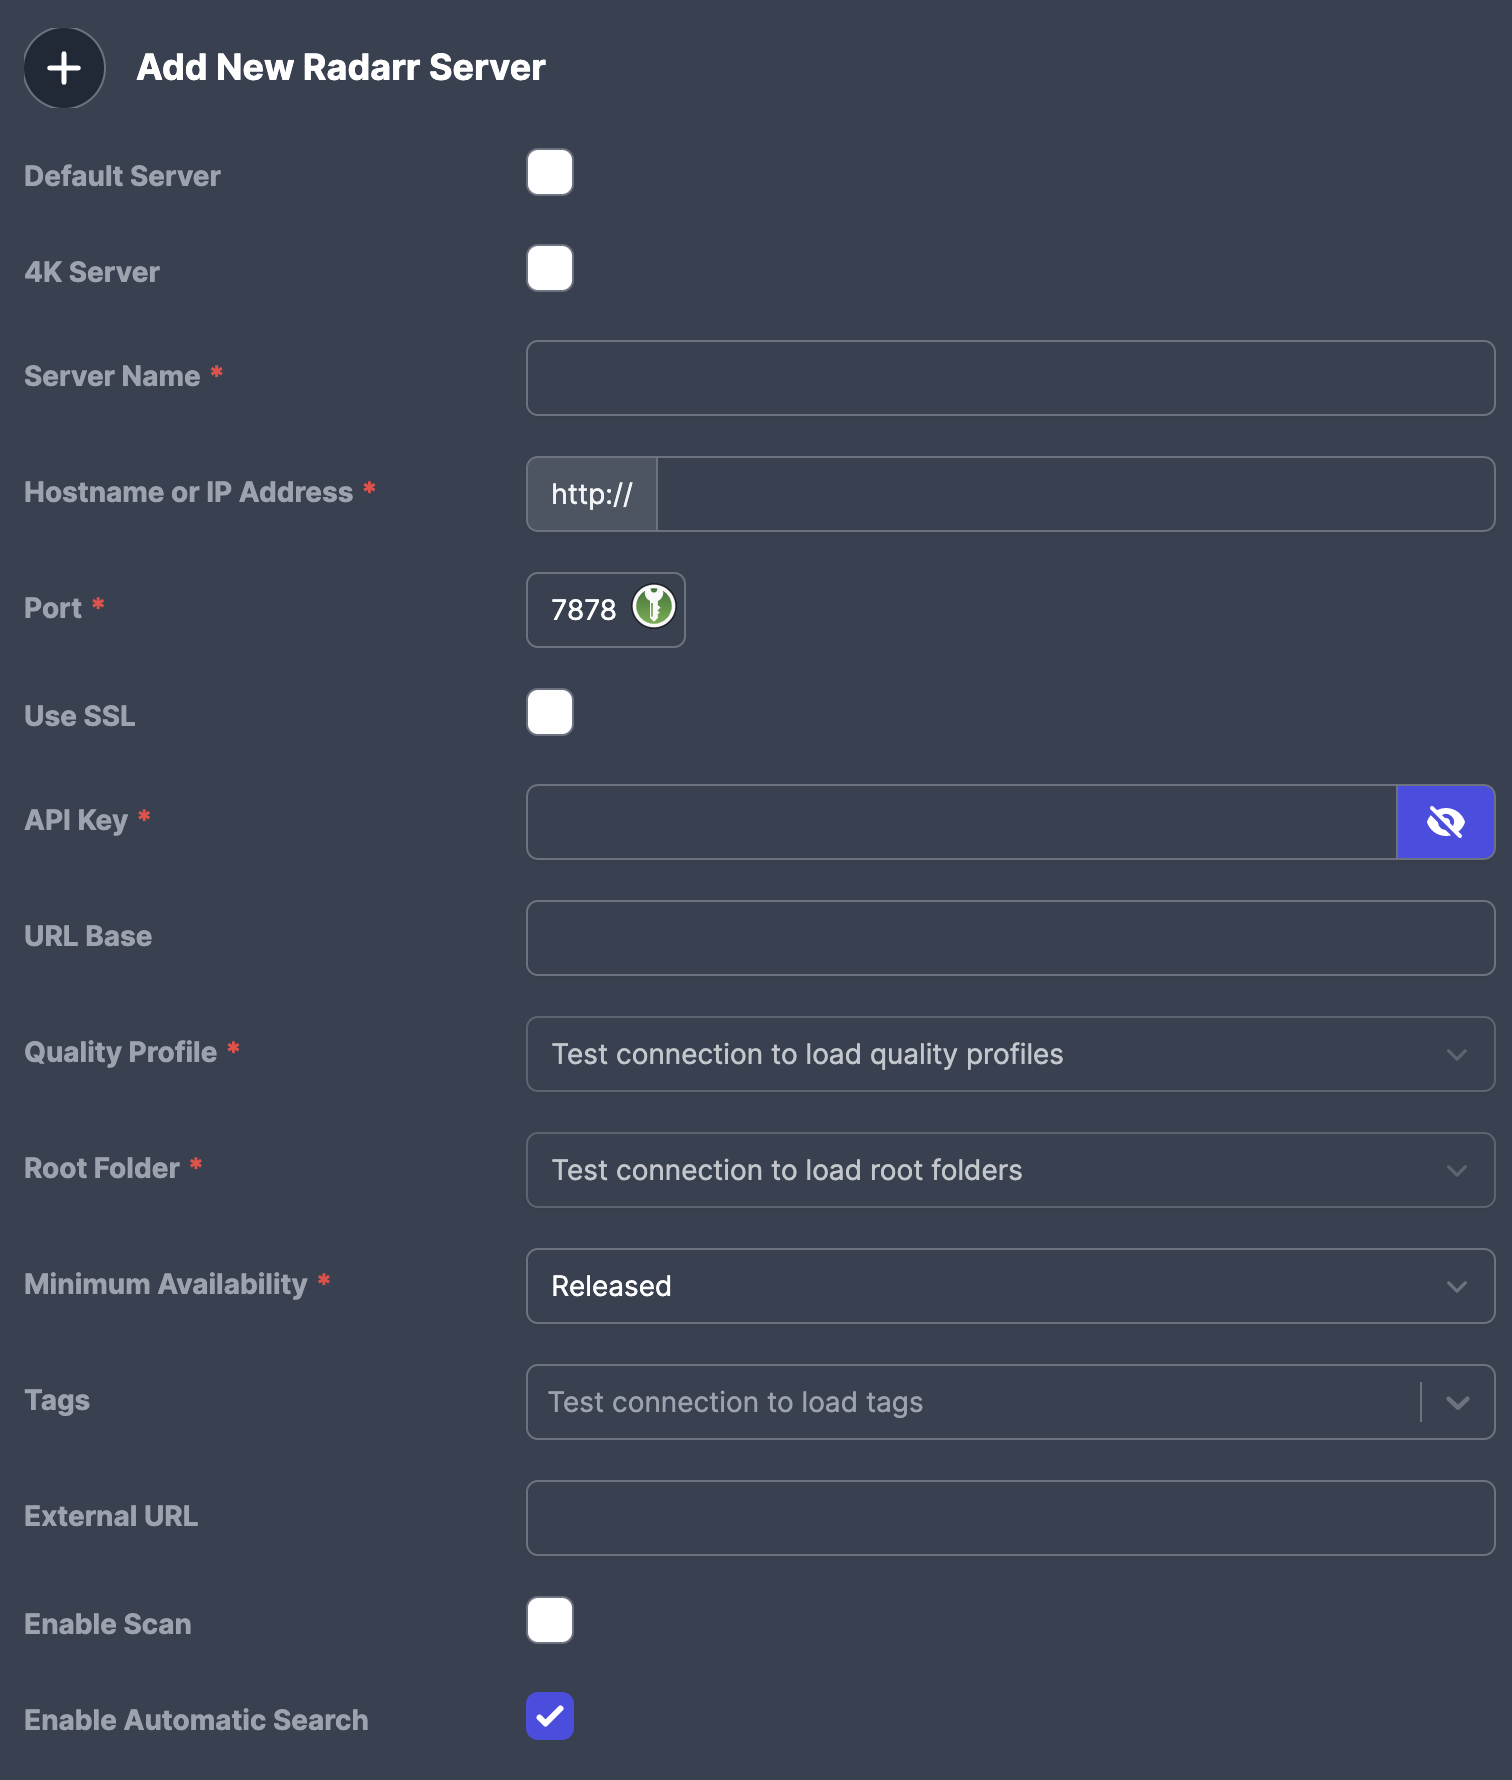
Sonarr:
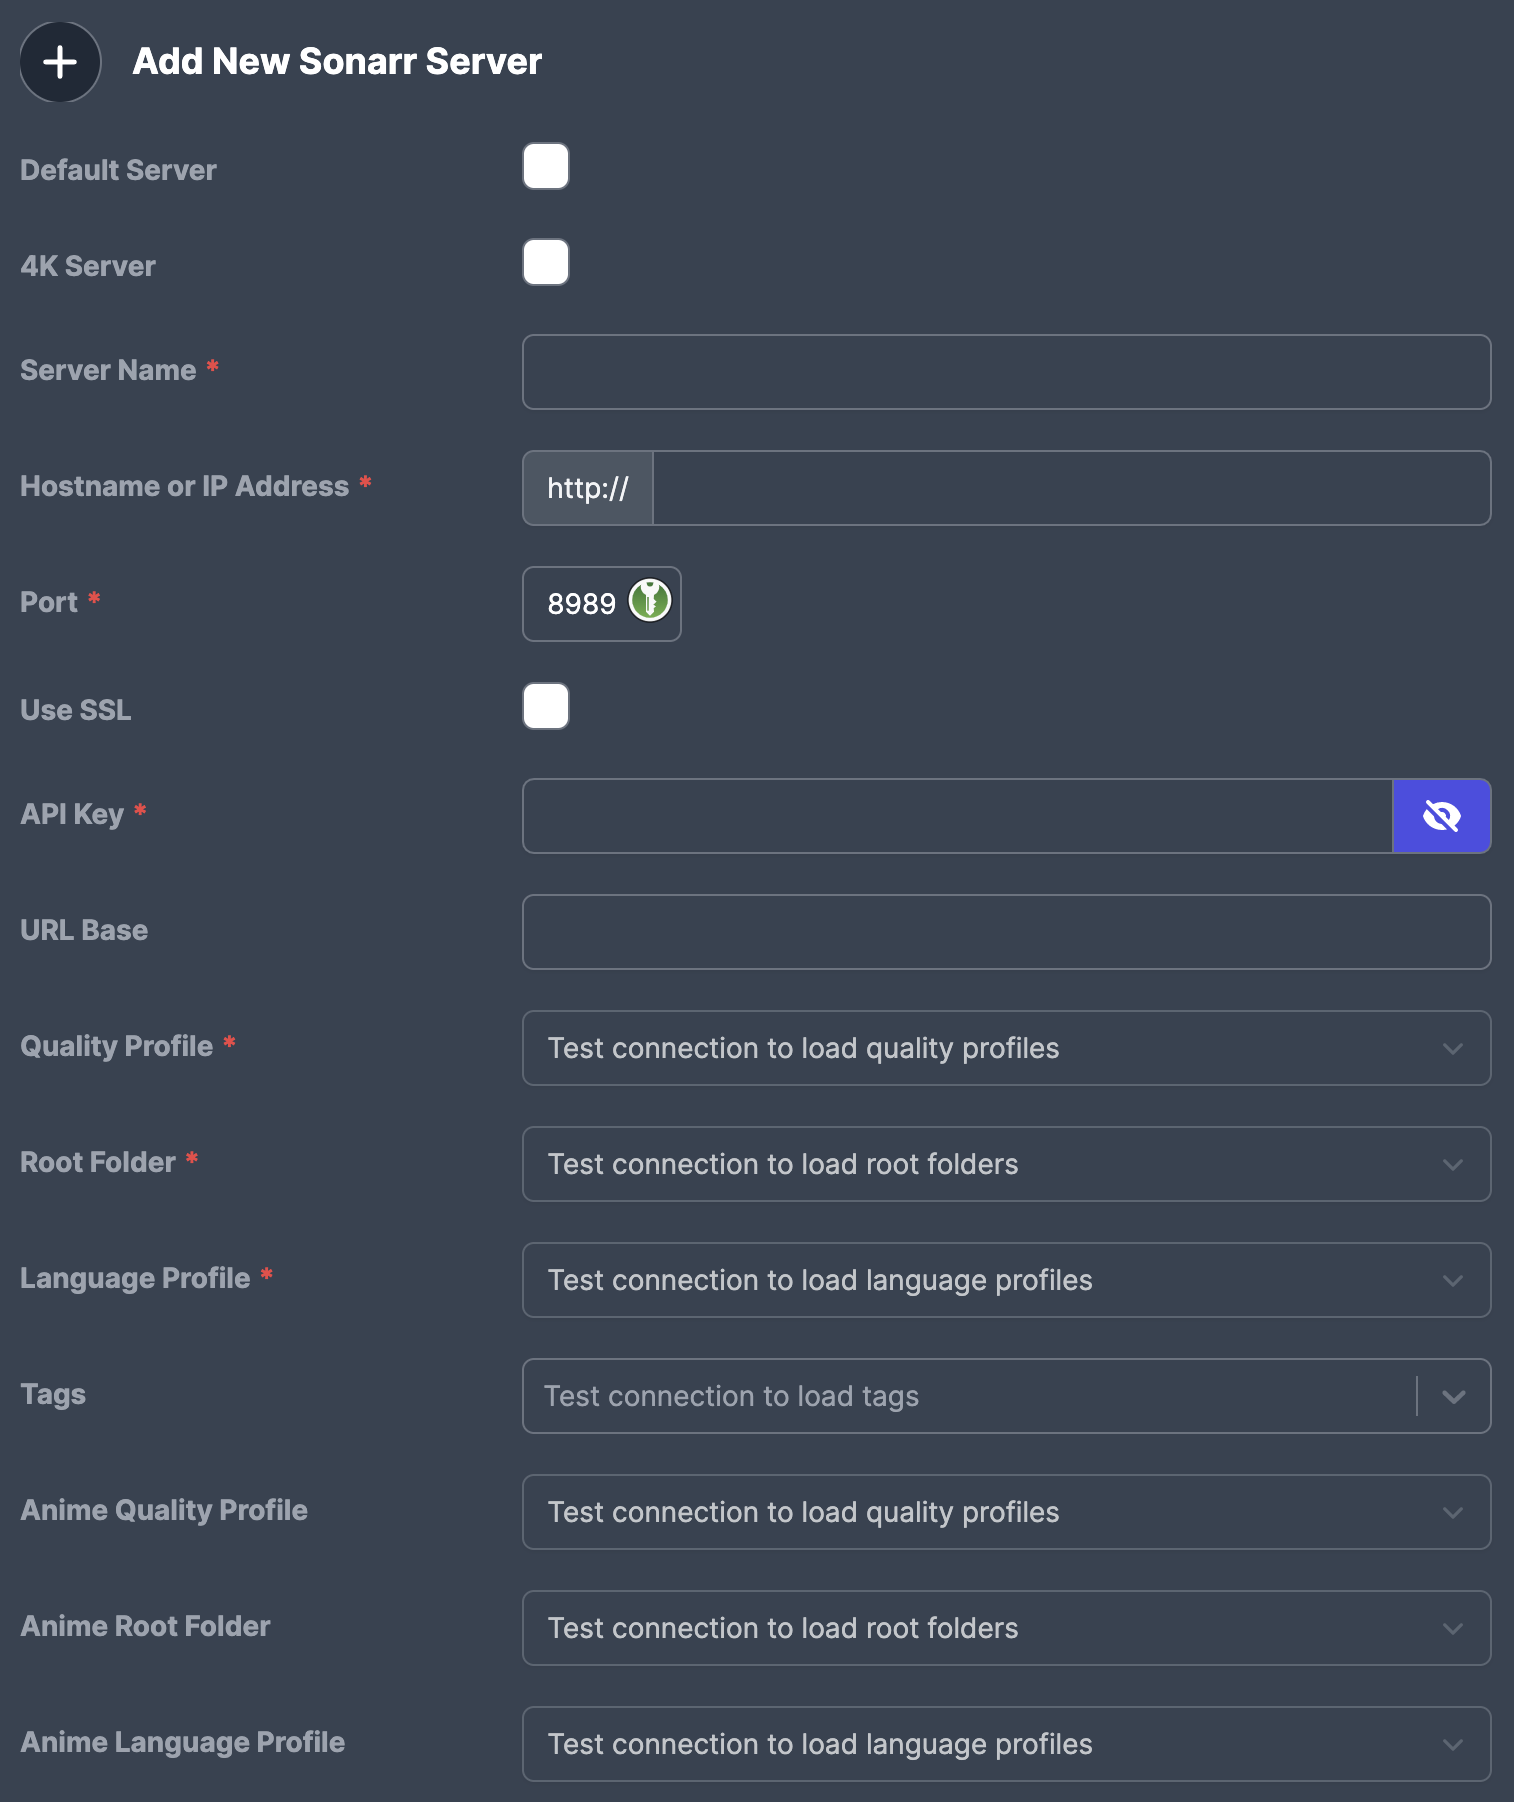 4. Configure Radarr or Sonarr, with your server, base url, port, and API Key.
5. From here, hit test
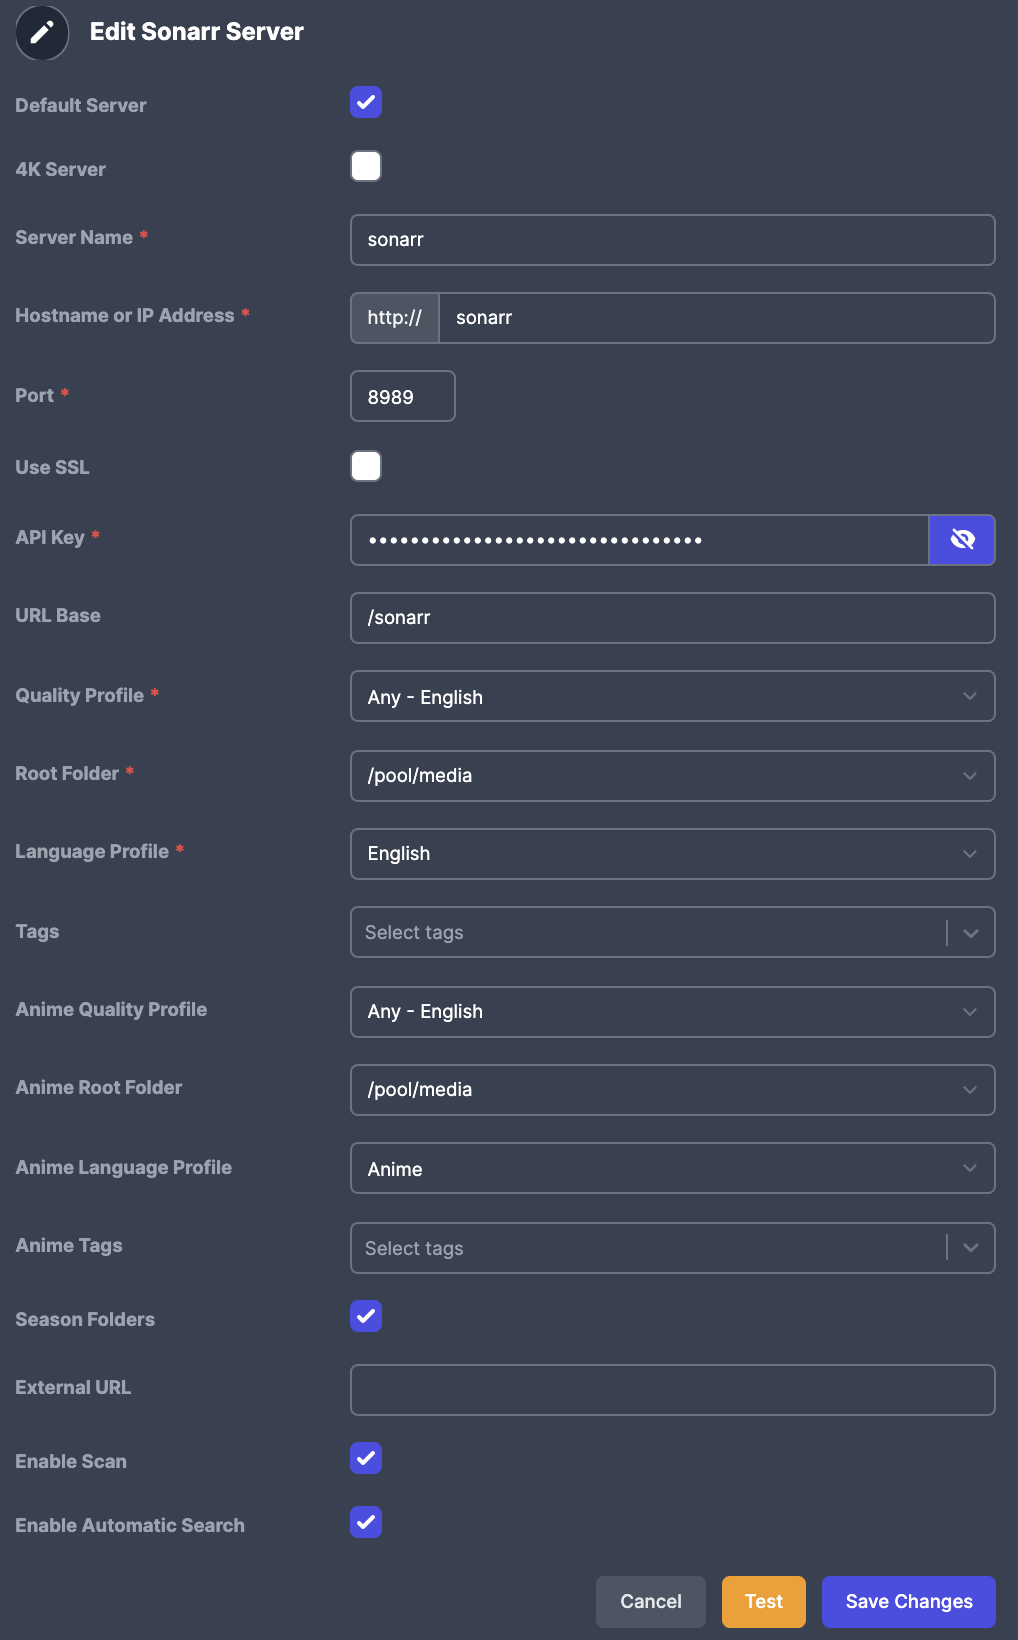
6. Once it confirms the connection, you will be able to select the Profiles and Quality.
7. Your Sonarr configuration should look (something) like this:
4. Configure Radarr or Sonarr, with your server, base url, port, and API Key.
5. From here, hit test
6. Once it confirms the connection, you will be able to select the Profiles and Quality.
7. Your Sonarr configuration should look (something) like this:
Repeat the same steps for Radarr and your 4K instances, if any.
Congrats, your Overseerr instance is now setup!
|
|
Tautulli
Tried and true Tautulli. The graphical representation of history, the log access, and everything else still make Tautulli a great app. As long as you configure it to login securely ;) (previosuly, tautulli didn’t require authorization or authentication).
Bind the Plex logs as Read Only
Since Tautulli has some benefits with reading the log files from Plex, but, there is no need for Tautulli to have write access, we will be mounting the Plex Log folder as :ro into Tautulli.
Configure Tautulli towards a server
Configure Tautulli to point towards a Plex server on your first login, from there - make sure that you have a username and password that secures your Tautulli instance. I find it easiest to allow users (Yourself and others included) to login to Tautulli using their Plex credentials. I would highly recommend enabling that.
Enabling tautulli subfolder access in SWAG
As with all the other applications and services so far, using SWAG with tautulli is as simple as moving the file for either subfolder or subdomain from *.sample to *.conf.
If you are using subfolder, do the following:
- Access tautulli at the host
- Go to Settings and click
Show Advanced - Set your domain
https://domain.org/tautulliunderPublic Tautulli Domain - Set your
HTTP Rootto/tautulli - Enable
Enable HTTP ProxyandUse Dynamic Anonymous Redirect Service - Optionally, if you want full SSL throughout the proxy chain, enable SSL and point the files towards the volume mounted SSL Cert provided via SWAG.
|
|
Calibre & Calibre-Web
There are a few considerations that you will want to take into when using Calibre.
Calibre Library Database
As LinuxServer’s default configuration causes Calibre to use it’s config folder to host the /Calibre Library folder, the best option here is to do one of two things:
- either move the Library to a different folder path (using
/library) and mount the library/mnt/rclone/calibre-library:/library - Volume mounting another folder inside /config, for example
/mnt/rclone/library:/config/Calibre Library
Personally, I think the second option is easier and provides a more streamlined configuration, however, if you host the Calibre configuration in an online storage for backup, it presents complications for the use cases. So, to make things simple, I would recommend the first option. That way you can separate the config from the library - and keep things backed up in case of data failure to the configuration and database.
Calibre Web Configuration
Here we would want to map the database and library configuration that we are using in Calibre back to calibre-web. That way the service has the same database and edits the configuration back.
When you first setup Calibre Web, it will ask you for access to the DB file, which means you will need to point to the same directory that you mounted the Calibre Library folder, as that contains the metadata.db file.
Previously, when I first setup Calibre - it used to show books that were uploaded, even when someone was not logged in. Which obviously causes an issue, however that seems to have been fixed. In any case, once you login with the user and password, it would be good to validate that that is indeed the case. Go to the admin at your domain or host, and verify under Feature Configuration that Enable Anonymous Browsing is not checked.
While we are in this page, and you want full ssl through the proxy, set the default folder paths back to the SSL Cert.
From there, I would recommend changing the username and password of the admin user. You should definitely not leave it at default configuration. Assuming that your admin user doesn’t have a different ID go to your host and modify both the username and password to your desired user and password combo. Then, change any configuration options below for the admin account.
Alternatively, you could set up an SMTP server, however, when I first configured Calibre, this did not work. It was only later determined to be an issue due to OAUTHLIB_RELAX_TOKEN_SCOPE=1 not being set, and this was fixed back in 2021 with this PR.
Setting up Google OAuth for Mail Delivery
I would highly recommend following the outline here.
Conclusion
That summarizes how I do everything with Docker. I hope that some of this was somehow useful to you. Even if you consider it a bundled mess. Maybe it will help guide you to some other documentation or guide. I am sure I will update this and make it better soon once I get more things ironed out and made perfect.
Awesome resources
If you have not already, I would check out: